
In most organizations, there is a business process in the system which aims to store and send document packages. Most of the time, documents are stored in repositories (shared or personal drives) labeled by their name or organized using folders and subfolders. This is usually challenging to connect to when using third-party process management systems.
In this two-part blog series, we’re going to build a document management system which creates an automated email to an external user with documents from a file repository according to the request form submitted by the internal user.
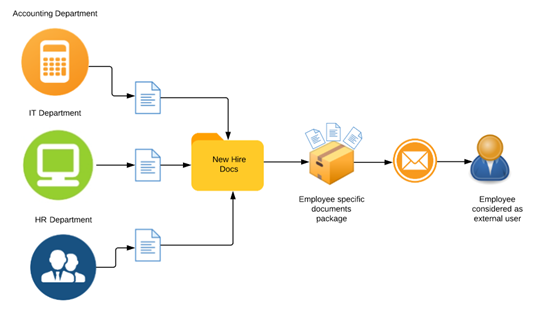
Let’s consider a business case when the Human Resources (HR) department of your organization sends a New Hire Pre-Employment Document Package to a future employee.
When thinking about this process without considering all possible use cases, it appears very simple. However, there are several problems HR departments face when the time comes to manage new hire paperwork packages.
Summary of process complexity and issues
Document management
There are probably a few different departments in your organization that share documents for new hires. For example:
- HR: has a generic document set that needs to be shared before the first day of employment
- Accounting: shares documents such as employee corporate credit card information
- IT: provides details on how to log in and register in different online systems
In order to manage the multiple document sets from various departments effectively, it’s important someone implements a document management process.
Creating document packages
Someone from the HR or Recruitment team has to compile a document package manually. The most time-consuming part here is ensuring that not only the generic document sets are included in the package, but also employee specific (or position specific) documents. You need to make it a focus here to not to miss any important documents.
Sharing documents with external user
A future employee is considered here as an external user, this is because the package is sent before their first day of employment. Therefore, this means no accounts exist in the domain and they won’t have any training on how to login to internal document management systems or HRIS. So, here we need to send the new hire package externally to a personal email address.
Below is a diagram demonstrating how this process looks:
Building a system that generates document packages automatically
We’ve recognized the pain point here which is that there’s no centric area for internal document management. Here is how we’re going to tackle the problem:
- Create a document repository to store and label documents
- Automate a request process
- Generate document packages
- Send documents to a future employee (external email address)
In the case study, the business requires a system where the hiring manager submits a form, and everything will be done automatically without human interaction. To do this, we’re going to use Office 365’s powerful SharePoint and Microsoft Flow tools, which enables us to design the business application without development experience.
Creating a document repository to store and label documents
The file repository will fulfill multiple roles in this case. We will need to:
- Store documents accessible online
- Tag (label) documents for better categorization. Since the requirements are to generate packages based on position (Job Title), we will need to make sure that documents have the correct metadata
- Generate an external link (for users outside of the organization) to be able to download documents
We are going to use the SharePoint document library to create this repository. You must have administrative rights to create a SharePoint library, or you can request document library creation rights from the Site Administrator. You can find detailed instructions on how to create document libraries here. I’ve already created a document library called New Hire Document Package. This has two custom fields which I’ll be using in my business requirements case, one is Document Type, and the other is Links. You can add as many columns as you want to define your files better, for example ‘location’ or ‘profession’ columns. Here, I’ve created two custom fields:
- Document Type: This is a choice with a drop-down offering multiple options. Your business requirements will dictate document type options. In my case I have General, Information Technology, Sales Engineer and Accountant
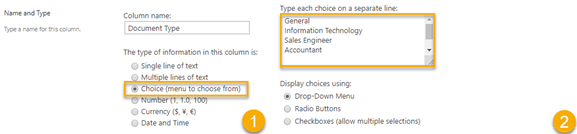
- Links: This column will store the external information (accessible for users outside of your organization) link for the document. Later in this blog post, I will demonstrate how to generate an external link automatically when the document is uploaded. The column type is a hyperlink and a generic SharePoint column type

For more details on how to create columns in the SharePoint library or list, visit this link.
This is how my document library looks like with test data uploaded.

As I previously mentioned, we will need to automate external link creation process.
Create a workflow to generate an external link and update the file’s metadata
Whenever someone uploads a new document to the New Hire Document Package library, we will generate an external link and update Links filed of that document.
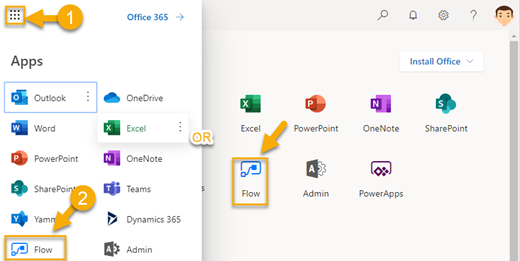
We’re going to accomplish logic explained above using Microsoft Flow. Navigate to Flow designer by going to https://flow.microsoft.com or use the app navigation menu in your Office 365 portal.
I would recommend using a generic Office 365 account that has access to the SharePoint Library and Flow. For example, online.services@yourcompany.com. This is especially useful when designing a workflow which sends an email out users with document links. This way, it’s not coming directly from your email address.
Below is a high-level overview of the workflow demonstrating that when a document is created, we will generate a link and update Links filed in the SharePoint library.
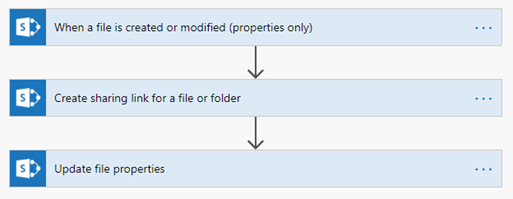
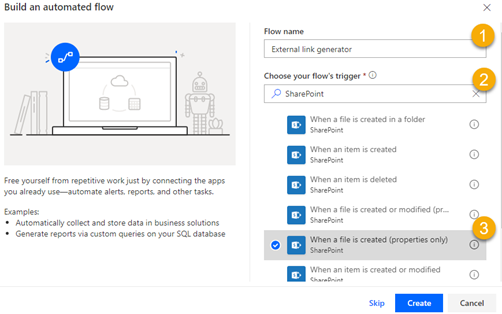
Now we understand this process, let’s get started building the application. When you’ve logged in to the Flow designer, click New and from the drop-down menu, select Automated – from the blank option. In the new flow creation window, name your flow (In my case I named my flow Create External Link). In the Choose your flow trigger field, type SharePoint and select When a file is created (properties only) from the list of triggers.
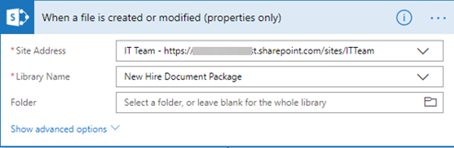
Ok, in the first step (the trigger), we will have to select the SharePoint library (New Hire Document Package) that we created earlier. This workflow will then recognize when a new file is created or uploaded to the library, it then can specify the URL of the site and select the library from the drop-down.
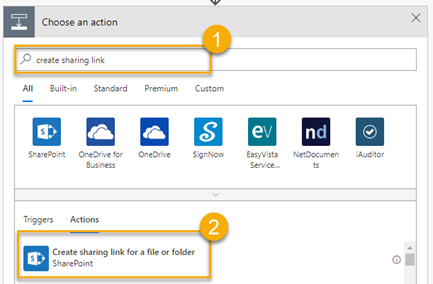
Click Next Step button and from the Choose an action menu, search for “Create sharing link” action.
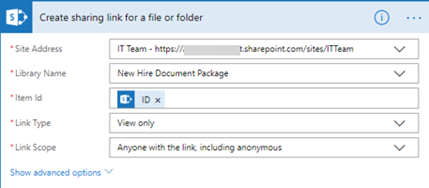
There are a few things you must specify when configuring this step:
- Site address and library name: which is the same library we used in the first step (trigger step)
- Item id: this is when you select the ID of the item from the previous step. Basically, you are passing the value of the item which triggered the event (new file creation or upload)
- Link type and Scope: This where we have to specify view or edit link and the scope in our case will be external users
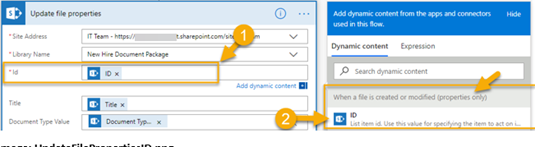
The last step of this workflow is to get the link and update the Links field of the document. Click Next Step and search for Update file properties action. In this action, we will have to select the same document library (New Hire Document Package). This action will also ask for an ID of the item you’re updating which is going to be the ID of Item which triggered the event.
Next, we will have to update the Links field. We are going to pull data from the step where we generated the link. Make sure to select the right step in the dynamic fields screen.

Always pay attention to values that you pass from previous to next action. Flow designer shows you steps and available values in the dynamic content window.
We are done building this workflow. I recommend testing this workflow by uploading a file to the library and making sure that the workflow kicks in and creates an external link. You can always check the workflow run history after you uploaded the file.

To recap, we created a repository to store and tag our documents; we also designed a workflow which will automatically generate external anonymous link and update file’s metadata to store the value of the external URL.
In Part 2 of the blog post series, we will be designing a process to request a document package using an internal form and generating an email with documents filtered according to the request form.


This is just about perfect. still can’t figure out how to prompt the user for the data when they upload a file.
Hi Daler. This is a great article.
I’m trying to build work flow where you get the link not just when a new document is created, but when it is created with a specific tag attached to it (i.e. someone uploads a document, then tags it as a ‘section a’, and then everyone who’s interested in ‘section a’ gets an email).
Do you think something like this is possible?
This is a very well written blog. I am not a developer. May I ask why do we need to create and immediately update the link? What are before update and post update values? Also the run history shows only the create link step.
Hi George,
The primary goal is an ability to share the file with external users (users who don’t have access to SharePoint directly). When we created a sharepoint library, we created a column called External link. When Internal user uploads the file, initially this column value is empty. After workflow completes its job, external facing link is generated and placed into the value of that column. Next, we take that link and share with external user to access the file.
I hope this make sense.
Daler
Good day! It all depends on the Flow service, hopefully it would help me well.
Thanks
Hello Daler,
What are you updating the value of column “Document Type” in Flow and why?
Thanks
Ashish
Dear Daler,
I am very interested in part 2 of your blog before proceeding with trying to create my system. I can’t seem to find it though. Can you help?
Best regards,
Rosa.
Hi,
Here is the link to Part 2 of the blog post:
https://www.practical365.com/sharepoint-online/how-to-create-an-intelligent-document-management-process-using-sharepoint-and-flow-part-two/
Thank you
good job Daler!
Great article!!!
Thanks for the article. Nice part 1 🙂
Do you know of any limitations in the rate of creation of those external links by Flow ? Is it always working and “fast” after uploading the package ?
If we are talking about how fast workflow will kick in, it all depends on the Flow service load at that moment. For me, it always worked pretty well.
Thanks