Combination of Azure Automation, SharePoint Online, and Exchange Online Maintains the Tenant Block List
Recently I wrote about the choice between the use of Outlook’s Junk Email Filter and tenant-wide allow/block lists. It’s a complicated topic that requires a lot of work by administrators to decide what’s best for a tenant. This article dives into the detail of what the tenant allow/block list is and how to maintain block entries automatically.
Exchange Online Protection (EOP) and Microsoft Defender for Office 365 have allow and block lists for tenants to customize the processing of inbound email. Administrators can’t add entries to the allow list. Instead, EOP adds entries for senders of blocked messages that should not have been blocked when tenants submit these messages to Microsoft.
Tenants can control the block list by adding entries for senders and domains they do not want to accept messages from. You can also add domains when you do not want to accept emails with links to these domains in the message body. Recently, Microsoft added the ability to block top-level domains (TLDs). This feature helps suppress likely spam or phishing attempts originating from certain TLDs such as the list of most-abused TLDs maintained by Spamhaus,

Microsoft 365 Defender and the Block List
The UI to maintain the block list is in the Email and Collaboration section of the Microsoft Defender 365 admin center. Go to Policies and Rules and then select Tenant Allow/Block Lists. Figure 1 shows a set of TLDs in a tenant block list.
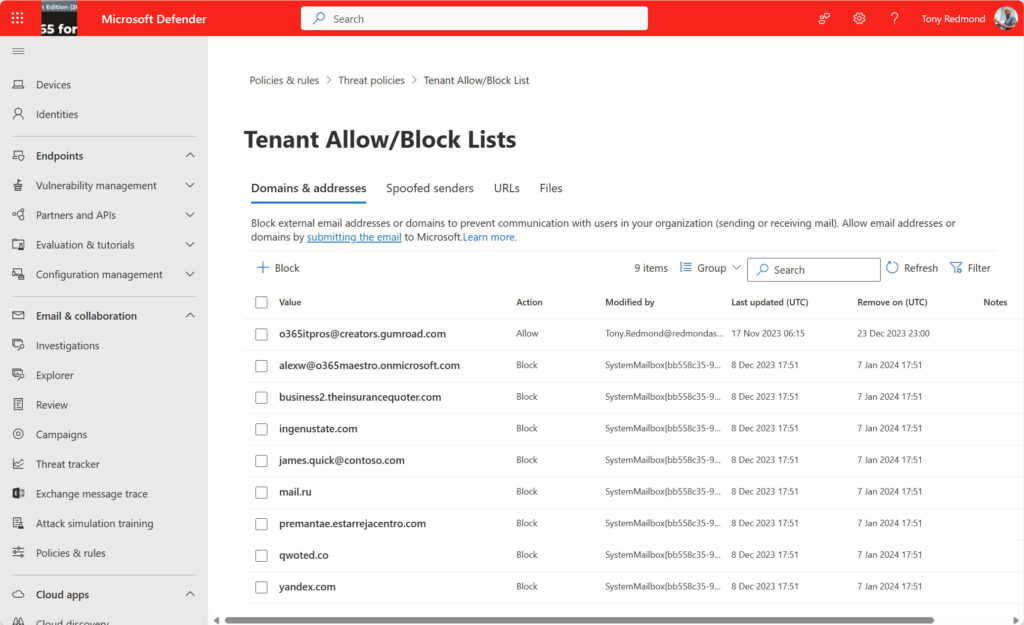
It’s easy to add blocked senders and domains or URLs for domains and TLDs. However, unless you mark a block list entry as “never expire,” the longest an entry remains on the block list is 90 days. In some respects, this is a good idea because it forces administrators to review the reasons why blocks are in place and decide whether to renew blocks or let traffic resume from a domain.
Automating Tenant Block List Updates
Automating the process is the answer. I put together a PowerShell script that can run as an Azure Automation runbook. The basic outline of the solution is:
- Store block list entries in SharePoint Online.
- Read the block list entries and update them in EOP.
- Update mail flow rules to block email from TLDs and specific domains.
- Email results to administrators.
Let’s dive into some of the technical details.
SharePoint List for Tenant Block List Entries
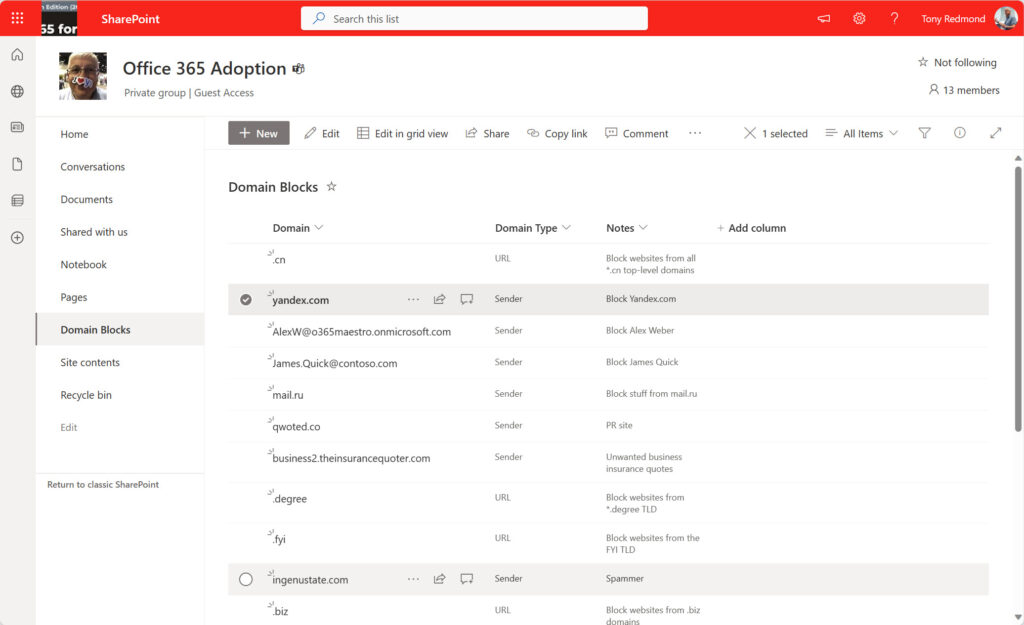
Block list entries that the organization wants to persist are held in a list in a SharePoint Online site. SharePoint Online lists are a good choice for storing data of this nature. The lists are easy to update, including with a mobile client. More importantly, the information is accessible using Graph requests (or Microsoft Graph PowerShell SDK cmdlets) for both interactive sessions and when an Azure Automation runbook executes on a headless server.
The SharePoint list stores both Sender and URL entries (Figure 2). Sender entries instruct EOP to block email from individual email addresses or domains. URL entries instruct EOP to block email when message bodies include URLs with the domain name. The URLs can be TLDs or individual domains.
The script reads the block list data from the SharePoint list to create a set of entries for processing. In this code snippet, cmdlets find identifiers for the site and the list and use this information to retrieve the list items. As in many Graph requests, the retrieved data is a little funky, so the script populates a PowerShell list with the entries.
$Site = Get-MgSite -Search 'Office 365 Adoption' | Select-Object -First 1
# List in the site with the block information
$List = Get-MgSiteList -SiteId $Site.Id -Filter "displayName eq 'Domain Blocks'"

# Read items from the list and build a PowerShell list object containing blocks to apply
Write-Output ("Fetching information about tenant blocks from SharePoint Online list {0}" -f $List.displayName)
[array]$Data = Get-MgSiteListItem -ListId $List.Id -SiteId $Site.Id  -ExpandProperty Fields
[array]$Items = $Data.Fields.additionalProperties

$Report = [System.Collections.Generic.List[Object]]::new()
ForEach ($Item in $Items) {
    $ItemtoBlock    = $Item.Title
    $BlockType      = $Item.DomainType
    $Notes          = $Item.Value
    $DataLine = [PSCustomObject][Ordered]@{
        ItemToBlock = $ItemtoBlock
        BlockType   = $BlockType
        Notes       = $Notes
    }
    $Report.Add($DataLine)
}

Updating Block List Entries
Because block list entries (in general) cannot be updated, to amend the expiration date it’s necessary to remove the existing block list entry and replace it with a new version that has an expiration date of 90 days in the future (the maximum).
The script performs different processing for Sender and URL block entries, so it separates the data fetched from SharePoint into two arrays and processes each set. This extract shows the processing for the URL set. Note the processing of the TLD blocks, which need to be in the format “\.biz*” for block list entries and the regular expression “\.biz$” to block inbound email for a TLD in a mail flow rule.
ForEach ($BlockURL in $URLBlocks) {
    Write-Output ("Processing block for {0}" -f $BlockURL.ItemToBlock)
    If (($BlockURL.ItemToBlock.Substring(0,1)) -eq ".") {
        $URLToBlock = ("*{0}/*" -f $BlockURL.ItemToBlock)
        $TLDBlock = ("\{0}$" -f $BlockURL.ItemToBlock)
        $TLDBlocksforTransportRule += $TLDBlock
    } Else {
        $URLToBlock = $BlockURL.ItemToBlock
        $IndividualDomainBlocks += $BlockURL.ItemToBlock
    }
    # If URL is already blocked, remove the current block
    If ($URLToBlock -in $CurrentURLBlocks) {
        Write-Output ("Removing current block for {0}" -f $URLToBlock)
        $Status = Remove-TenantAllowBlockListItems -ListType URL -Entries $URLToBlock -ErrorAction SilentlyContinue
    }
    # Add the block for 90 days
    $Status = (New-TenantAllowBlockListItems -ListType URL -Entries $URLToBlock -Block `
        -ExpirationDate $ExpirationDate -ErrorAction SilentlyContinue)
    If ($Status) {
        Write-Output ("Block successfully applied for {0}" -f $URLToBlock)
        $BlockData = [PSCustomObject][Ordered]@{
            Timestamp   = Get-Date -Format s
            Block       = $URLToBlock
            BlockType   = 'URL'
        }
        $BlockReport.Add($BlockData)
    } Else {
        Write-Output "Error occurred adding block"
    }
}
The effect of the block list is to move inbound items to the quarantine. Administrators can review quarantined items to assess the kind of email captured by the block from different domains and decide if to remove or keep blocks for the domains.
A side effect to consider is that sender block list entries stop anyone in the tenant sending email to those addresses, even if the address is only one of many recipients for a message. Figure 3 shows a non-delivery notification (NDR) with status code 550.5.7.703 generated for a message sent to a blocked domain. The error saying that the recipient’s email provider rejected it is incorrect. The sending tenant applied the block.
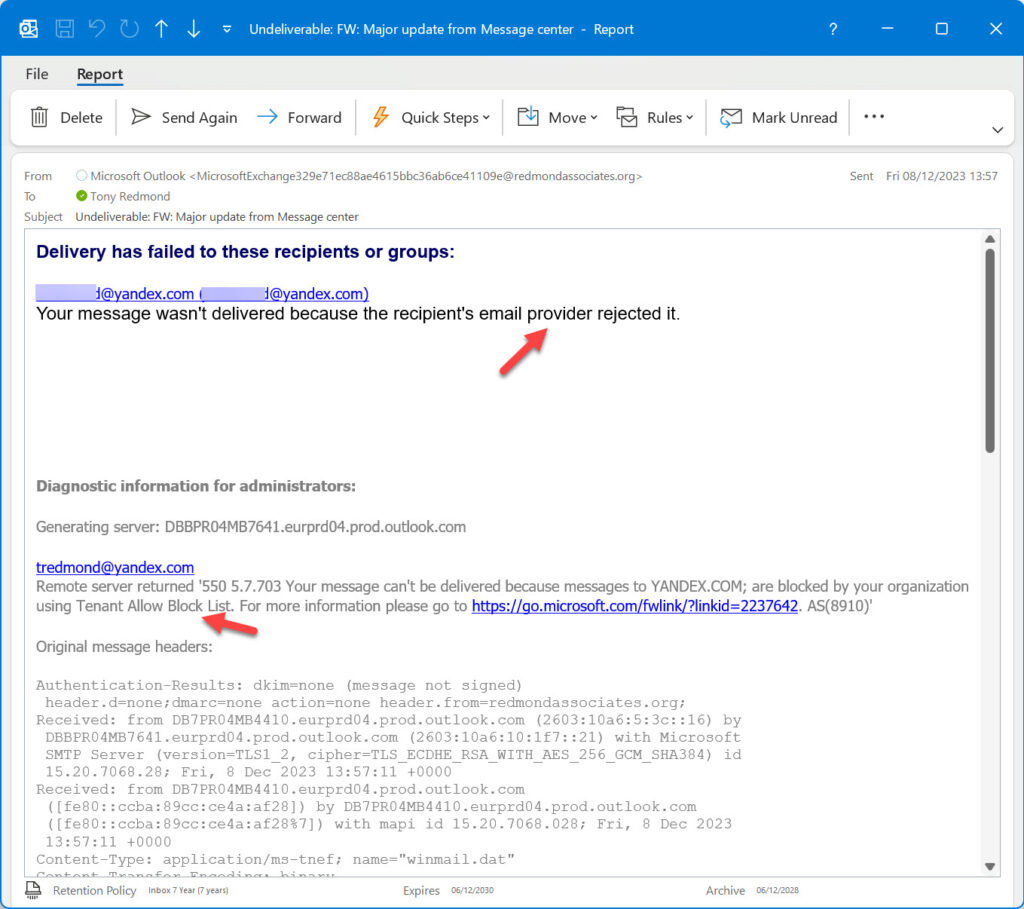
Blocking of inbound messages is expected. Blocking of outbound messages, especially when an address is only one of the recipients, will probably come as a surprise.
Updating Mail Flow Rules
After updating the EOP block list, the script moves on to mail flow rules. A URL block entry only blocks emails when the message body includes the URL. If you want to block all email from a domain, you can add a sender entry to the block list. I decided to use two mail flow rules.
- Block email from TLDs.
- Block email from specific domains.
It would be nice to use a single rule, but TLD detection depends on pattern matching defined in the FromAddressMatchesPatterns property while blocking email from domains uses a simple array defined in the SenderDomainIs property.
Here’s the code to update the mail flow rule to block email from TLDs. As you can see, if the mail flow rule doesn’t exist, the script creates it.
If ($TLDBlocksforTransportRule) {
# Now to update the transport rule to block TLDs if any TLDs are to be blocked.
# First, check if a rule exists. If it doesn't, create it
    [array]$CheckTransportRule = Get-TransportRule -Identity $TransportRuleName -ErrorAction SilentlyContinue
    $Comments = ("Rule updated automatically on {0} to process TLDs: {1}" -f (Get-Date -format 'dd-MMM-yy HH:mm'), ($TLDBlocksforTransportRule -join ", "))
    If (!($CheckTransportRule)) {
    # Transport rule not present, so create new rule
        $NewRule = New-TransportRule -Name $TransportRuleName -Enabled $True `
            -FromAddressMatchesPatterns $TLDBlocksforTransportRule -SenderAddressLocation 'Header' `
            -Comments $Comments -Quarantine $true
        If ($NewRule) {
            Write-Output "Transport rule created to block email from specified TLDs"
            $NewRuleCreated = $true
        }
    } Else {
    # We have a transport rule, so update it
        Write-Output "Updating transport rule for TLD blocks..."
        Set-TransportRule -Identity $TransportRuleName -FromAddressMatchesPatterns $TLDBlocksforTransportRule `
            -ErrorAction SilentlyContinue -Comments $Comments
        $BlockedTLDs = Get-TransportRule -Identity $TransportRuleName | Select-Object -ExpandProperty FromAddressMatchesPatterns
        If (!(Compare-Object -ReferenceObject $TLDBlocksForTransportRule -DifferenceObject $BlockedTLDs)) {
            Write-Output ("Transport rule updated to block email from these TLDs {0}:" -f ($TLDBlocksforTransportRule -join ", "))
        }
    }
}
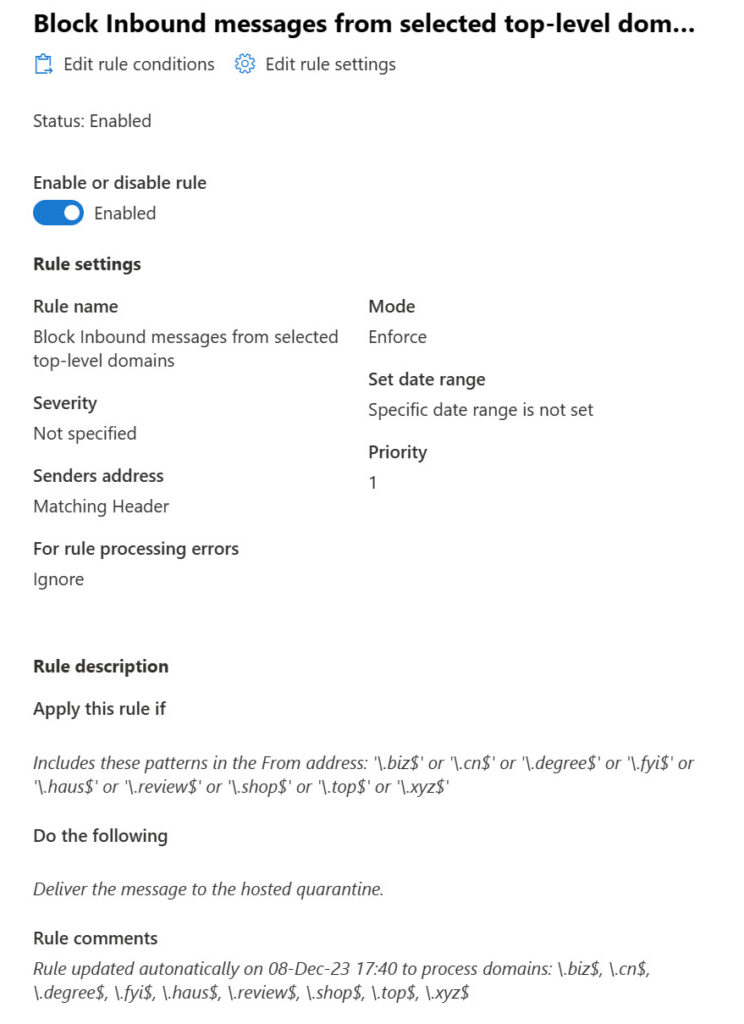
As before, email blocked by the mail flow rule ends up in the quarantine. It would be easy to amend the rule to delete the messages. Figure 4 shows the rule properties as viewed through the Exchange admin center.
Using Azure Automation to Run the Script
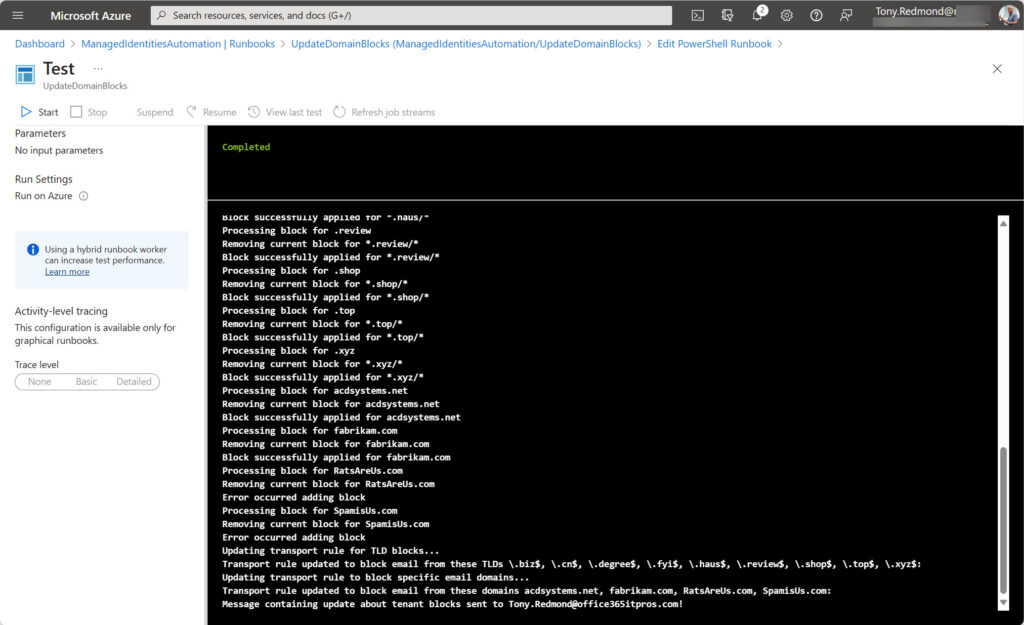
If you run the script interactively, you’ll know when it’s done. But this is a good example of a script to execute as a scheduled Azure Automation runbook to renew blocks every 90 days. There’s nothing in the code that prevents it from running with Azure Automation (Figure 5) using a managed identity to connect to Exchange Online and the Graph SDK.
The automation account used to execute the runbook must:
- Hold the Exchange Online administrator role (the process to assign the role is described in this article).
- Be assigned the Graph permissions necessary to read information from the SharePoint Online list (Sites.Read.All) and send email (Mail.Send). You can only assign permissions to the service principal of the automation account using PowerShell. See this article for information.
- Have the necessary PowerShell modules loaded as resources. These modules include the Exchange Online module and the Microsoft.Graph.Authentication, Microsoft.Graph.Sites, and Microsoft.Graph.Identity.DirectoryManagement modules. Make sure that you use the latest modules (here’s a handy script to update PowerShell modules for Azure Automation accounts).
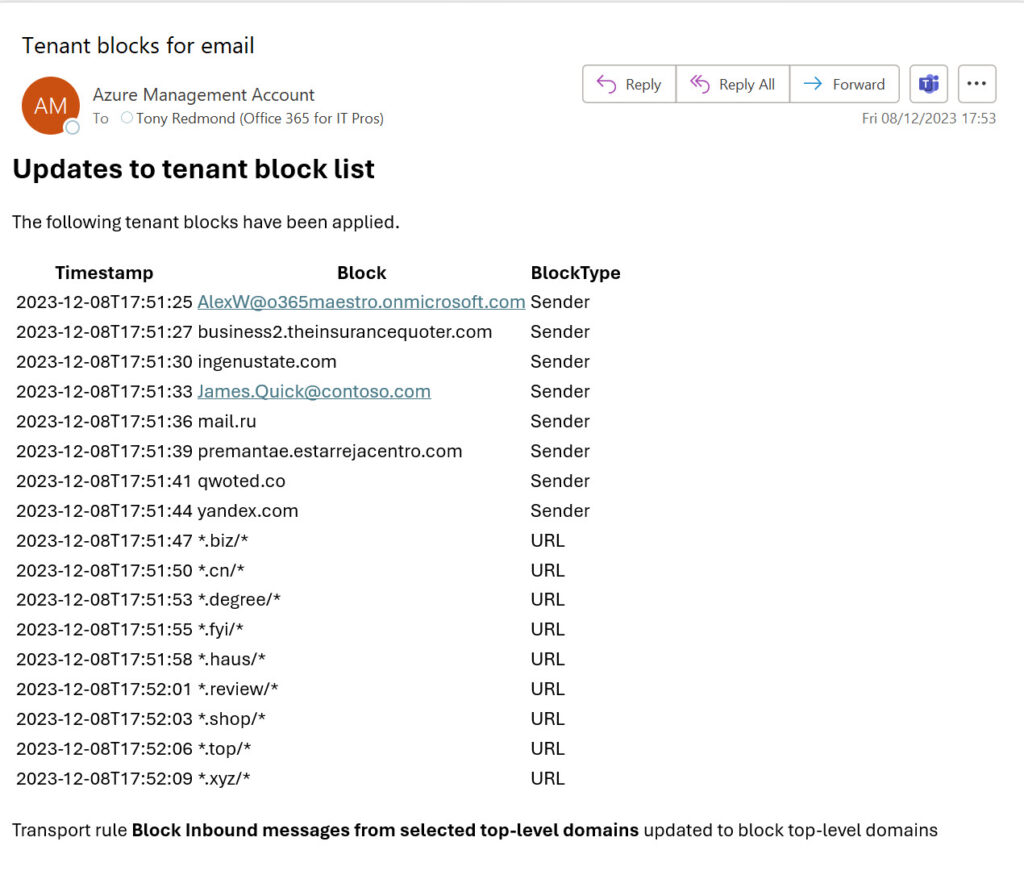
With everything in place, the runbook executes and generates an email at the end to report what it did (Figure 6).
You can download the complete script from GitHub. Remember that this is code written to explore and illustrate a principle and needs better error handling and logging before it is used in production. It’s the basis for further evolution, nothing more.
Automating Tenant Operations Isn’t Very Complex
I’m sure that I’ve forgotten something, but the point is that automating Microsoft 365 management is not particularly complex once you know about the modules, cmdlets, and permissions to use. The trick is to discover what those elements are and then combine them together into a solution using available tools (which is why you read Practical365.com). Hopefully, the idea outlined here sparks some creativity in how you approach the automation of tenant management operations.


