Mastering OWA Connections
You’ve got an on-premises Exchange environment. With the advent of Hybrid Working, an increasing number of Outlook Web App (OWA) users are connecting from shared or personal devices. In addition, corporate acquisitions and rebrands are at an all-time high, which means changes seem to be never-ending. Managing all of this can pose several challenges for on-premises organizations, including:
- Delivering the performance and availability of Exchange Online.
- Keeping track with new domains spinning up all the time.
- Preventing servers from overloading while clients seem to spiral out of control.
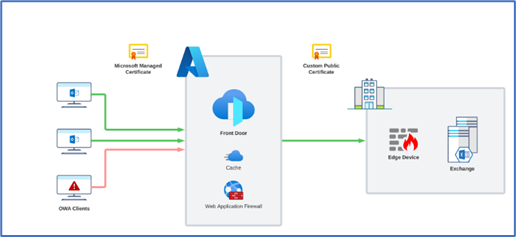
Luckily, there’s an alternative, cost-effective option that can help you better manage your on-premises environment. In this article I’ll demonstrate how you can use Azure Front Door to help reduce your Exchange Server load, increase OWA Client performance and provide Microsoft managed certificates.

Enter Azure Front Door
Azure Front Door is a Global Application Gateway backed by Microsoft’s global network. This is the same global network that provides local Point-of-Presence connectivity to Exchange Online. Using Azure Front Door, we can reduce the strain on Exchange through caching, content compression, and filtering out malicious bots before this traffic hits the on-premises network.
Also, Microsoft provides publicly signed certificates at no additional cost. This is great because it gives us some flexible options when introducing new email domains and OWA URIs.
Another point to note is that we should approach any Azure deployment from a cost-conscious perspective, and we can use the Azure Pricing Calculator to generate an estimated cost of Front Door.
For this example we are using one routing rule, one WAF policy, and one Managed ruleset, and let’s also add an estimated network load of 100 GB egress and 75 GB ingress per month. In this scenario, our cost estimate comes out to $65.65 per month.
Front Door Setup
First, to get Front Door up and running you’ll need an Azure subscription – but don’t panic, Front Door is a public PaaS service and doesn’t require private network connectivity to Azure. So, you can happily set this up without having to configure VPNs or extend your data center network.
Once you have that piece in place, navigate over to the Front Door page in the Azure admin center and create a new Front Door resource. Front Door is associated with an Azure subscription and can be part of an existing resource group or a new one.
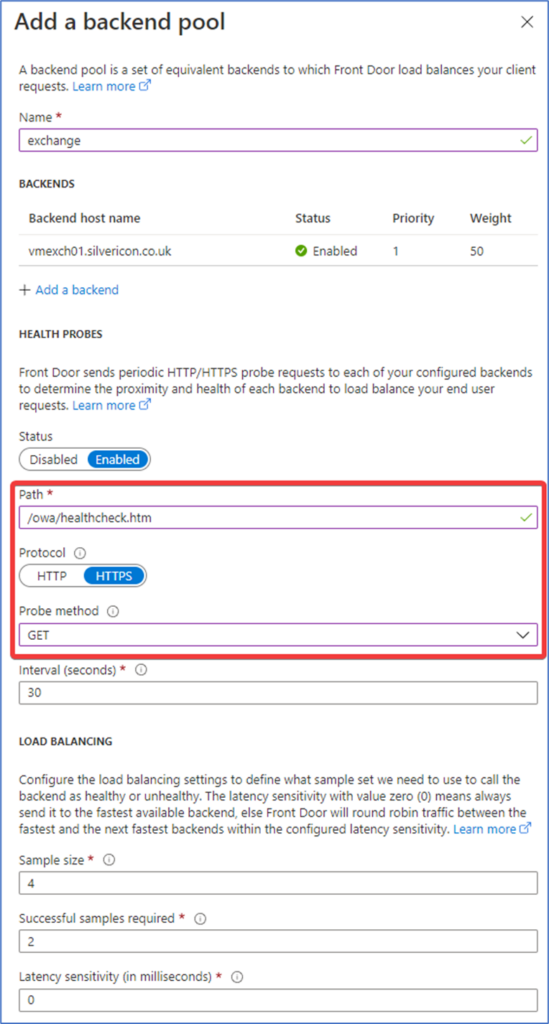
Click Next : Configuration > to create the initial configuration (it can be customized later). Add a frontend and give it a unique name. Then, add a Backend pool. When adding the backend host, select Custom host and make sure that your Exchange public certificate lists the Backend host name and that the Backend host header is blank (Figure 2):

From there you need to configure the Health Probes section, ensuring that you set the Path to “/owa/healthcheck.htm”, the Protocol is set to “HTTPS” and you set the Probe method to “GET” (Figure 3):
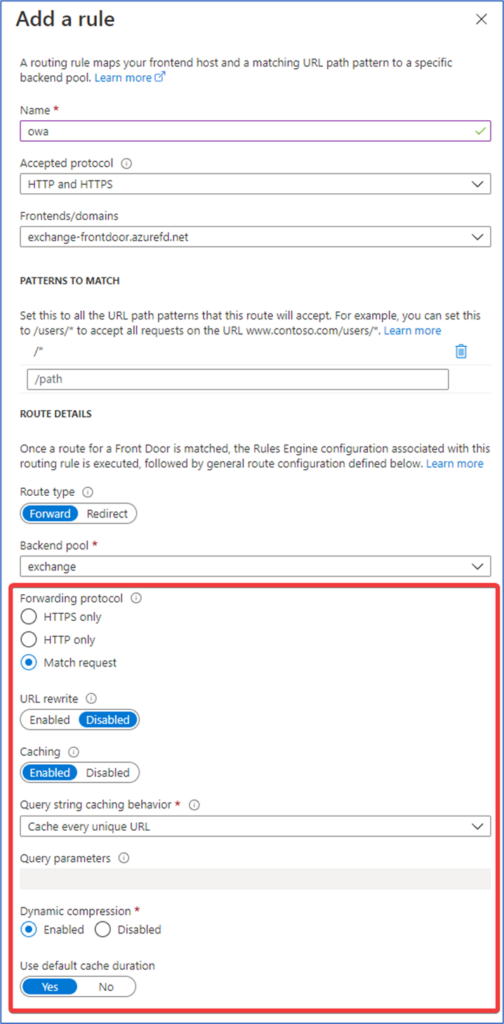
Next, add a Routing rule andset the Forwarding protocol to “Match request” and set Caching to “Enabled” (Figure 4):
After that, Review + Create, then Create.
**Note: Before customizing, you should check the Backend Health Percentage, which is on the Overview page of the Front Door resource. If everything checks out, this should be at 100% after a short while.
If it isn’t, you should check on the following:
- Is the health probe path correctly set to “/owa/healthcheck.htm”?
- Is the health probe method set to “GET”?
- Is the backend hostname listed in the public certificate used by the host?
- Does your backend host provide the full certificate chain?
Now that we have Front Door talking to our backend, let’s address the frontend domain. Navigate to the Front Door designer page, and here you’ll see the designer view that you saw in the create wizard. Front Door validates your custom domains via CNAME records, so go ahead a create a CNAME record for the custom domain you want to add, pointing to the frontend name listed in the designer.
Example DNS record:
Source: “exchange.silvericon.co.uk”
Type: “CNAME”
Destination: “exchange-frontdoor.azurefd.net”
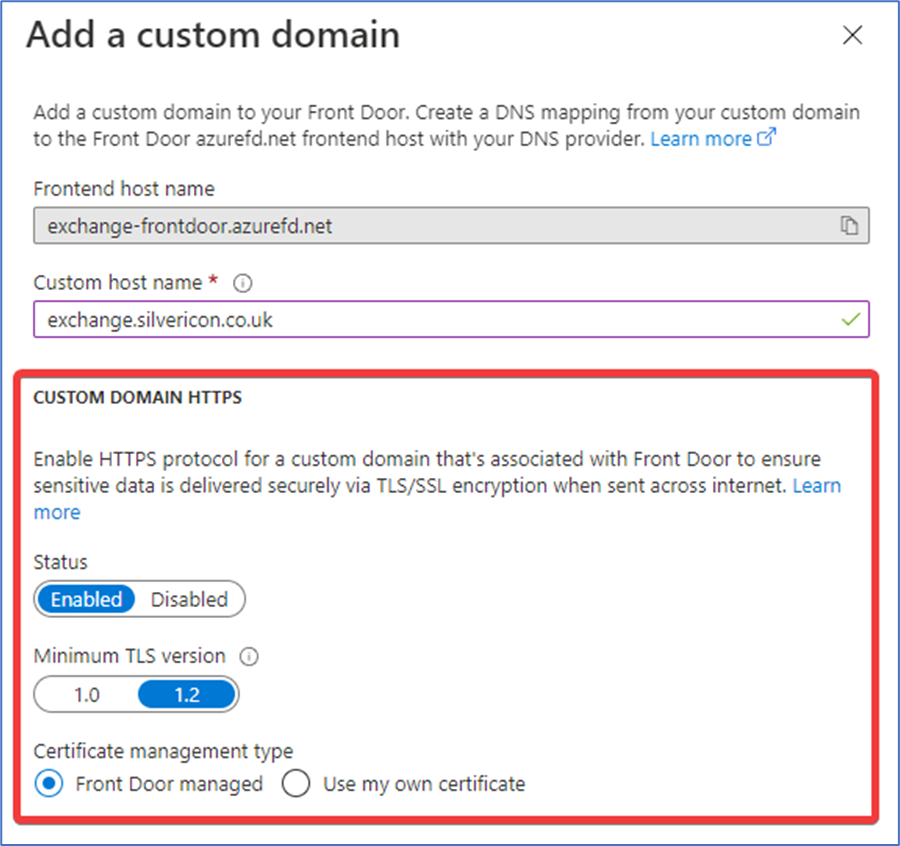
Once the public record is in place, you can add your custom domain to Front Door. Set the Custom host name as per your CNAME record. Next, set Custom Domain Https to “Enabled” and set Certificate management type to “Front Door managed” (Figure 5):
Continue to add all the custom domains required. Select the Routing rule you created, then select the new custom domains from the Frontends/domains drop-down box and click Save.
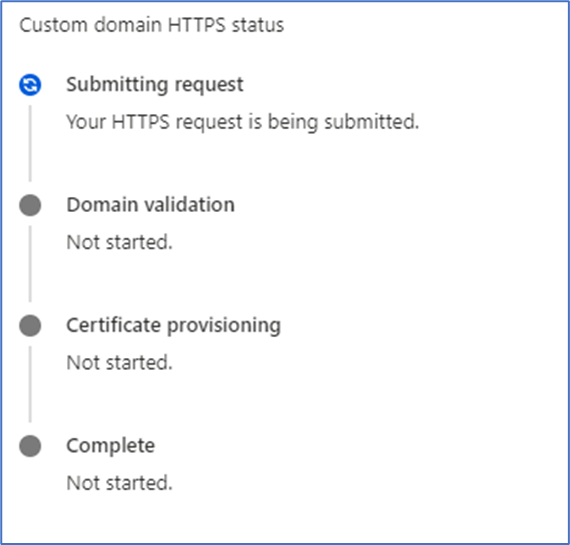
*This next part can take a bit of time to complete; you can check on the progression by going back to your custom domain in the Front Door designer (Figure 6):
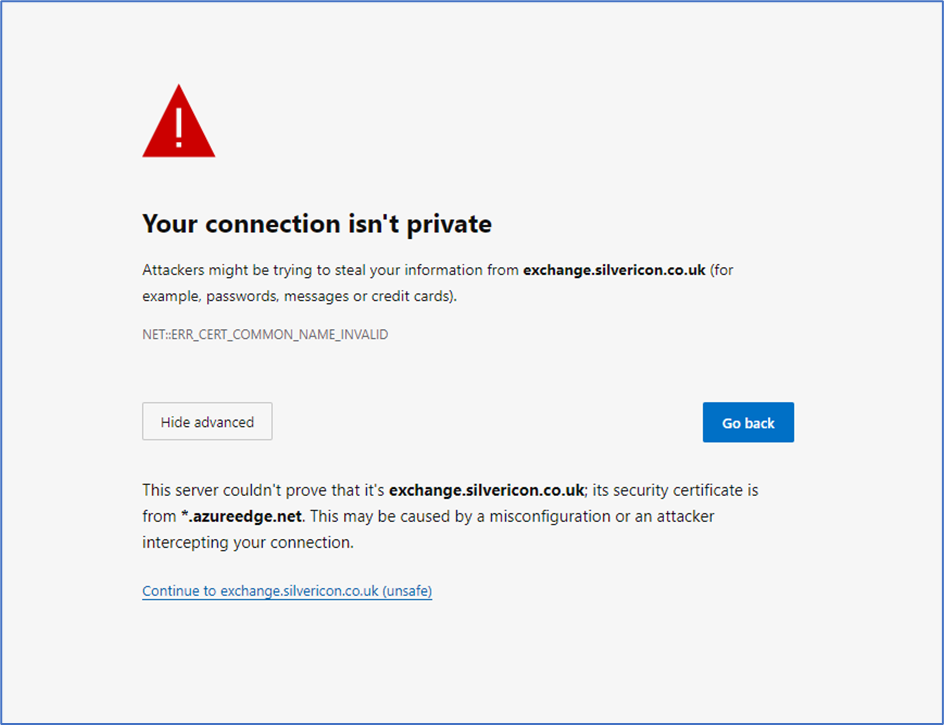
Note that a certificate error is displayed until the custom domain has been added (Figure 7):
You can now browse your custom domains, and you should see your OWA page.
Adding Domains
The custom domains you add to Front Door do not need to be listed in your Exchange public certificate. This means you can easily add new OWA URIs and Autodiscover records without changing your existing certificate, and at no extra cost – Front Door charges for data transfer and routing rules, but not for custom domains and associated certificates.

Performance Results
Now that we have a global network and caching solution in place, how does it affect OWA performance and server load?
Load test results:
- OWA – Direct
- Server Load – Network Averages
- Ingress – 2.1MB
- Egress – 4.4MB
- Client Performance – Averages
- Response Time – 100ms
- DOM Load Time – 909ms
- Server Load – Network Averages
- OWA – Front Door
- Server Load – Network Averages
- Ingress – 1.7MB
- Egress – 3.4MB
- Client Performance – Averages
- Response Time – 7ms
- DOM Load Time – 585ms
- Server Load – Network Averages
These results show that the server load decreases while the client performance improves. The response time for the client sees a vast improvement as well, due to the front door network’s local Point-of-Presence. The load time also improves, and the server load also decreases due to Front Door caching.
However, when people use multiple clients (Outlook, OWA, and mobile) you end up with an unpredictable user-to-client ratio. Then, when each additional client creates a significant load on the server, the situation becomes unmanageable.
Luckily, with Front Door cache to handle inbound clients, people using multiple clients will have a relatively low impact on server load. This brings us closer to a one-to-one user-to-client ratio, making sizing and management much simpler!
Security and Logs
TLS sessions are established with Front Door, not direct with Exchange. This limits the ability of attackers to execute TLS based attacks. Also, the Azure DDoS Basic service protects Front Door as standard, which provides automatic DDoS attack mitigation. In other words, implementing Front Door delivers a fair amount of network security straight out of the box, and without any configuration required.
But there are options out there to improve security even further. For example, by using Web Application Firewall policies we can block known bots discovered by Microsoft Threat Intelligence, before they get to Exchange.
To do this, you’ll first need a way to review the firewall logs which requires a Log Analytics workspace. Go over to the Log Analytics workspaces page, and create a workspace. Once you’ve done that, you need to configure Front Door to send logs over to the new workspace.
First, open your Front Door resource and go to Diagnostic settings. Click Add diagnostic setting, select “allLogs” and configure “Send to Log Analytics workspace” (Figure 8) then click Save.

Now go to the Web Application Firewall policies (WAF) page and create a policy. Set the Policy for to “Global WAF (Front Door)” and ensure that the Front door SKU is set to “Front Door”. Set the Policy mode to “Detection,” and then click Next: Managed rules >.
Configure Default rule set to “None.” The default rules protect web applications from known attacks, however Exchange isn’t a typical web application and using these rules prevents OWA from working properly.
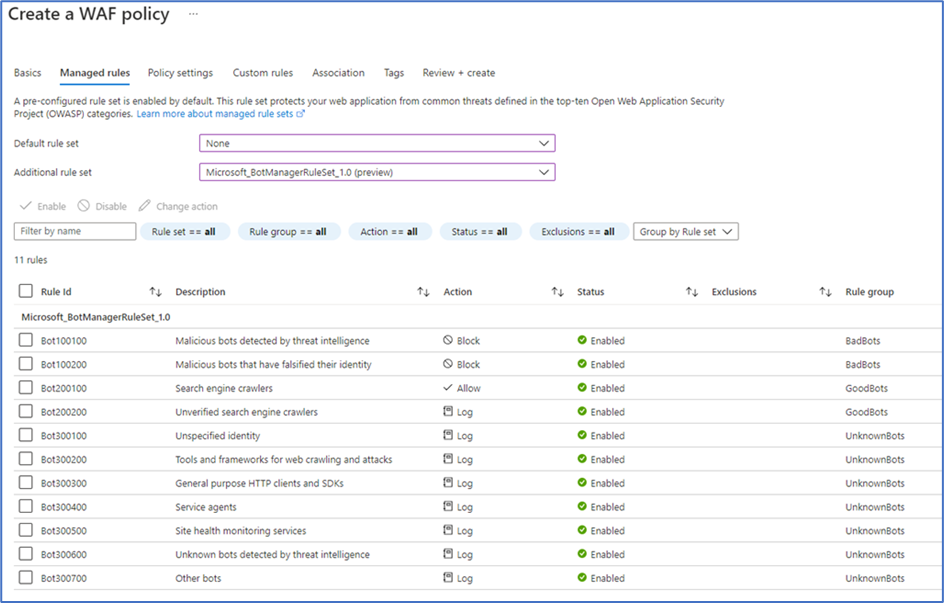
Set the Additional rule set to “Microsoft_BotManagerRuleSer_1.0 (preview).” This ruleset is continually updated by Microsoft Threat Intelligence to include known bad bots. We can also use the rule set to block some unwanted good bots, such as search engine crawlers. Click Association, add your fronted and custom domains. Click Review + create and click Create.
Once the WAF policy is created and associated, it will take some time before logs appear in the workspace. After an hour or so, go to your Log Analytics workspace and click Logs to review. A new query will open, and you’ll want to enter the following Kusto Query Language (KQL) code and then click Run:
AzureDiagnostics
| where Category == "FrontdoorWebApplicationFirewallLog"
The command will return all WAF log entries, so to review just the entries that block traffic you’ll want to use the following query:
AzureDiagnostics
| where Category == "FrontdoorWebApplicationFirewallLog"
| where action_s == "Block"
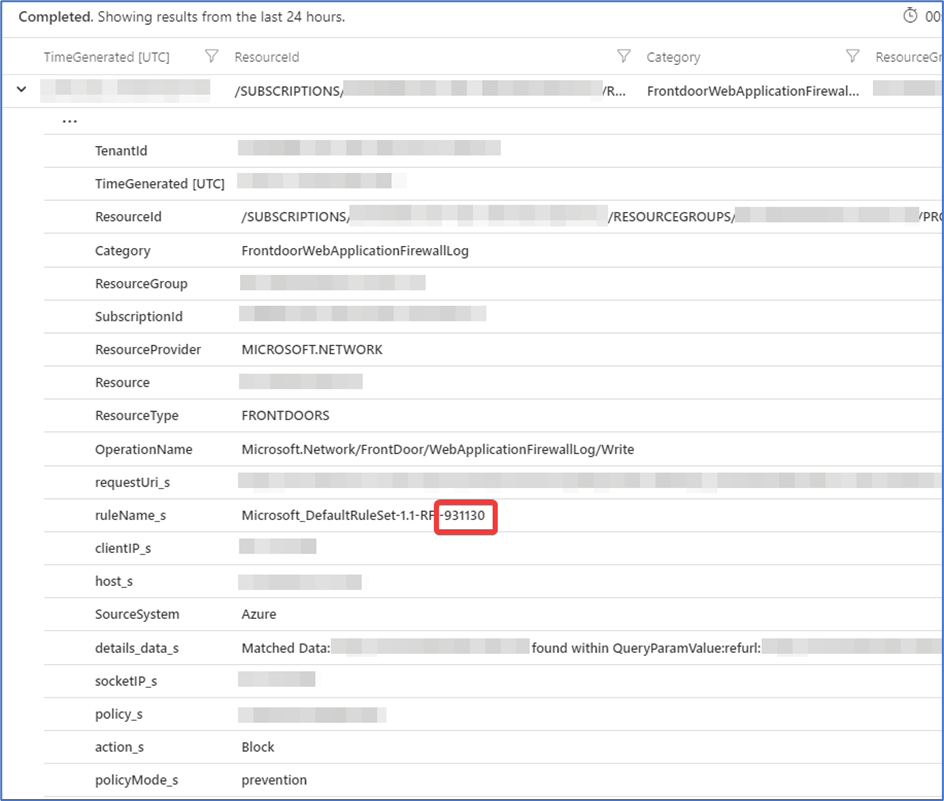
If you find that legitimate traffic is being blocked, look for the value in the ruleName_s field, specifically the number at the end (Figure 10). Then open your WAF policy, go to Managed rules and select Rule Id with the noted number and click Disable.
Once you’re satisfied and legitimate traffic is not being blocked, the last step is to put the WAF into prevention mode. Go to Overview and click Switch to prevention mode:
Locking Down On-Premises Servers
The last thing you need to do is prevent Exchange from accepting traffic not routed via Front Door, and choosing the best solution depends on your on-premises environment. The trick is to only allow access to the OWA protocol from specific IP ranges, so if you have a Layer 7 device between Exchange and your edge, you might be able to use that.
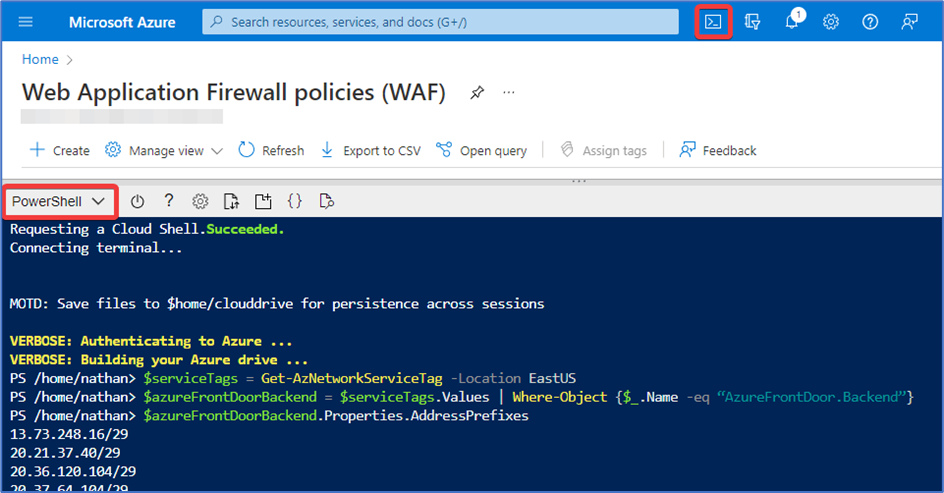
Otherwise, you can use the IP Address and Domain Restrictions feature of IIS, and apply IP Address restrictions to the OWA virtual folder. The IP addresses you must allow are listed under the AzureFrontDoor.Backend service tag. To obtain the list, open the Azure Cloud Shell switch to PowerShell (Figure 11) and run the following:
$serviceTags = Get-AzNetworkServiceTag -Location EastUS
$azureFrontDoorBackend = $serviceTags.Values | Where-Object {$_.Name -eq “AzureFrontDoor.Backend”}
$azureFrontDoorBackend.Properties.AddressPrefixes
Additionally, there are two Azure IPs that must be allowed access for health monitoring:
- 168.63.129.16
- 169.254.169.254
Lastly, don’t forget to add your on-premises IP ranges. If you don’t, you could lock yourself out of the EAC/ECP.
Front Door Rules
By using Front Door, your organization will see benefits such as enhanced security, increased OWA Client performance, and Exchange Server loads reduced for a reasonable monthly cost – making Front Door an excellent way to leverage the size and scope of Microsoft’s global datacenter network for on-premises Exchange.


Great Article it gave a lot of clarity for me , also we are trying to implement the Azure front door+Internal LB + Exchange as backend , do you have any arctile or anything of that sort please , where I am coming from is to make sure the Load balancer retiring does not affect our set up
Nathan
How do we reach you?
dnye at automann com
Great article Nathan! Great read