
If there’s one area that can cause pain further down the road, it is using different internal and external names with Exchange Server. If you are currently migrating from Exchange Server 2010 to 2016, then this is an ideal opportunity to ensure you use a simpler set of DNS names for the environment. This will allow a simpler set of SSL certificates to be implemented, and make it easier to use technologies like Hybrid Modern Authentication, publish the environment externally (if you haven’t already) and reduce the problems you see when devices switch on and off internal and guest Wi-Fi networks.
What you should consider doing is picking a single set of DNS names that you will use internally and externally. In a simple Exchange environment, this might be something simple, like mail.contoso.com used to connect to Exchange both by internal and external clients. This is a much better approach than using mail.contoso.com for external clients, but using a name like mail.contoso.local for internal access. You can read more about why in our article Exchange Server 2016 Client Access Namespace Configuration.
If you do choose to use different internal and external names, then you will most likely need to maintain at least two sets of SSL certificates – one with public names in, published by a separate VIP on your load balancer, and a second set of SSL certificates containing the internal names, again published separately.
Often the challenge with using the same DNS name internally and externally is two-fold:
- The DNS name for mail.contoso.com has a record pointing at an external IP address that shouldn’t be accessed by external clients, and
- The DNS zone contos.com contains many records with external IP addresses and it’s undesirable to create an internal copy of the DNS zone (known as split DNS) just for Exchange.
The good news is that this challenge is easily solved, using a technique known as Pinpoint DNS. Pinpoint DNS is a technique that allows us to leave the contoso.com external DNS zone completely as-is, and create internal records that will just override requests to names like mail.contoso.com.
And the best part about using this approach? It’s extremely simple!
I didn’t catch that, what is Split DNS and what is Pinpoint DNS?
Normally if you want to have a single name used externally and internally for Exchange, like mail.contoso.com, you will need two sets of records.
One will be the public IP address that sits in the DMZ and has security measures applied. The second will be the internal IP address that is within the internal network. For performance reasons, we might not want internal clients accessing Exchange through the firewall either.
The typical way to provide different IP addresses for one DNS name is to create an internal-only version of the contoso.com. This typically has all the same records added as the external DNS zone, except for one thing – the Exchange Server addresses have internal IP addresses. This is called Split DNS.
The downside to this approach is that you now need to maintain two different copies of your main DNS zone. One with your normal DNS provider, with the external records, and a second on your internal DNS servers. If changes happen regularly then this will constitute more work – and if they happen very irregularly then there’s a good chance someone will forget to update the internal copy of the DNS zone.
PinPoint DNS works in a similar, but more targeted way. As the terms allude to – we’ll be looking to pinpoint the exact record we want to replace. Therefore, instead of creating a whole internal copy of a DNS zone to match practical365.com, for example, we’ll create a DNS zone only for the record we want to replace with an internal record. In reality, this might be at least two DNS zones – one for mail.practical365.com and another for autodiscover.practical365.com.
Creating PinPoint DNS zones
The most common internal DNS server used by organizations that run Exchange Server is on Windows – usually, AD integrated – therefore we’ll demonstrate PinPoint DNS using Windows DNS.
We’ll be looking to create PinPoint DNS zones to match the following external Exchange names:
| Record Type | DNS Name | External IP Address | Internal IP Address |
| A | mail.practical365.com | 55.127.124.12 | c |
| A | autodiscover. practical365.com | 55.127.124.12 | 192.168.20.12 |
We’ll create these PinPoint DNS zones on the DNS servers used by our internal clients. In our example org (like many others) these are AD domain controllers.
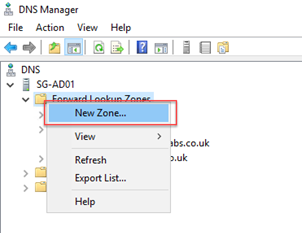
In Windows Server DNS Manager, we’ll navigate to Forward Lookup Zones, right-click and choose New Zone:
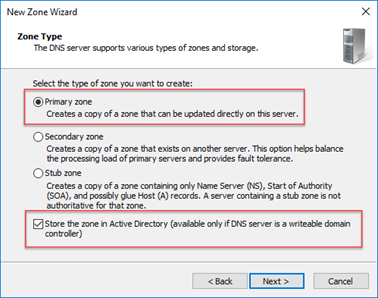
We’ll then choose to create a Primary zone, and if you are configuring it on an AD domain controller, choose Store the zone in Active Directory:
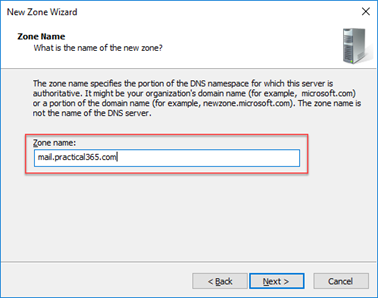
We’ll then enter a DNS zone name to match the full DNS name of mail.contoso.com – not contoso.com. This is how we create our PinPoint DNS zone:
Complete the wizard, optionally choosing to disallow dynamic updates.
After this is created, the DNS zone itself won’t perform any purpose, although until a record is added it will prevent any internal request resolving the name we’ve just added.
We’ll need to add a record into the zone. In our example (and most for Exchange) we’ll create an A record:
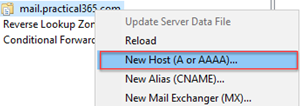
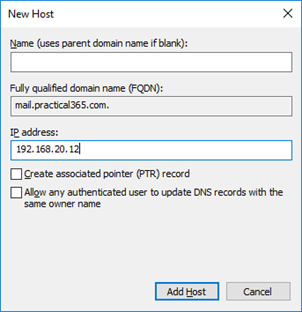
On the new host dialogue window, we will enter the IP address of our Exchange Server (or load balancer VIP) taking care to leave the name of the record blank:
After creating the record, the PinPoint DNS zone should look similar to the example shown below:

We’ll then repeat the process for the other records. In the example below, we now have PinPoint DNS zones for the mail and auto-discover names:

Making the change in Exchange Server
You will, naturally, need to update Exchange Server URLs so that clients see this change, and update SSL certificates so that the site is trusted. To do this, follow the guidance in our articles below:
Exchange Server 2016 SSL Certificates
PowerShell Script to Configure Exchange Server Client Access URLs
Summary
In this article, we’ve used a simple technique to make it easy to have the same internal and external names within our Exchange environment. Using the same names internally and externally will make it easier in the long-term when integrating with services like Office 365.


Thanks, Mr. Steve
This is awesome, thanks Steve. After all these years…PinPoint DNS.