Information Protection Scanner to the Rescue
In my experience, when people talk about implementing sensitivity labels, they often refer to using sensitivity labels for data stored in Microsoft 365 (SharePoint Online, OneDrive, or Exchange Online). Once that is done, they often ask, “What’s next?” Usually, they consider how to apply sensitivity labels to on-premises data that cannot migrate to Microsoft 365. Fortunately, the Microsoft Purview Information Protection On-Premises Scanner can help.

Scanning On-Premises Repositories
Microsoft 365 includes several ways to apply sensitivity labels, including manual assignment and automatic assignment by the policy. Data in on-premises repositories, such as SharePoint Server, NAS, or Windows File Servers, poses a challenge. We cannot ask users to open each file and use auto labeling to apply the labels via Microsoft 365 Apps or Microsoft 365 Web interfaces. Automatic processing is a much better idea, which is why Microsoft offers an on-premises scanner… You need to install the on-premises scanner on a Windows Server with an internet connection to Microsoft 365 (cannot be isolated servers) and meet other requirements listed here, to perform the following:
- Connect to a supported repository, listed in Microsofts documentation, to read the files and analyze against defined labeling configurations and other file discovery tasks.
- Perform compliance actions, like deleting files or applying sensitivity labels.
- Log the findings to Microsoft 365’s Unified Audit Log, which is then made available to an administrator via Activity Explorer.
There are other third-party solutions out there that can do similar things (like Trellix McAfee ePO); however, the key advantage of using Microsoft’s on-premises scanner is the ability to use the same set of labeling/DLP policies and consistent logging capability across online and on-premises repositories. All findings (e.g. files matching policies) will be visible in the Activity Explorer, providing a centralized and consolidated view of all labeling-related activities. It’s really handy when you have requirements to use tools like Sentinel to analyze and discover the potential threats against information leakage, as you have all the logs in a single console.
TEC Talk: What to Do About Exchange On-Premises After Microsoft Starts to Block Messages
Hear what Tony Redmond has to say about what might happen if your org is using older on-premises Exchange servers.
Applying Labels via the Scanner
To start, install and connect the scanner to Microsoft 365 according to Microsoft’s documentation, then the fun part begins.
First, we need to create a scan job instructing the on-premises scanner where to connect and how to scan. Scanning jobs consist of a network path (which must be reachable by the on-premises scanner) and properties that define how the scanner will work. Figure 1 shows the default options when creating a new scan job. I recommend using the default options in most cases to avoid accidentally updating the current protection settings or updating the access rights without knowing what’s in the repository. However, I encountered one situation where my client stated that we could apply the labels to the files in a specific repository as all files are supposed to be confidential there. In this case, you may want to enable Relabel options and let the label be applied according to the policy defined or the configurations.
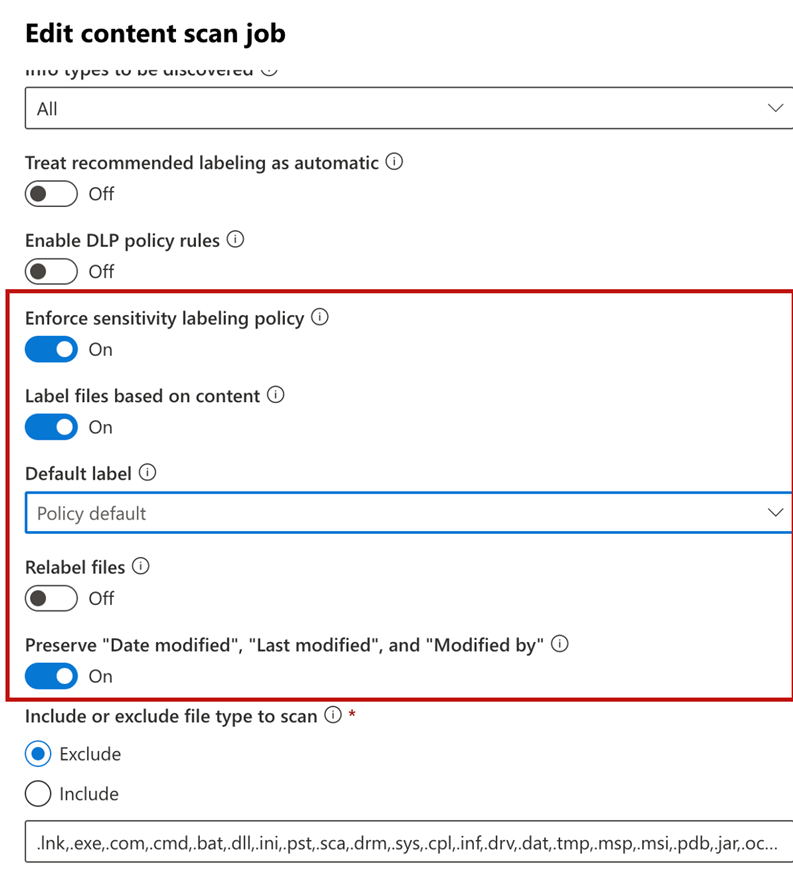
However, when you first set up the scanner, I always recommend not enabling Enforce sensitivity labeling policy. This means the scanner will run in report mode and scan files in the target repository and report any findings back to Unified Audit Log together with a scan report which will upload to the admin portal. You can then review the policies and results before turning on the sensitivity label policy. After enabling the sensitivity label policy, the scanner will perform the action (i.e. apply the label) defined in the policy for matching documents.
Advanced Deployment and Considerations
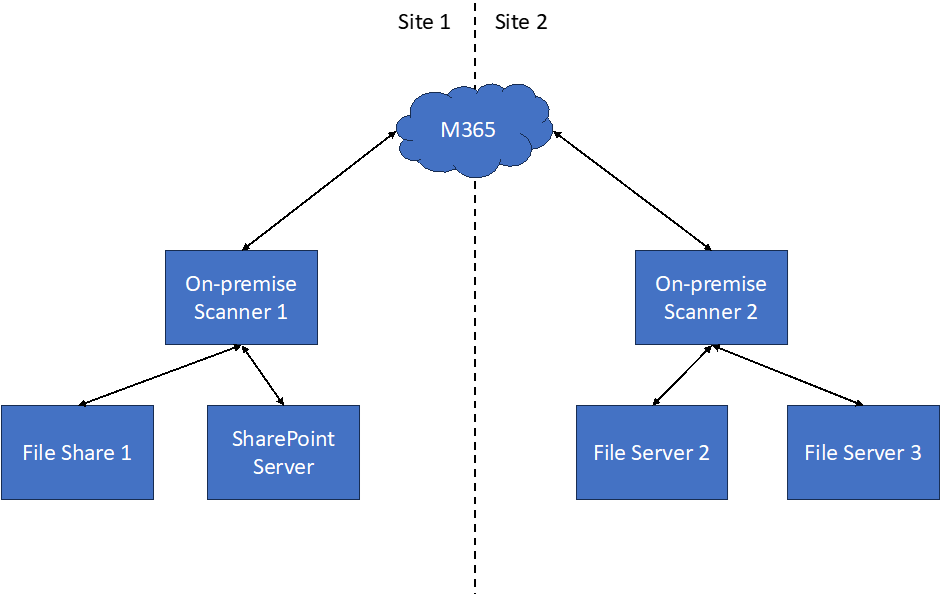
Some of my clients have multiple sites and multiple repositories they need to scan. I always recommend installing at least one scanner on each site. If that site has some large repositories, like a file server with TBs of data, you may have to consider setting up an additional scanner so the workload can be divided across multiple scanners. The deployment would be like what is illustrated below in Figure 2.
For some reference figures on the on-premises scanner performance when scanning jobs, check out this Microsoft blog. You can use the numbers there as a reference to plan how long it will take for a scanner job to complete. Usually, we are talking about 5-10 min per GB of data scanned and applied to the label. And I see some much longer if the file server is a bit old. For SharePoint, we may need a bit more time in my experience, and it usually takes around 10-15 min per GB. You can also calculate the number of scanners required in your deployment. In my experience, the key factors to consider are:
- Amount of time to scan all the target documents.
- Number of repositories that need to be scanned concurrently.
Regardless of how you calculate, I would suggest configuring scan jobs so that they will be complete within one day. If needed, you can divide a repository into multiple scan jobs (like one job per subdirectory).
The scanner leverages the Azure Information Protection unified labeling client to inspect and apply labels to the documents. So the file type supported would be the same as the one listed here.

Bonus Track: DLP for On-premises Repository
The original version of the scanner was the AIP scanner, which was designed only for use by Azure Information Protection. The latest iteration gained the ability to process DLP policies and detect potential violations as the scanner processes files.
The way DLP works is similar, but instead of comparing the file content against the labeling policy, the on-premises scanner compares against the DLP policy, in which the target repository type is an on-premises repository. The scanner can check file content against the DLP policies defined and perform actions defined by policies. One action is to delete the file and replace it with a “notice file” as a placeholder to let users know that their file is seized. This action may be a bit radical for some clients, so use it cautiously. Most of the time, we just remove the permission so only a specific user/group can access the file if the files are detected to violate a DLP policy. For example, you can define a policy to detect any files with over 300 account numbers in a document and have an on-premises scanner to scan and identify the documents. Then you can apply the compliance actions.
Similar to labeling, violations and results are logged back to Microsoft 365 Unified Audit Log to give you a centralized view of what’s happening on-premises and online.
Complete Sensitivity Label Protection with the Scanner
Almost 90% of my clients have an on-premises repository for many reasons. The top 3 reasons I typically here are:
- The overall cost for SharePoint storage, if adding all files (including long-term archived files).
- The ability to work with some applications (like Adobe Photoshop or AutoCAD) when files are stored in SharePoint.
- Preferring to keep the files on-premises due to the nature of the document (confidentiality is the top reason).
In this light, using the scanner is a good way to ensure complete protection after rolling out sensitivity labels within Microsoft 365.
Also note that although Microsoft announced the retirement of the unified label client in April 2024, this step won’t impact the on-premises scanner. Instead, Microsoft said that they will continue to enhance the product, so that’s good news.


Hi!
IS Purview IP Scanner compatible with SharePoint server SE?
Hello,
I am having some difficulty understanding the difference between “Enforce Sensitivity Labeling Policy” and “Label Files Based on Content.” Could you please provide more details on how each of these works?
Thank you!
Old, but it explains what label files based on content does… https://techcommunity.microsoft.com/t5/security-compliance-and-identity/best-practices-for-deploying-and-using-the-aip-ul-scanner/ba-p/1878168
As to enforce sensitivity labeling policy, that means that Purview will enforce the auto-label policy to apply sensitivity labels based on whatever criteria are defined in the policy.
I have SharePoint on-premise, and in my scan job, the label is only applied to one repository. Could you guide me on how to fix this
Hello,
Any information on the results of on-prem file server scans appearing in Content Explorer?
Thanks
The results of the scanner (file discovery activities) will show up in the Activity Explorer (not the Content explorer). In the Activity Explorer you can see which files are discovered and which SITs were discovered in the files. If you configure the scanner for it, it will also show you which source values contributed to what SIT.
Hi James Yipi,
Thanks for the excellent article.
Please let me know how to setup MS Purview DLP policy for Box.com. Request you to share any articles if you have.
Thanks,
Santhosh
Hi,
I would stress the importance on testing throughput of scanning as well, the SQL aspects required in order for the scanner to log its data. There is also the limitations of using Activity explorer to get the data insights back, export of only 30k items so the use of O365 management API, or Sentinel then using KQL can be great ways to get a full view also. I would also raise the fact that when a file is read it locks it, length really depends on amount of text within the scanner needs to look at (only ever seen this once but end users did raise concerns albeit limited).