Don’t Allow Users to Export Data from Windows to USBs
Information protection and information leakage prevention are key security topics. Many ways exist to tackle identified risks. Some solutions involve implementing fancy solutions, like Trellix DLP for Endpoint, which can be lengthy as you need to first implement that solution before enabling the USB blocking feature, but other simple yet effective solutions exist, especially to control information leakage. We believe the simplest solution is often the most effective solution to a problem. There is no need to over-engineer things. This article discusses two simple solutions to control the number one source of information leakage: copying data from Windows endpoints to USB storage devices.

Traditional Approach #1: Windows Device Control
Since the advent of USB storage devices, Windows administrators have used a registry setting to control peripherals connected to Windows devices. We can update the registry directly or use GPO to deploy the setting (more appropriate for enterprise deployment) as shown in Figure 1.
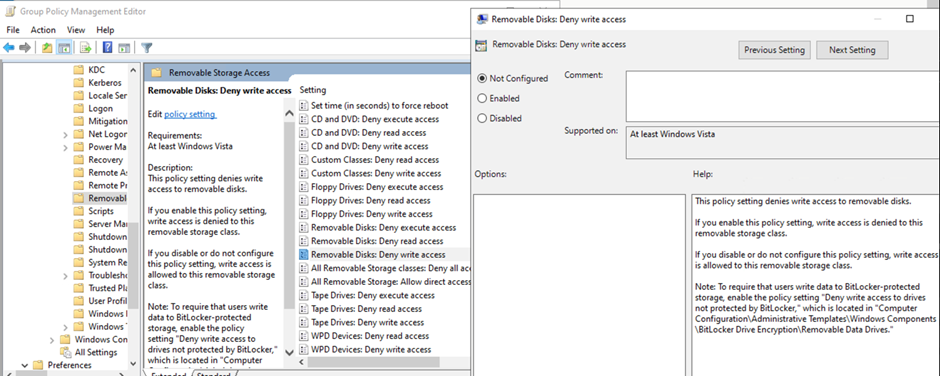
Other registry keys are available to control different kinds of devices (like Floppy Drives, if you still know what those are). But you may notice the key only allows Block or Allow and nothing more. This method is not very flexible. For example, you may want to allow some devices that are approved by the company. This can be accomplished by applying the Device Installation Restriction policy instead of the Device Restrictions as shown in Figure 2.
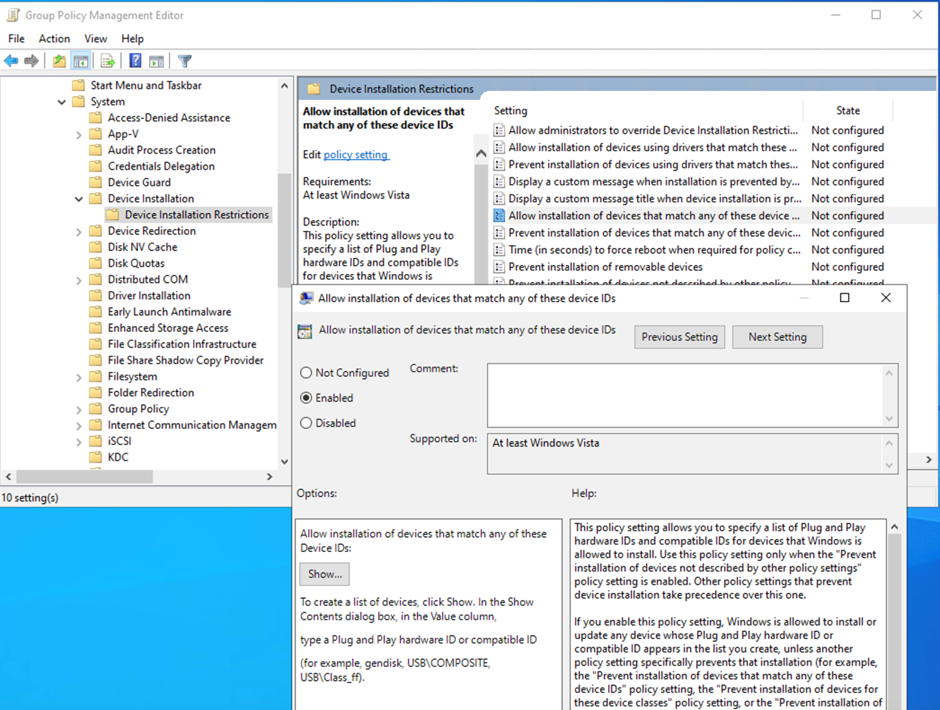
One issue is that the specific hardware identifier is required for each USB device. This makes the whole process very complicated. Once I saw a client who needed the identifier to do the following before giving the USB drive to its user:
- Plug the USB device into a Windows endpoint that was not connected to the corporate network.
- Obtain the hardware identifier.
- Add the identifier to GPO.
The whole process takes a long time and the list of hardware IDs gets longer and longer and becomes very difficult to manage.
Traditional Approach #2: Using Intune with Windows Device Control
With the adoption of Intune, people can migrate GPOs (and other registry settings) to Intune configuration profiles. The same set of settings can be deployed using an Intune configuration profile. Figure 3 depicts an example of such a policy.
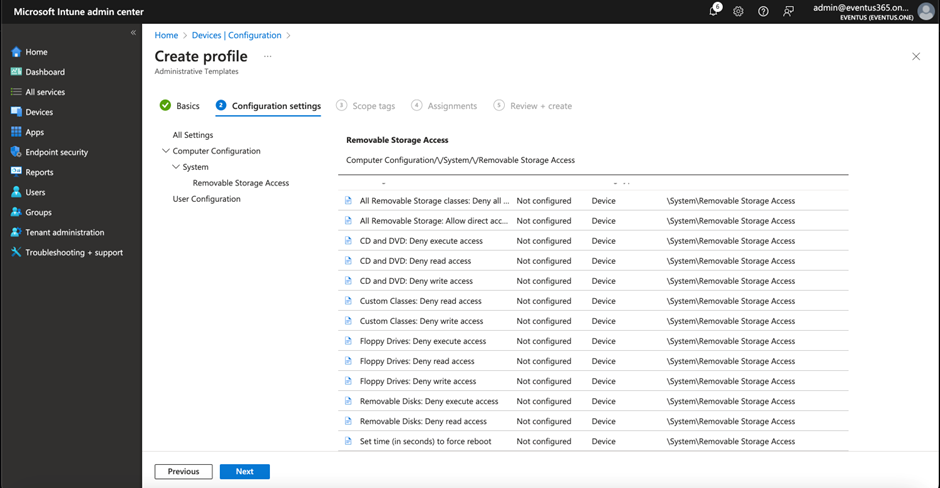
Note that GPO will revert the underlying registry keys impacted by the policies when it is no longer in effect, but Intune does not. Take this fact into consideration when you implement this kind of restriction policy as you may need to configure another set of the configuration profiles to revert the settings.
A Modern Solution: Using Device Control with Defender for Endpoint
When the need exists to adopt more restrictive control over endpoints to protect corporate information and prevent potential attacks like ransomware, corporations often adopt device restrictions. Soon they realize that simply blocking everything will just not work. Business and security teams often come up with some enhanced conditions for when the restrictions should be lifted for specific users or groups. This makes the policy very difficult to manage if we still use Hardware-ID based approach for example. Imagine you need to copy the policies multiple times and assign them to different people yet each time adding a new hardware ID needs to update all the policies.
Microsoft’s solution is the Device Control policy, part of the Defender for Endpoint package. These policies require the deployment of Defender for Endpoint in your environment along with licenses for Defender for Endpoint. The good news is that this feature works with Defender for Endpoint Plan 1 or Business Plan (the one included in Microsoft 365 Business Premium).
The key difference between the traditional Windows device restriction policies and the Device Control policies in Defender for Endpoint is that the Device Control policy supports conditions. This allows us to do things like:
- Only block USB storage devices when outside the corporate network.
- Allow read-only access.
- Allow specific device brands/vendors.
- Block specific types of Bluetooth devices.
Figure 4 is an example of the Device Control policy which blocks USB write access.
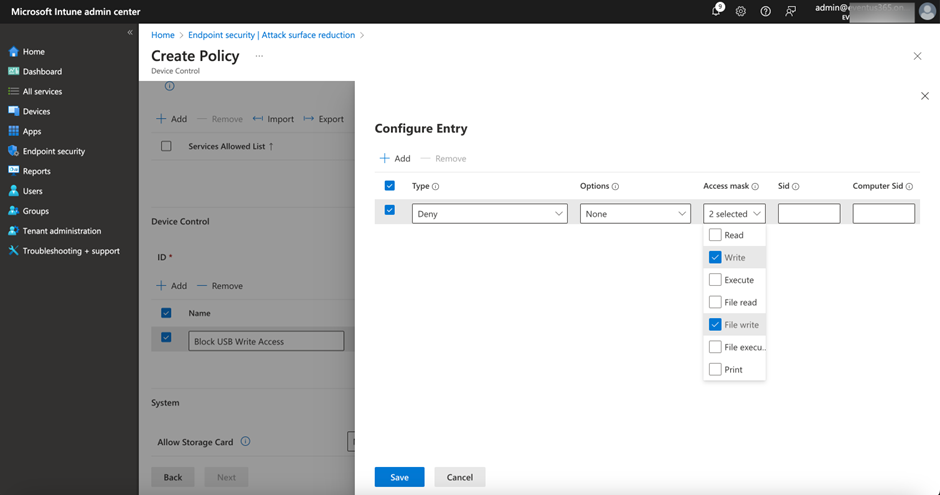
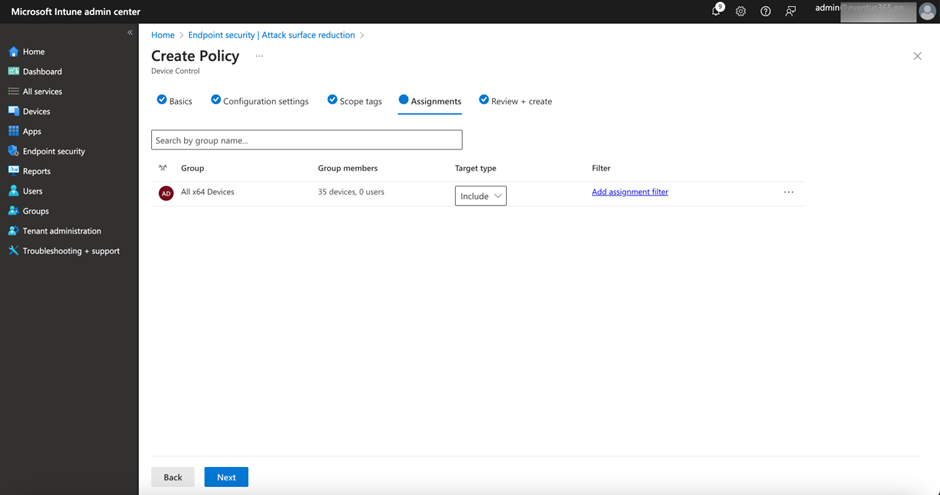
A critical setting of each policy is to define the target for the policy. You can either target users and devices at the policy level or target individuals by specifying the SID or Entra ID objectId of the group or users, or you can target specific types of devices like USB storage media. Then each policy can include multiple entries, and each entry defines a specific action and access rights. One thing to note here is if you target the policy at an Entra ID group, make sure the device always has internet access as Defender for Endpoint will check group membership whenever needed. That’s why I usually use assignments just as shown in Figure 5 instead of targeting within the policy.
Defining a policy to block USB access to specific users, devices or groups is straightforward. The most difficult part is to define the conditions in which you want to apply to the policy rather than just assignment to all users. In this situation, we must first create reusable settings.
You can think of reusable settings as a group of conditions to specify one or more conditions to use when applying Device Control Actions. Reusable settings can be used with other policies, like Windows Firewall, and you can learn more about this setting here. Settings like network location, Vendor ID, and Hardware ID, are all considered conditions that allow Defender for Endpoint to determine if the Device Control policy should be applied. If a policy match happens, Defender for Endpoint applies the action defined in the policy. You may notice Intune Admin Center only supports defining the reusable settings for Printers and Removable Media related policies as shown in Figure 6.

Microsoft supports other types of reusable settings (at the time of writing, the other types of conditions supported are Network, VPN Connection, File, or Print Job) but you can only define reusable settings with XML and upload to Intune via Custom Profile as shown in Figure 7. Do note that you must generate a GUID for each group you define. You need to make sure the same GUID is used in OMA URI, XML content as well as the policy definitions as shown in Figure 7. Defining a new reusable setting via Custom Policy and OMA URI. You can generate a new GUID via the PowerShell New-Guid cmdlet or an online website like guidgenerator.com .
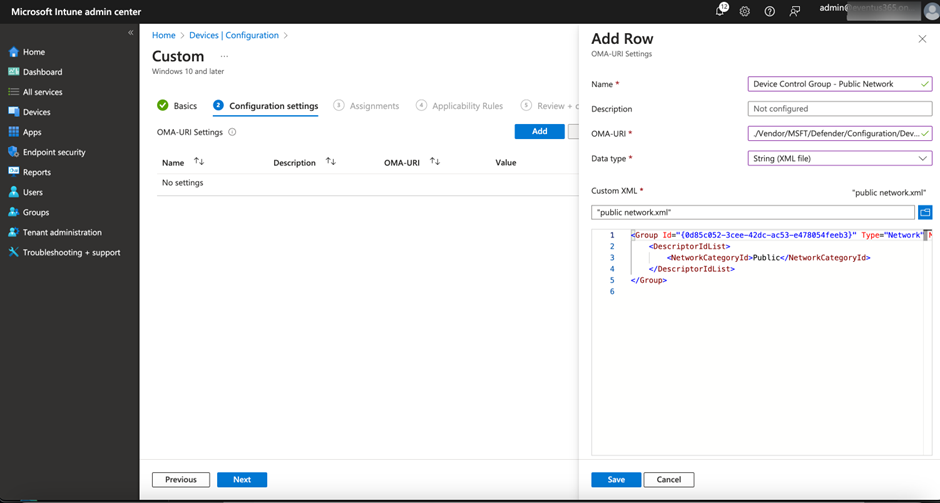
Below is an example definition of reusable setting to match when the user’s device is connected to a public network and removable storage devices:
OMA URI: ./Vendor/MSFT/Defender/Configuration/DeviceControl/PolicyGroups/%7b<GUID>%7d/GroupData
<Group Id="{<GUID>}" Type="Network" MatchType="MatchAll">
    <DescriptorIdList>
        <NetworkCategoryId>Public</NetworkCategoryId>
        <PrimaryId>RemovableMediaDevices</PrimaryId>
    </DescriptorIdList>
</Group>
If you use a custom policy to define the reusable settings, you must use a custom policy to define the Device Control policy as shown in Figure 8. Below is an example definition that leverages the reusable setting defined previously and applies Block and Audit Denied action. Do note that there is a need to generate a different GUID for each place marked below with <GUID>.
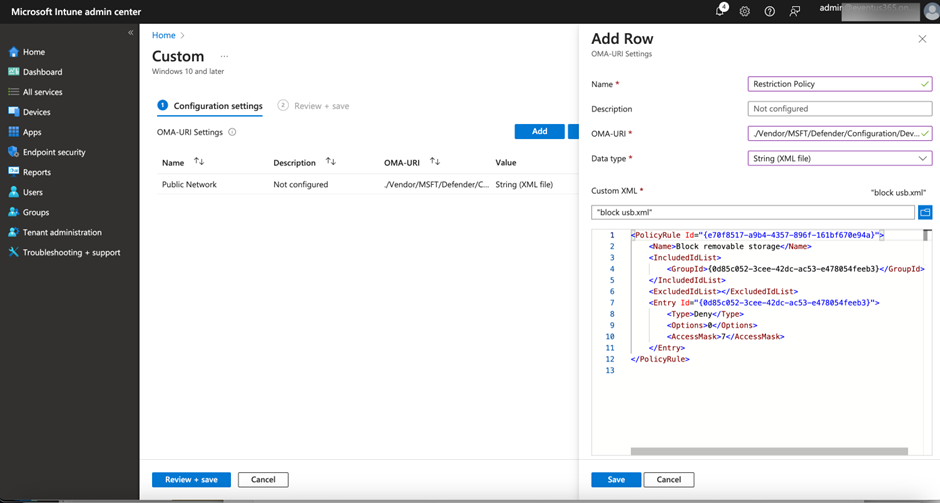
OMA URI: ./Vendor/MSFT/Defender/Configuration/DeviceControl/PolicyRules/%7b<GUID>%7d/RuleData
<PolicyRule Id="{<GUID-Rule>}">
    <Name>Block removable storage</Name>
    <IncludedIdList>
        <GroupId>{<GUID-Reuseable Setting>}</GroupId>
    </IncludedIdList>
    <ExcludedIdList></ExcludedIdList>
    <Entry Id="{<GUID-Entry1>}">
        <Type>Deny</Type>
        <Options>0</Options>
        <AccessMask>7</AccessMask>
    <Entry Id="{<GUID-Entry2>}">
        <Type>AuditDenied</Type>
        <Options>3</Options>
        <AccessMask>6</AccessMask>
    </Entry>
    </Entry>
</PolicyRule>
Using Device Control with Defender for Endpoint provides full support for advanced hunting. This means we can use Advanced Hunting in Defedner for Endpoint to identify devices connected and their status. Using Windows Device Control may generate some logs, but the logs related to Windows Device Control only save to the device’s log. You will have to implement other means to gather the log to a central location before you can perform a centralized analysis.

Adopting Device Control in Defender for Endpoint
One of the key reasons why my clients prefer to use Device Control in Defender for Endpoint instead of Windows Device Control is the support for macOS devices. A similar set of policies can be used on both platforms. But note that you cannot use the “same policy” for both platforms. You must define two different policies: one for the Windows endpoint and the other for the macOS endpoint. The common part is the support of a similar query structure, but the syntax is very different as macOS is JSON-based where whereas Windows is XML-based.
Using Device Control with Defender for Endpoint helps improve maintainability as it is no longer required to maintain a long list of hardware IDs for example. This makes managing the environment much easier. That’s why now would be a good time to revisit your endpoint control method and convert to a modern one if you already have Defender for Endpoint licenses.


hi, on picture 8, is GUID in OMA the same like the {}?
We could also use Endpoint DLP !
Great write up!
I did want to add that for customer with M365 Business Premium licenses that don’t have access to Advanced Hunting you can see reports in the Defender Portal. If you go to security.microsoft.com and Reports then under the section Endpoints you will find Device Control where you can see details on the media being used like: Media name, Class name, Class GUID, Device ID, Vendor ID etc.