Exploring What’s Possible to Automate eDiscovery Operations
Microsoft has recently modernized the Purview eDiscovery solution to introduce a unified framework for case management that spans standard and premium cases and content searches. Microsoft plans to retire the classic eDiscovery (premium) in August 2025. At that point, the unified framework will be the only Purview eDiscovery solution available. Some eDiscovery features, like review sets and data purges, are only available for premium cases, and those require Office 365 E5 licenses. Purview uses the same UX for both standard and premium eDiscovery cases, hiding features when necessary if a premium license isn’t available.
Part of the unified framework is a revamped Graph eDiscovery API, with cmdlets mapping each API method available through the Microsoft Graph PowerShell SDK. This article explains how to use the SDK cmdlets (I used V2.28) to create and automate the processing of some elements of eDiscovery case management. Some of the cmdlets are from the beta version of the Microsoft.Graph.Security module. This situation should change as time passes, and all the production cmdlets work as expected. Some of the issues I observe when working with the cmdlets might be due to the transition to the unified eDiscovery framework. These problems should also work their way through the system over time.
As we’ll see, some eDiscovery steps must still be accomplished manually through the Purview GUI, but perhaps fewer than you might have thought. I suspect that some of the deficiencies are deliberate (human eyes must review items), and some are due to bugs.
Update: Need to run the eDiscovery cmdlets in app-only mode, including in Azure Automation runbooks? Here’s what you need to do.

Create a New eDiscovery Case
Cases are the central component of eDiscovery. Everything is linked to a case, so the first step is to create a case to work with. The sample scenario is to find old email notifications sent by Exchange Online when people receive email that ends up in quarantine. This mightn’t seem very exciting, but it allows us to explore how to use the API to purge items without doing any harm.
To work with eDiscovery using the Microsoft Graph PowerShell SDK, the first step is to connect to an interactive session with the eDiscovery.ReadWrite.All scope (permission) using an account that holds the eDiscovery Manager Purview RBAC role:
Connect-MgGraph -Scopes eDiscovery.ReadWrite.All
To create a new case (which will always be a premium eDiscovery case), we use a hash table to hold the details of the case. Only the display name is required. The description and external identifier (a value to help customers recognize eDiscovery cases) are both optional. After populating the hash table, run the New-MgSecurityCaseEdiscoveryCase cmdlet and pass the hash table as the payload (body parameter):
$NewCaseDetails = @{}
$NewCaseDetails.Add("displayName", "Unwanted Quarantine Notifications")
$NewCaseDetails.Add("description","eDiscovery Case to Find and Remove unwanted Quarantine notifications older than 30 days")
$NewCaseDetails.Add("externalId","UQN-001")
$Case = New-MgSecurityCaseEdiscoveryCase -BodyParameter $NewCaseDetails
The $Case variable now holds details of the case, including its identifier. We will need this information to interact with other cmdlets.
Find Cases
Sometimes you might forget to store details of the newly created case in a variable, so let’s find the set of cases created in the last month and view their details. This code uses the Get-MgSecurityCaseEdiscoveryCase cmdlet with a filter to find cases created in the last month:
$LastMonth = (Get-Date).AddDays(-31).ToString("yyyy-MM-ddTHH:mm:ssZ")
[array]$Cases = Get-MgSecurityCaseEdiscoveryCase -Filter "CreatedDateTime gt $LastMonth" -Sort 'CreatedDateTime DESC'

$Cases | Format-Table DisplayName, Id, CreatedDateTime -AutoSize

DisplayName                       Id                                   CreatedDateTime
-----------                       --                                   ---------------
Unwanted Quarantine Notifications 7fc26cf0-bc8d-421c-8ad1-bea9782f564c 03/06/2025 16:24:45
Nouvon Investigation              b111e498-e24b-45ac-9e67-225a29c0caeb 29/05/2025 14:31:01
The case we want to work with is the first in the list, so we can put its details in a variable with:
$Case = $Cases[0]
Create a Search
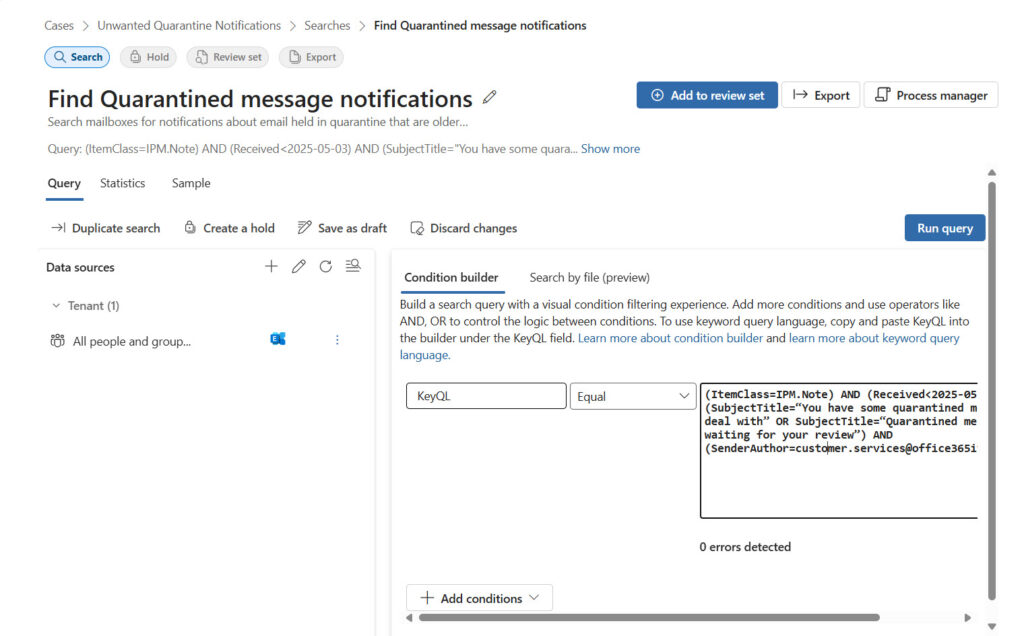
Searches are the backbone of eDiscovery cases because they find the items for investigators to review. In this case, we want to find quarantine notifications that are older than 30 days (the maximum a message can stay in the quarantine). To be safe, we’ll look for messages older than 31 days. After creating the search date in the correct format, we build the remainder of the KeyQL query for the search. As with any eDiscovery query, it’s critical to be as precise as possible so that the search can zero in on the target items. In this case, the query searches for messages received more than 31 days ago with a specific sender and either of two variations for the subject:
$OlderThanDate = (Get-Date).AddDays(-31).toString('yyyy-MM-dd')
$Query = ‘(ItemClass=IPM.Note) AND (Received<={0} AND (SubjectTitle="You have some quarantined messages to deal with" OR SubjectTitle=“Quarantined messages are waiting for your review”) AND (SenderAuthor=customer.services@office365itpros.com))’ -f $OlderThanDate
A hash table holds the search parameters. The data source scopes parameter defines the locations that the search will scan for items that match the query. In this case, the query should search every mailbox in the tenant, and that’s defined by the special allTenantMailboxes location. To search all SharePoint and OneDrive sites, add the allTenantSites location. The New-MgSecurityCaseEdiscoveryCaseSearch cmdlet creates the new (and empty) case. Details of the newly created search are captured in the $Search variable.
$NewSearchDetails= @{}
$NewSearchDetails.Add("displayName","Find Quarantined message notifications")
$NewSearchDetails.Add("Description","Search mailboxes for notifications about email held in quarantine that are older than 30 days old.")
$NewSearchDetails.Add("contentQuery", $Query)
$NewSearchDetails.Add("dataSourceScopes","allTenantMailboxes")

$Search = New-MgSecurityCaseEdiscoveryCaseSearch -EdiscoveryCaseId $Case.Id -BodyParameter $NewSearchDetails
Figure 1 shows what the created search looks like through the eDiscovery UX.

Adding Individual Data Sources
Instead of searching all tenant mailboxes or sites, you can add individual locations (data sources) to a query using the New-MgSecurityCaseEdiscoveryCaseSearchAdditionalSource cmdlet. These locations are referred to as additional sources, and they can be users, groups, or sites. When you add a user, their mailbox and OneDrive for Business account become a data source for the search, Each location must be added separately. Here’s an example of adding a user and a SharePoint Online site as data sources for a search:
$UserSourceDetails = @{}
$SiteSourceDetails = @{}

$UserSourceDetails.Add("@odata.type","microsoft.graph.security.userSource")
$UserSourceDetails.Add("email","Ken.Bowers@office365itpros.com")

$SiteSourceDetails.Add("@odata.type","microsoft.graph.security.siteSource")
$SiteSourceDetails.Add("site", @{webUrl = "https://office365itpros.sharepoint.com/sites/BlogsAndProjects"})

New-MgSecurityCaseEdiscoveryCaseSearchAdditionalSource -EdiscoveryCaseId $Case.Id -EdiscoverySearchId $Search.Id -BodyParameter $UserSourceDetails
New-MgSecurityCaseEdiscoveryCaseSearchAdditionalSource -EdiscoveryCaseId $Case.Id -EdiscoverySearchId $Search.Id -BodyParameter $SiteSourceDetails
To list the individual sources scanned by a case, use the Get-MgSecurityCaseEdiscoveryCaseSearchAdditionalSource cmdlet to fetch the information about the configured sources, and then extract the information:
[array]$DataSources = Get-MgSecurityCaseEdiscoveryCaseSearchAdditionalSource -EdiscoveryCaseId $Case.Id -EdiscoverySearchId $Search.Id -All | Select-Object -ExpandProperty additionalProperties

$Report = [System.Collections.Generic.List[Object]]::new()

ForEach ($S in $DataSources) {
   $Source = $null; $SourceType = $null; $SiteSource = $null
   Switch ($S.'@odata.type') {
      "#microsoft.graph.security.userSource" {
         $SourceType = "User"
         $Source = $S.email
         If ($S.includedSources -eq "mailbox,site") {
            $SiteSource = $S.siteWebUrl
            $SiteSource = "Mailbox and OneDrive"
         }
       }
       "#microsoft.graph.security.siteSource" {
         $SourceType = "Site"
         $SiteSource = $S.site.webUrl
       $Source = $S.site.displayName
       If ($null -eq $Source) { $Source = "OneDrive for Business" }
     }
   }
   $ReportLine = [PSCustomObject][Ordered]@{
      Source       = $Source
      ‘Site’       = $SiteSource
      'SourceType' = $SourceType
   }
   $Report.Add($ReportLine)
}
$Report | Out-GridView
Applying Holds
An eDiscovery hold retains information specified by a KeyQL query. The hold is in-place, meaning that the items remain in their original location. If a user deletes a held item, the responsible workload retains the item until the hold is released.
An eDiscovery hold is composed of a hold policy (details of the hold) and a hold rule (the KeyQL query). Often, the query is the same as used with a case search, but it doesn’t have to be. This code runs the New-MgBetaSecurityCaseEdiscoveryCaseLegalHold cmdlet to create a hold that uses the query from the search created above:
$HoldParameters = @{}
$HoldParameters.Add("displayName", "In-place hold for Investigation 2025-101")
$HoldParameters.Add("description", "An in-place hold to retain emails and files of interest to Investigation 2025-101")
$HoldParameters.Add("contentQuery", $Query)

$HoldPolicy = New-MgBetaSecurityCaseEdiscoveryCaseLegalHold -EdiscoveryCaseId $Case.Id -BodyParameter $HoldParameters
After creating the hold, you must add some data sources for Purview to apply the hold against. Holds can apply to mailboxes, OneDrive for Business accounts, SharePoint Online sites, and Microsoft 365 groups (the group mailbox and group site). Up to 1,000 individual mailboxes and 100 individual sites can be configured as hold data sources. Holds are indefinite and remain in force until they are removed from a case.
This code adds a user as a source for a hold policy. The documentation states that you can add a user’s mailbox and OneDrive account in one action, which is consistent with how adding a user data source to a search works, but neither the Graph API nor the cmdlet works when the included sources are “mailbox, site.” Instead, you must add a mailbox and a OneDrive account separately. Here’s how to add a mailbox and a (OneDrive) site to a hold policy:
$UserSource = @{}
$UserSource.Add("email", "Lotte.Vetler@office365itpros.com")
$UserSource.Add("includedSources","mailbox")

New-MgBetaSecurityCaseEdiscoveryCaseLegalHoldUserSource -EdiscoveryCaseId $Case.Id -EdiscoveryHoldPolicyId $HoldPolicy.Id -BodyParameter $UserSource

$SiteSource = @{}
$SiteSource.Add("@odata.type","microsoft.graph.security.siteSource")
$SiteSource.Add("site", @{webUrl = "https://office365itpros-my.sharepoint.com/personal/lotte_vetler_office365itpros_com"})
New-MgBetaSecurityCaseEdiscoveryCaseLegalHoldSiteSource -EdiscoveryCaseId $Case.Id -EdiscoveryHoldPolicyId $HoldPolicy.Id -BodyParameter $SiteSource
Users added in this method do not show up in the eDiscovery UX as data sources. However, they are listed as locations in the details tab for the hold, but only after taking action to retry the policy from the Policy actions menu (no Graph API method is available to retry a hold policy). Microsoft acknowledges the failure to list data sources as a bug that might be fixed by the time you read this text.
Running an Estimate Search
To test the effectiveness of the query, we should run an estimate search to see if we can find some items. It’s an estimate search because eDiscovery doesn’t fetch anything from the scanned locations. Instead, eDiscovery estimates how many items will be found if it is asked to create a review set or to export the results.
Unfortunately, the V1.0 cmdlets to start an estimate search and fetch the results both return inaccurate information, as does the V1.0 methods. The problem might have been resolved through an updated SDK cmdlet by the time you read this text. To start an estimate search, run the Invoke-MgBetaEstimateSecurityCaseEdiscoveryCaseSearchStatistics cmdlet:
Invoke-MgBetaEstimateSecurityCaseEdiscoveryCaseSearchStatistics -EdiscoveryCaseId $Case.Id -EdiscoverySearchId $Search.Id
Searches run as background processes. To find out if the estimate identifies any items, use the Get-MgBetaSecurityCaseEdiscoveryCaseSearchLastEstimateStatisticsOperation cmdlet, which fetches the last set of statistics returned for a query.
Export Search Results
Exporting the results of searches (or from a review set) are an important part of eDiscovery work. It’s often the case that information found by a search must be reviewed by outside experts. eDiscovery supports Entra ID B2B guest access to review sets, but the most common method of sharing information for review is to export messages to PSTs and documents to individual files.
Two cmdlets are available:
- Export-MgBetaSecurityCaseEdiscoveryCaseSearchResult: exports the results of a search and reports detailing what is found.
- Export-MgBetaSecurityCaseEdiscoveryCaseSearchReport exports just the reports.
This example exports the results found by a search. The export formats parameter specifies that messages are exported to PSTs instead of individual .msg files. See the documentation for more details about parameter values:
$ExportParameters = @{}
$ExportParameters.Add("displayName", "Export Quarantined messages")
$ExportParameters.Add("exportCriteria", "searchHits")
$ExportParameters.Add("exportformats", "pst")
$ExportParameters.Add("additionalOptions", "subfolderContents")
$ExportParameters.Add("exportLocation", "responsiveLocations")

Export-MgBetaSecurityCaseEdiscoveryCaseSearchResult -EdiscoveryCaseId $Case.Id -EdiscoverySearchId $Search.Id -BodyParameter $ExportParameters
The export process copies files found by a search to a secure Azure storage location. Depending on how many items to process, an export can take a long time to finish. Once complete, an eDiscovery manager must download the files manually.
Specifying a name for the export job in the DisplayName property can create too long a file name for the zip file containing the downloaded report files. You might need to rename the file before you can open it. This issue doesn’t occur with zip files for exports generated through the Purview UX.
Add a Review Set
A review set is a static copy of items found by a search (or copied from another review set) intended to be used by investigators to examine items in the set to decide if the items are of interest or not. Investigators can tag and annotate items in a review set and export selected items for external review. The New-MgSecurityCaseEdiscoveryCaseReviewSet cmdlet creates a new review set in an eDiscovery case.
$ReviewSet = New-MgSecurityCaseEdiscoveryCaseReviewSet -EdiscoveryCaseId $Case.Id -DisplayName "Review Set for Investigation"
To copy files found by a search to a review set, use the Add-MgSecurityCaseEdiscoveryCaseReviewSetToReviewSet cmdlet. The identifier for the source search is in the payload passed to the command:
$ReviewSetParameters = @{}
$ReviewSetParameters.Add("additionalDataOptions", "linkedFiles")
$ReviewSetParameters.Add("search",@{id = $Search.Id})

Add-MgSecurityCaseEdiscoveryCaseReviewSetToReviewSet -EdiscoveryCaseId $Case.Id -EdiscoveryReviewSetId $ReviewSet.Id -BodyParameter $ReviewSetParameters
The additionalDataOptions parameter specifies whether the review set should include linkedfiles (files shared with Outlook or Viva Engage Teams) and allVersions (all available versions of files stored in SharePoint Online and OneDrive for Business). The command used here doesn’t include the allVersions option, so Purview copies only the latest available version of files to the review set.
Populating a review set can take several hours (or longer), depending on how many items must be processed.
Purging Items
I touched on the topic of purging items found by eDiscovery cases in an article about removing unwanted calendar items. Some of the same ground is covered here, albeit in a different context.
Purging can only be done for eDiscovery premium cases. SharePoint Online and OneDrive don’t support purging, so the only items that can be removed are email (“mailboxes”) and the compliance records for Teams chat and channel messages (“teamsMessages”). Mailbox items can be soft-deleted (“recoverable”) or hard-deleted (“permanentlyDelete”). Teams compliance records are always hard-deleted, and their removal from a mailbox subsequently leads to deletion of the associated messages from the Teams message store.
This code creates a payload instructing Purview to permanently remove the mailbox items found by the search. The Clear-MgSecurityCaseEdiscoveryCaseSearchData cmdlet then sends the purge command to Exchange Online:
$PurgeParameters = @{}
$PurgeParameters.Add("purgeType","permanentlyDelete")
$PurgeParameters.Add("purgeAreas","Mailboxes")

Clear-MgSecurityCaseEdiscoveryCaseSearchData -EdiscoveryCaseId $Case.Id -EdiscoverySearchId $Search.Id -BodyParameter $PurgeParameters
-ResponseHeadersVariable Response
The response headers generated by the request contain details of the purge job. To find the current state of the job, extract the URI stored in the location value and use Invoke-MgGraphRequest to retrieve details of the job. In this example, the data returned says that the purge succeeded.
[string]$ResponseLocationURI = $Response.Location
$ResponseURI = [system.uri]$ResponseLocationURI

Invoke-MgGraphRequest -Uri $ResponseURI -Method Get

Name                           Value
----                           -----
createdDateTime                05/06/2025 13:44:58
id                             f580a3b0c72b4c849912520e04bc39e7
percentProgress                100
action                         purgeData
status                         succeeded
completedDateTime              05/06/2025 13:47:23
Remember that searches are performed against primary and archive mailboxes, including the recoverable items structure in each mailbox. The items found might be visible or invisible to users. For example, let’s assume that you want to clean up some unwanted messages. A purge can remove up to 100 items per location. Those items are in the order found by the search. If a mailbox has 200 matching messages, most of which are in the Deletions folder in Recoverable Items, the purge might move 100 items from Deletions to the Purges folder and never touch the items visible to the mailbox owner.
eDiscovery is a Workable Rather than a Perfect API
The nice thing about working with data through an API is that you can get a better appreciation of how an application works. The eDiscovery API isn’t perfect, but it can automate many aspects of eDiscovery case processing. Having to use a mixture of production and beta cmdlets is a little annoying at times. That situation should change when eDiscovery settles into the new unified framework and the developers have a chance to tidy up some of the visible loose ends. At least, that’s the plan.


Hello Tony,
Your article has really helped us to get started, much appreciated! Could you shed some light on the following as well?: When viewing the properties of an eDiscovery Case, we see the following tabs via the UI: “Searches | Hold Policies | Review Sets | Exports | Data Sources”. We’ve attempted to add entries under the “Data Sources” tab via Graph, but unfortunately they never show up in the UI. We then tried manually adding a couple of test users via the web UI and then tried just about all of the cmdlets via Graph to display them via the console to no avail. There seems to be something we’re missing? Are the “Microsoft.Graph.Security” cmdlets still incomplete? Any insights would be greatly appreciated! (FYI: We’ve successfully added sources directly to the individual searches via Graph, that hasn’t been a problem.)
The last time I looked, there were some gaps that the developers had to fill. If you find a problem, my suggestion is to report it to Microsoft support so that they can check it out and escalate to engineering if a gap does exist. Formally reported issues are the best way to make Microsoft assign engineering time to fix things.
Helo Tony, did you ever find a way to download the results via Powershell ? Anw, Thanks for this guide, very helpfull to migrate from my old ways.
$exportResult = Get-MgBetaSecurityCaseEdiscoveryCaseOperation -EdiscoveryCaseId $Case.Id | ? {$_.action -eq “exportResult”}
$operations = Invoke-MgGraphRequest `
-Method GET `
-Uri “https://graph.microsoft.com/beta/security/cases/ediscoveryCases/$($Case.Id)/operations/$($exportResult.id)”
I have my $operations.downloadUrl but it gives me a “placeholder” tiny file instead of the zip I can see on the GUI portal.
Sorry. I never looked into this operation. I’ll add it to my list to do when I have a chance.
I am interested to find out how to download the files to local workstation too
We have created eDiscovery case (premium) and in the process of adding SharePoint sites to the hold. We have few thousands of sites to add to the hold policies. Per the documentation each hold can have max 2000 sites.
We tried adding the site source using the command New-MgBetaSecurityCaseEdiscoveryCaseLegalHoldSiteSource. You can only add one site at a time. Last week I was able to add batch of first 100 sites then the command stopped working with this error below:
Too many retries performed. More than 3 retries encountered while sending the request. (HTTP request failed with
| status code: TooManyRequests.{“error”:{“code”:”TooManyRequests”,”message”:”SharePoint or OneDrive compliance
| location count limit is
| exceeded”
I don’t know if this is related to throttling limits. I am not able add the sites anymore to the hold using the above command since last week. However, I can add them through Purview Portal which is dead slow and timing out frequently. To add a single site to the hold, you have to search the site, select it, save and close, and apply hold and wait for the page to load which may error out. Think of repeating this for thousand sites. I am curious if others have the same experience. Please share.
This isn’t a Microsoft site and we do not offer support for Microsoft products. You’ll need to create an incident with Microsoft Support and ask them to check things out. They can check your tenant for anything obvious and if that doesn’t turn anything up, they can escalate to product engineering.
Yes we did create a support ticket with Microsoft yesterday. Had an initial discovery call and waiting for the product team response. I posted here to share my experience and to see community users have any insight. Thanks.
Good. A support incident is the only way to get attention from product engineering!
I am using ediscovery to detect privacy sensitive information in files stored in SharePoint. You can add sources in the UX but when a library is private the source is not shown. You have to add the url manualy. There is no way to add 100 SPO url in bulk so you have to add then one by one. Is it possible to handle that via PowerShell?
I haven’t tried to add multiple SPO URLs like that, but it should be easy to test by creating an array of the URLs and then walking down through the array to add each URL as a data source.
Very nice article, I was trying to do a script to export the mailbox in a PST and later import in another mailbox, those cases are necessary in our env. How can i import the PST in cloud since new-mailboximportrequest is also deprecated?
You’d need to write a routine to open the PSTs, read their content, and update target mailboxes. The kind of stuff discussed in https://learn.microsoft.com/en-us/office/client-developer/outlook/mapi/using-a-wrapped-pst-store-provider
AFAIK, there’s no Graph API for this purpose.
having trouble with the Search Creation
New-MgSecurityCaseEdiscoveryCaseSearch : Display name is required.
but im either using your example exactly with the $NewSearchDetails or im adding the parameters inline and its still failing –
$Search = New-MgSecurityCaseEdiscoveryCaseSearch -EdiscoveryCaseId $Case.Id -DisplayName “Test” -NoncustodialSources $UserSourceDetails -ContentQuery “” -DataSourceScopes Mailbox
any ideas? or is this just a bug in the code?
This worked for me (just a moment ago):
$NewCaseDetails = @{}
$NewCaseDetails.Add(“displayName”, “Test Case for My Notifications”)
$NewCaseDetails.Add(“description”,”eDiscovery Case to Find and Remove unwanted notifications older than 30 days”)
$NewCaseDetails.Add(“externalId”,”UQN-0501″)
$Case = New-MgSecurityCaseEdiscoveryCase -BodyParameter $NewCaseDetails
It’s not the code, so the problem is your environment. Do you have the right Graph permission to run the cmdlet and is the signed in account an eDiscovery manager?
creating the case is fine. its creating the Search that was the issue
Curiously, case custiodans are due to go away this month (August) https://learn.microsoft.com/en-us/purview/ediscovery-managing-custodians
I wonder what will happen then… it’s likely that you will have to add mailboxes as data sources before you can create a search.
Ok – think i figured it out:
If i add the mailboxes i want searching to the case FIRST using
New-MgSecurityCaseEdiscoveryCaseCustodian -EdiscoveryCaseId $case.id -BodyParameter $UserSourceDetails
it then allows me to create the search by using
$Search = New-MgSecurityCaseEdiscoveryCaseSearch -EdiscoveryCaseId $Case.Id -DisplayName “Test” -ContentQuery “” -DataSourceScopes “allCaseCustodians”
and doesnt complain about a missing Displayname
Interesting. Maybe the fact that I am running as an eDiscovery manager removes the need to create a case custodian. I was able to create a search (just now) quite happily using the code in the article.
Is there any way to perform search on only specific mailbox or a set of mailboxes, instead of all tenant mailbox?
Yes. Add the target mailboxes as data sources for a search and don’t add “all tenant mailboxes”
I tried with it, getting “Display name is required” error. seems like not accepting just a single mailbox entry in data source scope
I’ve done this many times and was able to run a single mailbox search today. Sounds like a bug. Have you reported it to Microsoft support?
I’ve found Microsoft support to be quite frustrating lately. It often feels like a waste of time to open a support ticket, as they repeatedly ask for log collections without clear communication on what happens next. After gathering the logs, I receive daily emails stating they’re working on it, but after a month, I’m asked to collect the same logs again. This cycle continues, and eventually, I discover that Microsoft has resolved the issue on their own after a couple of months, while the engineer continues to update me as if the problem is still ongoing. When I try to close the ticket, their managers often reach out to persuade me not to leave negative feedback. It seems easier to wait for issues to resolve themselves rather than go through that process.
Thank you for all your help, Tony! I always refer to your articles when I need assistance, and I consistently learn something new from them.
Dealing with support can often be frustrating if you know more about a topic than the assigned agent does. The point is that once you register a problem, Microsoft must respond… and you can escalate the issue until you get a good response… including up to engineering if need be. That’s the advantage of going through the official channels.
Thank you for this informative article.
I note that you mentioned the need for an interactive session and the eDiscovery Manager role.
I tried via certificate based auth using an App Registration with eDiscovery.ReadWrite.All (Application permission) and it failed with “Unauthorized”. Hopefully this is possible in the future.
The problem here is that Purview RBAC groups are used for role management. If it were an Entra ID administrative role, we could assign it to the app and you’d be able to manage eDiscovery via the app.
I sent a note to the eDiscovery architect to ask if app-only access might be a possibility in the future. We’ll see. What use cases are you considering?
The response is that there is a way using Exchange Online service principals. Try the directions here: https://learn.microsoft.com/en-us/graph/security-ediscovery-appauthsetup?WT.mc_id=M365-MVP-9501
This works perfectly. Thank you very much.
The nice thing is that the technique even works with a managed identity in Azure Automation!
Hello Tony, thx for the useful information. Is there a way to include only the primary mailbox in the discovery search (excluding the online archive)?
Not to my knowledge.
thank you sir for the prompt reply.
I was wondering, why are additional usersources being added as opposed to custodian sources?
Custodians are a concept that is more important im eDiscovery V1. In the new eDiscovery, the case is the central thing you deal with, and sources are where information relating to the case are found.
Thanks… this is very useful information. I want to search multiple mailboxes. Since I do not want to search all mailboxes how should the line for dataSourceScopes be handled?
$NewSearchDetails.Add(“dataSourceScopes”,”allTenantMailboxes”)
I tried using “none” as this appeared to be valid value, per
https://learn.microsoft.com/en-us/graph/api/resources/ediscovery-sourcecollection?view=graph-rest-beta&viewFallbackFrom=graph-rest-1.0
I ultimately ended up using “allCaseCustodians”, even though there are no custudians defined, but I’m guessing that is ok. I tried excluding this line all together but when I tried creating the search container I came back and said at least one data source must be identified.
My biggest sticking point though to how I can identify multiple mailboxes for usersources when I’m adding additional sources. I’m thinking I need to create array, but exactly how it should be setup I’m not sure. Thanks in advance!!!
I get the same thing.
I want to create a search with specific mailboxes but I can’t seem to do it without using the UI or adding them to the case as custodians. The above instructions aren’t accurate as you can’t create a search without a data source and then add additional ones. I have over 2500 mailboxes to search, and adding them as custodians will take hours to run! By comparison, I can use the older compliance cmdlets much quicker!
You mean adding the mailboxes to the case as data sources? You can do that with PowerShell, which seems like a good way to add 2,500 mailboxes.