
As IT professionals, we are often tasked to automate business processes. Many business processes involve forms, email, Office documents, file storage, and notifications. Building custom solutions used to be a costly exercise that only developers could do.
Today, Office 365 provides IT pros with the tools like SharePoint, Microsoft Forms, PowerApps, Flow, and PowerBI. These tools can be used to automated business processes without any programming skills.
In this article, I will be demonstrating how to automate a user on-boarding process. This solution will use:
- SharePoint Online for the back end
- Microsoft Flow as workflow engine
- PowerApps as a form customization tool
The entire solution will be built without writing a single line of code. This puts the power of business process automation in the hands of IT pros. You can become a hero in your organization by taking what you learn from this article and using it to automate other business processes.
Before You Begin
Before we dive into building an automated solution, let me help you understand the process and the approach you need to take:
- Understand the problem – Before jumping in and starting to develop solutions, take some time to break the problem into smaller pieces. This will help you to not miss important details.
- Identify personas – You have to identify the users involved in this business process. Know what their business knowledge, technical skills, and level of access is. You should also identify what Office 365 apps and services they are licensed for. This will help you to build a process that fits with their capabilities.
- Whiteboard – Drawing a visual representation of the workflows will help you understand the business logic and the steps required to solve the problem. You should also involve your users in this step to engage them in the process.
- Testing – Try to break your process and understand the possible failure modes before you release it to your end users. A test environment that the users can also take part in is helpful at this stage. Their unique perspective can help you to discover bugs that you missed in your own testing.
Ok, let’s get started.

The User Onboarding Scenario
The HR department contacts IT and says they would like to automate the onboarding process for new staff. The goal is to make the process more streamlined and easier to control.
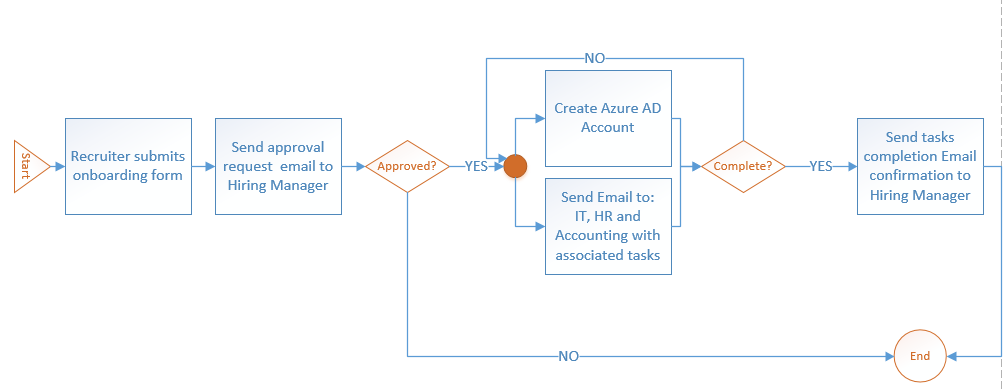
The first and most important step is to interview everyone who is involved in the process and gather as much information as possible. Using the information that you gather, draw a business logic diagram.
Looking at the requirements, we need to ask ourselves:
- How is HR user going to submit a request?
- Where are we going to store requests?
- How are we going to trigger emails?
- How are we going to monitor task completion?
Let’s answer all these questions, one at the time. The architecture is pretty simple:
- HR users will submit requests using a SharePoint list form that is customized with PowerApps
- The requests will be stored in a SharePoint Online list
- Microsoft Flow is going to be our workflow engine for processing requests and triggering email notifications for task completion
All the steps in this article assume you have Office 365 licensing that includes SharePoint Online, Microsoft Flow, and PowerApps. You also need permission to create SharePoint lists, Flows and PowerApps.
Creating the SharePoint Online List
SharePoint Online will host the list that is used to store HR user requests. It will also host the PowerApps form that HR users use to submit onboarding requests when a new staff member is hired.
The SharePoint list can be created in an existing site, or you can create a new site to host it. A good option is to create the SharePoint list in a Team Site that is associated with an Office 365 Group. This gives you access to other Group resources for the HR team to use as well. For example, they can use the Group’s OneNote notebook to host their own user documentation for the onboarding process. The Group mailbox can also be used for receiving the email notifications that are triggered by Flow.
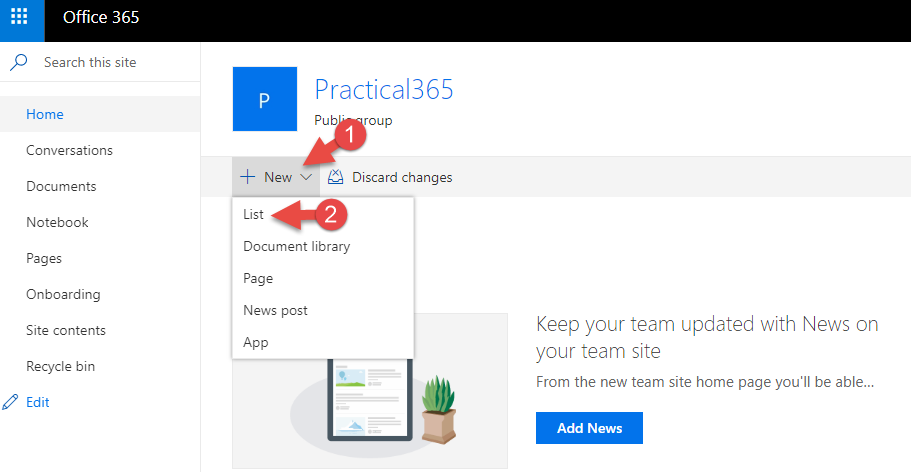
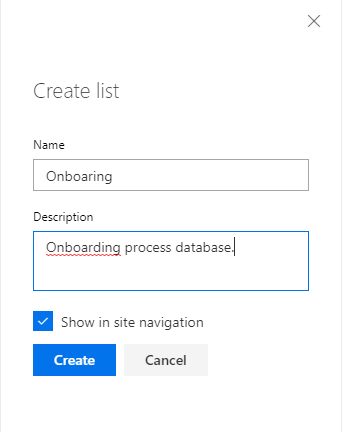
Give the new list a meaningful name and description, and allow it to be shown in the site’s navigation as well.
After the SharePoint list is created, we need to build the required fields to store request metadata. For this example, the form will have two sections:
- New hire details
- Associated tasks fields
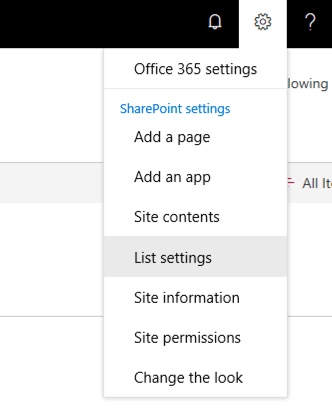
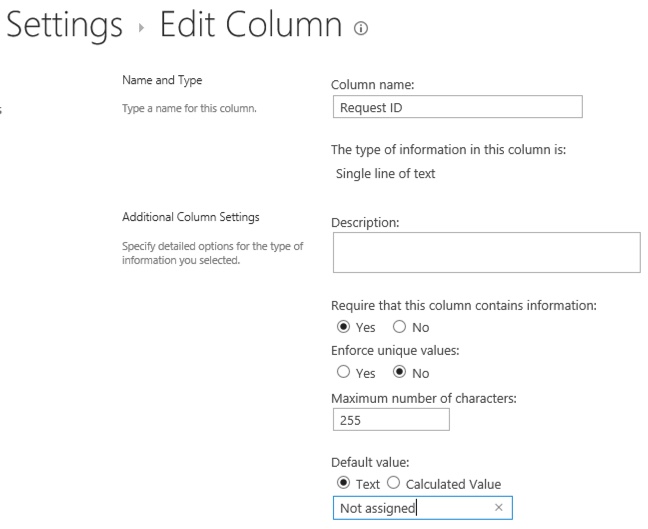
Every SharePoint list or library comes with a column named Title. This column is mostly used as a link to the details of the item. Rename the Title column to Request ID and set the default value to “Not Assigned”. To rename the field, open the Settings menu in the top right of your browser window, and select List Settings.
In the list columns, click on the Title column. Now you can change the column name and set the default value.
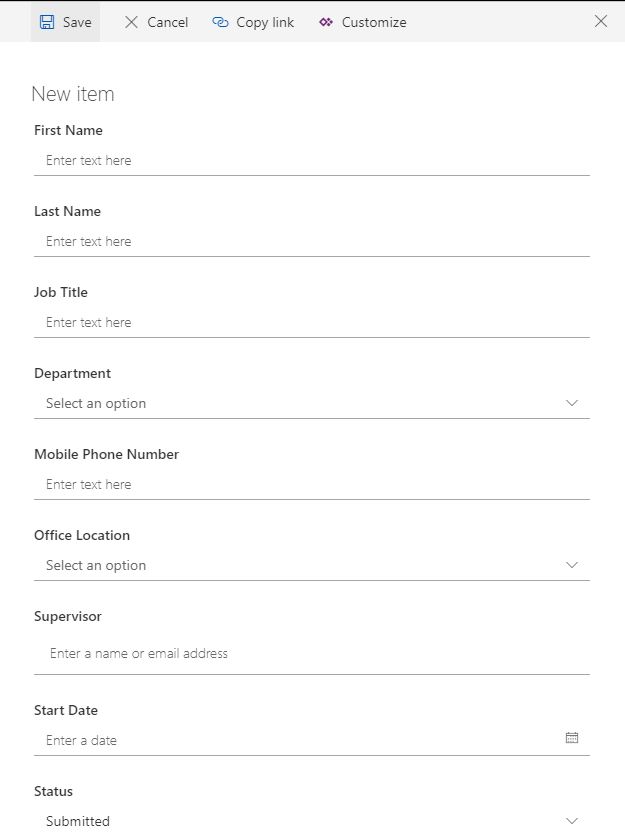
Next, add more columns to the list for storing the rest of the data about the new hire. Each column will become a field in the form that HR users fill out for new hires. In this example, I’m adding the following columns:
- First name (single line of text)
- Last name (single line of text)
- Job title (single line of text)
- Mobile phone number (single line of text)
- Department (choice, configured with a list of your department names)
- Office location (choice, configured with a list of your office locations)
- Supervisor (person or group)
- Start date (date and time, set to date only)
- Status (choice, configured with a list of request statuses)
When the HR user is filling out the form, those fields will look similar to the screenshot below.
Before we go further, I would like to highlight two of the important columns in that list.
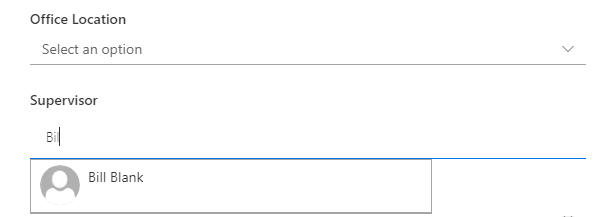
The Supervisor field is a person field. When the HR user starts typing a name in this field, SharePoint queries users from your Azure Active Directory and will display suggested results that match.
The Status field is a choice field with four options; Submitted, In Progress, Completed and Rejected. We’ll leave the default value set to “Submitted”.
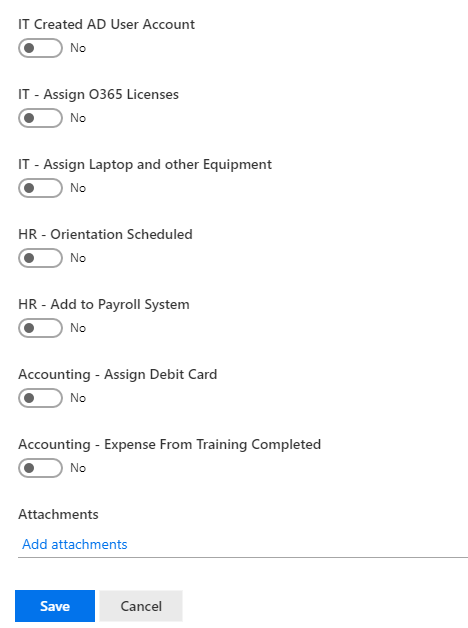
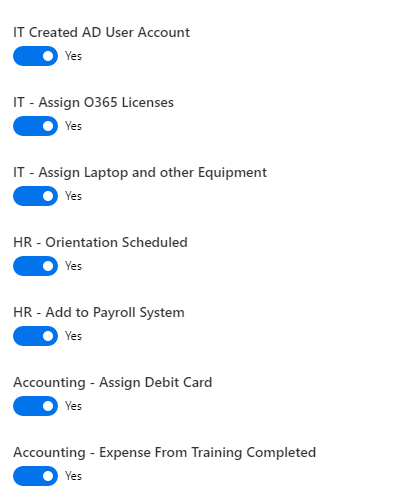
Ok, now let’s add some more columns that will become fields on the form. These are fields are added as Yes/No check boxes, and each refers to the tasks that a department has to complete. For this example, the following tasks are potentially required for each new hire:
- IT – Create Azure AD account
- IT – Assign Office 365 licenses
- IT – Assign equipment
- HR – Schedule orientation
- HR – Add to the payroll system
- Accounting – Expense form training
- Accounting – Assign debit card
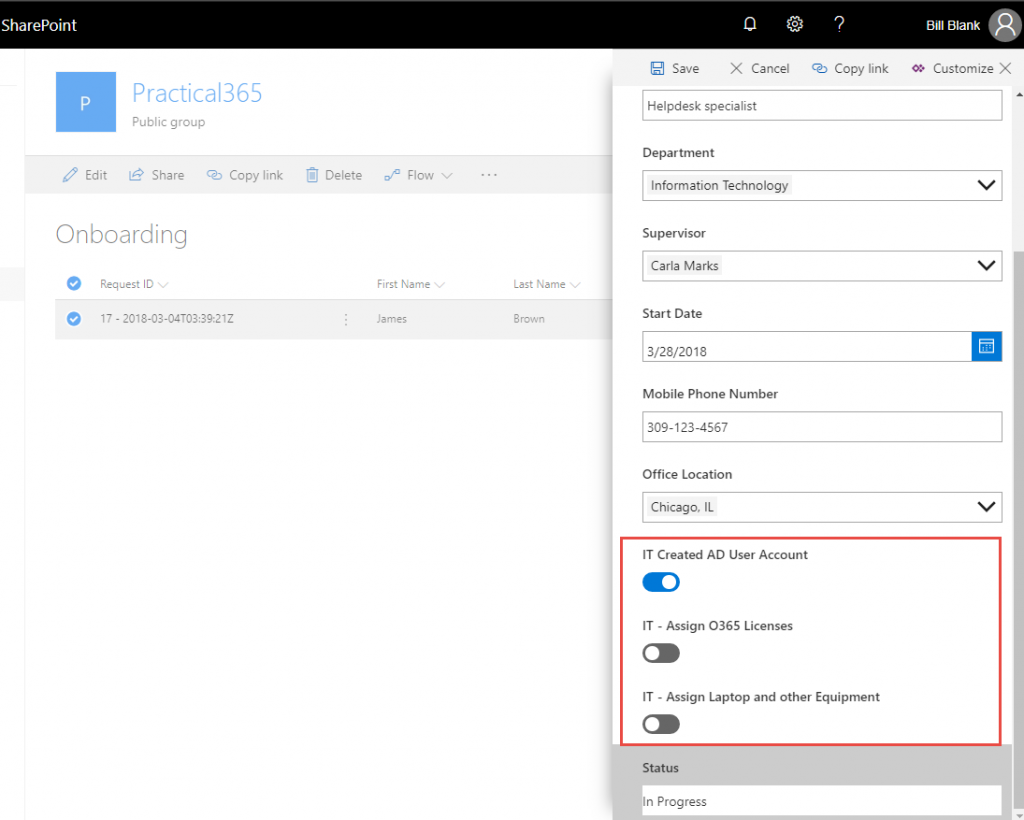
When the HR user is filling out the form, those fields will appear as toggles similar to the below screenshot.
We are done setting up the back end of our system in SharePoint Online.
Creating the Flow
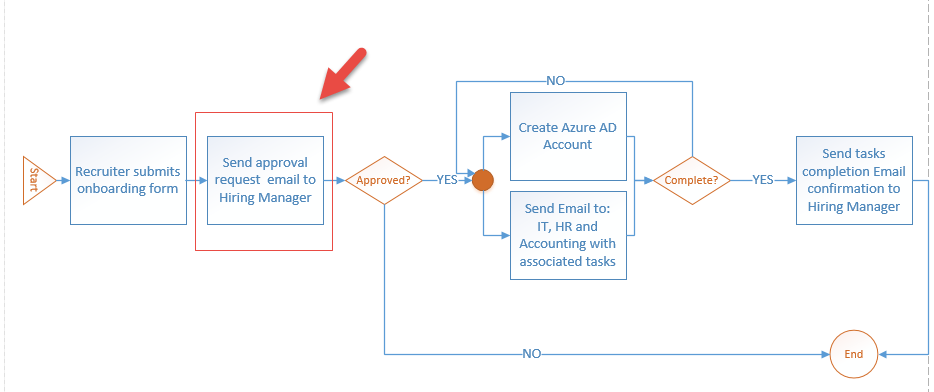
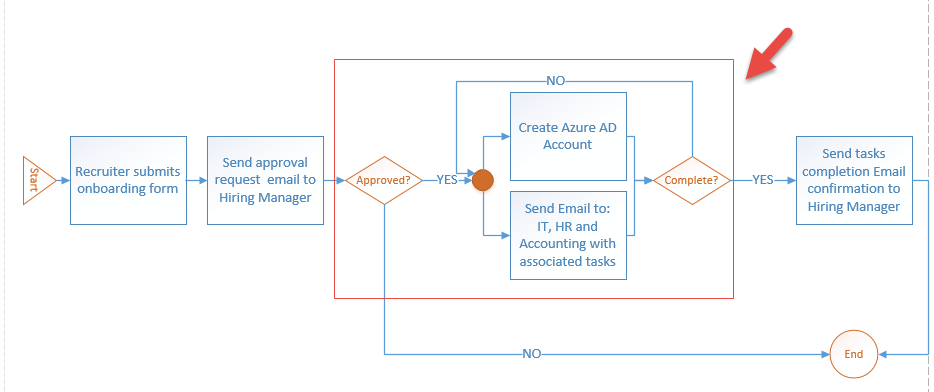
The next step is to implement the automated workflow for the onboarding process. We are going to use Microsoft Flow to achieve this. Based on our process diagram, submission of the form should trigger an approval request email to the hiring manager. In this example, the hiring manager is specified in the Supervisor field of the SharePoint form.
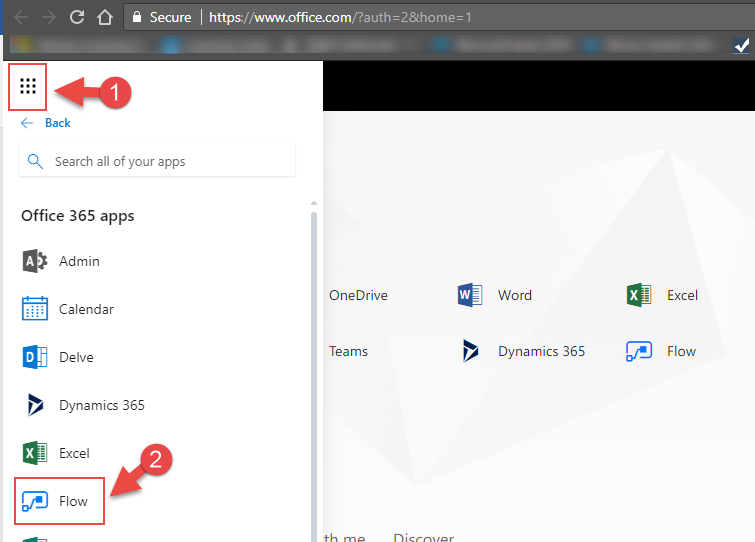
To create this Flow, in your Office 365 portal launch Flow from the waffle menu.
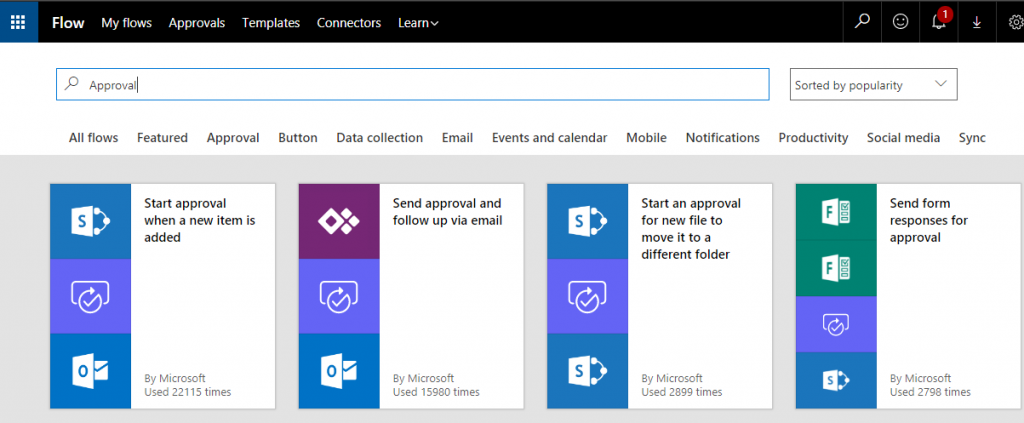
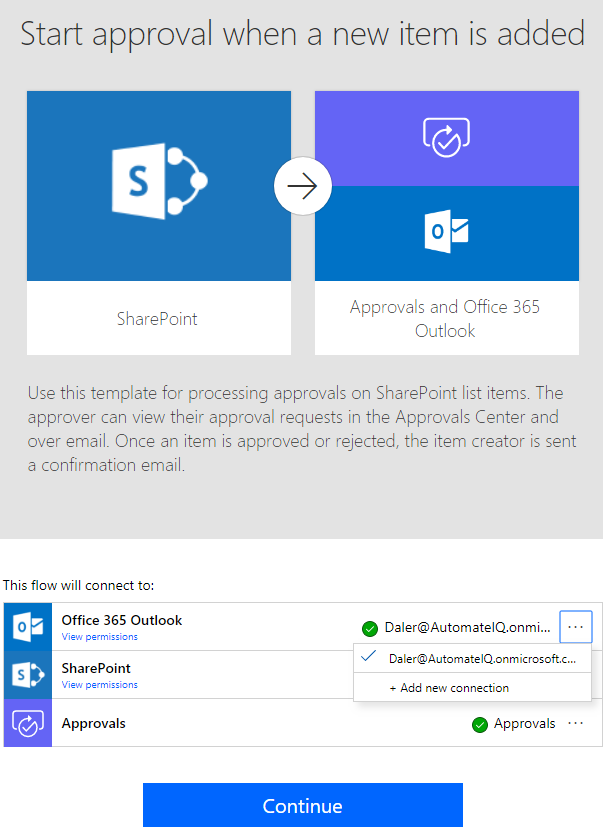
Microsoft Flow provides predefined templates to use as a starting point to build your custom Flows. For this example, I am going to use the “Start approval when a new item is added” template.
When you create a new Flow you will have the opportunity to change the credentials used to connect to services such as Exchange and SharePoint. For this demonstration I’ll just be using my test user account. In real world scenarios I would recommend creating service accounts to use in Flows. For example, use noreply@yourdomain.com or service@yourdomain.com. This ensures that Flow actions are not associated with a specific user’s account and can be managed by others in the future.
The Microsoft Flow template consists of four main parts:
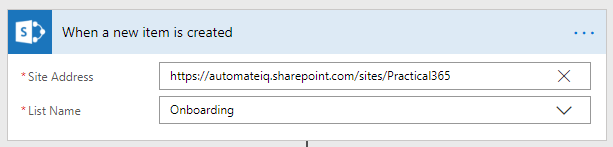
- Which SharePoint list should trigger the event
- The process to start an approval by assigning to a user
- Conditions, e.g. approved or rejected
- Condition outcome, e.g. if/then statements for the approved or rejected states

Enter the site address and list name for the SharePoint Online list that was created earlier.
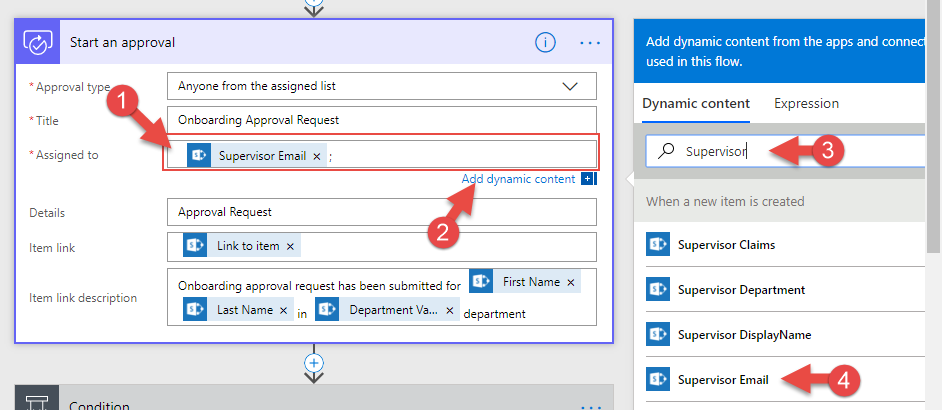
Next, let’s specify the approval path. There are three required fields:
- Approval type
- Title
- Assigned to
In our case, we will set the Approval type to “Anyone from the assigned list”. The Title can be whatever is appropriate for your workflow. Approval request will be sent to a new hire’s supervisor. The Supervisor’s name and email address are pulled from the SharePoint list by adding dynamic content to the field. Since Supervisor field is a “person” field type, there are multiple metadata available for this field. For this scenario, the “Supervisor Email” value is used to populate the Assigned to field.
The approval email message that will be generated can contain a URL that links to the request in the SharePoint list. Again, we can use dynamic content to add the “Link to item” value to the Item link field.
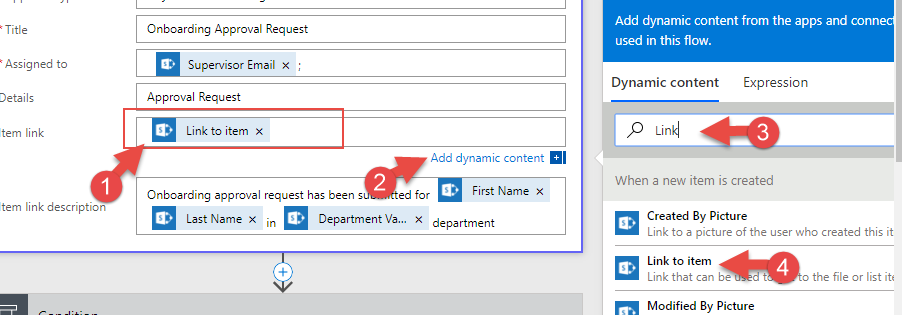
The Item link description field is also filled out using dynamic content.
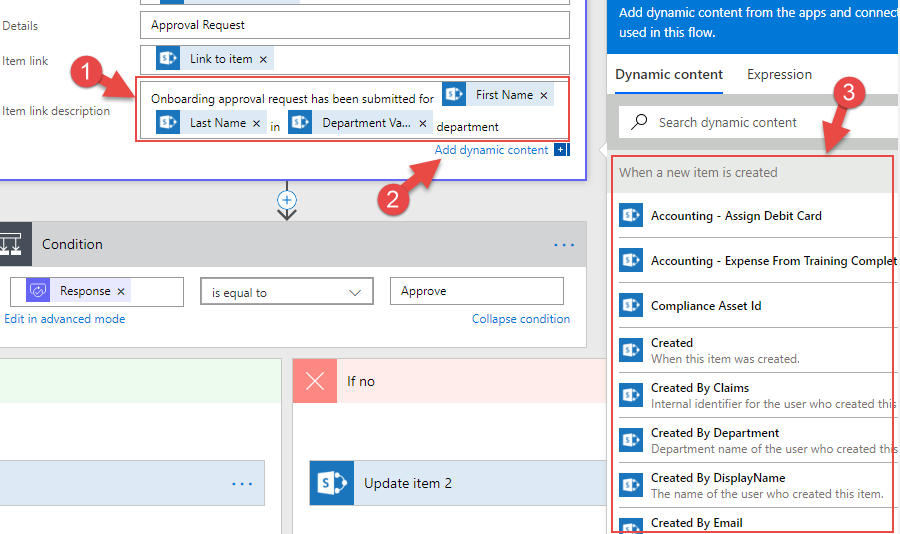
After setting the approval request email message, we need to set the condition for approval and rejection scenarios.
We are going to use the approval email outcome in the condition setting. If the response is “Approve”, then that is a “yes” outcome. If not, then the outcome is “no”.

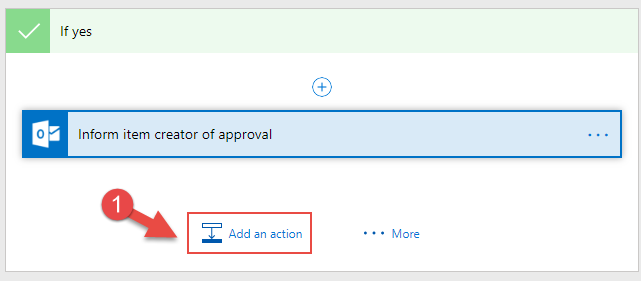
Let’s review the If Yes outcome and its actions. We can add as many actions in the scope of this outcome as we need to. Based on our requirements, we are going to:
- Update the Request ID SharePoint field from “Not Assigned” to “Unique ID + Date”
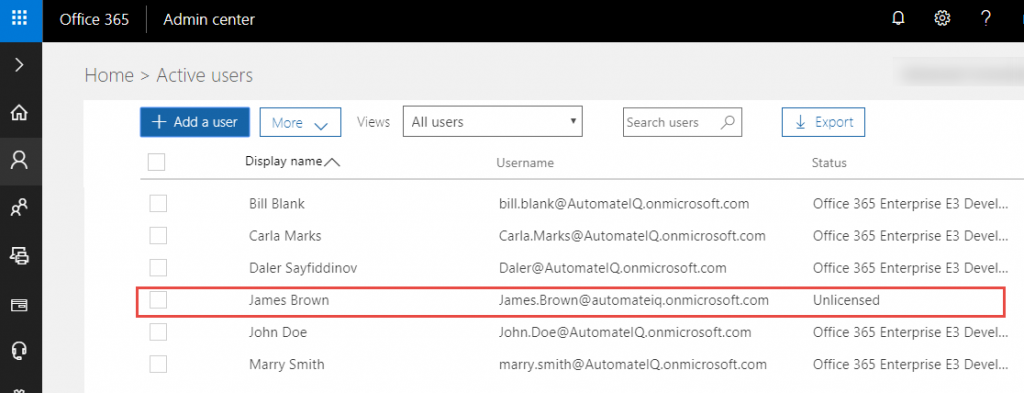
- Create the Azure AD account based on data provided in the form
- Update SharePoint List column IT – Create AD User Account field from “No” to “Yes”
- Send an email to the requester notifying them of the approval outcome
- Send emails to IT, HR and Accounting requesting to complete specified tasks

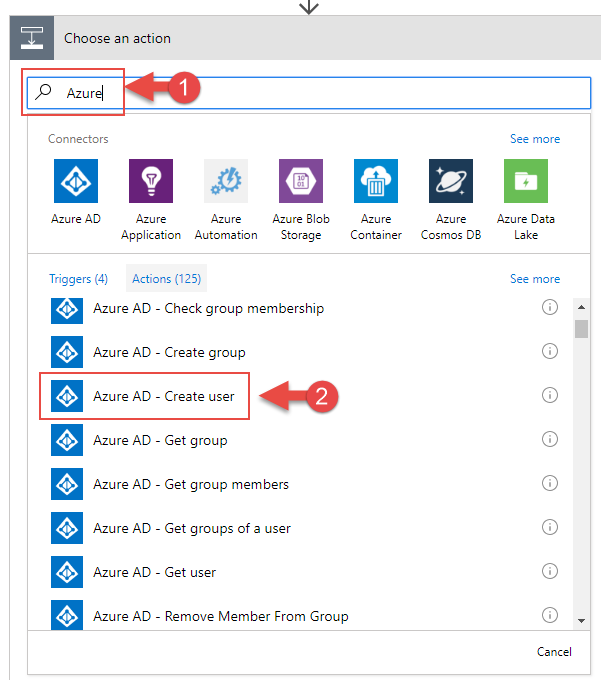
When you’re researching the capabilities of Flow, you can refer to this list of Azure AD Flow templates, and this list of SharePoint Flow templates for ideas about which actions are available.
To add actions to the outcome block of the flow, click on the Add an action button.
Then search for the action that you want to add to the Flow.
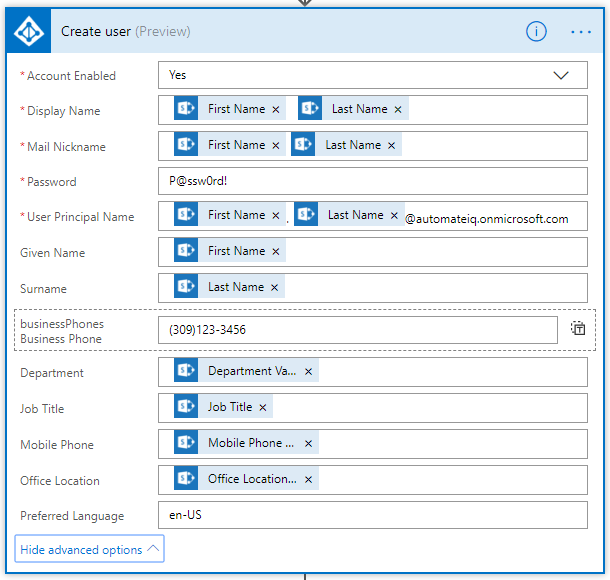
Let’s review the details for the Azure AD – Create user action. We are going to use dynamic data pulled from the SharePoint list to complete the user creation task.
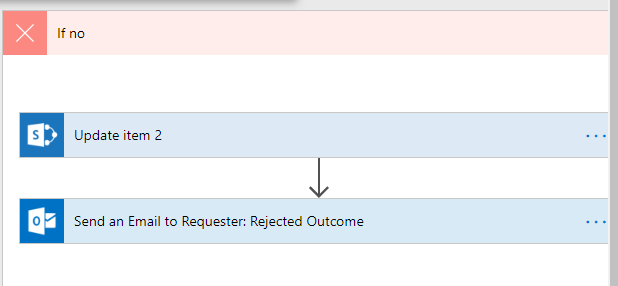
Now, let’s review If No outcome and its actions. Based on the requirements we are going to use the Update Item action to set the request status to “Rejected”. Then, we’ll send an email to the requester notifying that the request was rejected.
This is the end of the approval Flow.

Monitoring for Onboarding Task Completion
In the previous section of this article, we covered how to set up the automated creation of the Azure AD user account, and notify various departments so that they can complete their onboarding tasks for the new staff member.
The second part of this Flow is to send an email to the hiring manager when all of those onboarding tasks are complete.
I am going to create another Flow to check whether all tasks are completed, and if “Yes” send an email to the requester. The Flow will also set the Status of the request to “Completed” when all tasks are completed.
This Flow will be triggered by edit events on the SharePoint list. Whenever a SharePoint item is edited, Flow will be checking the state of each of the onboarding tasks.
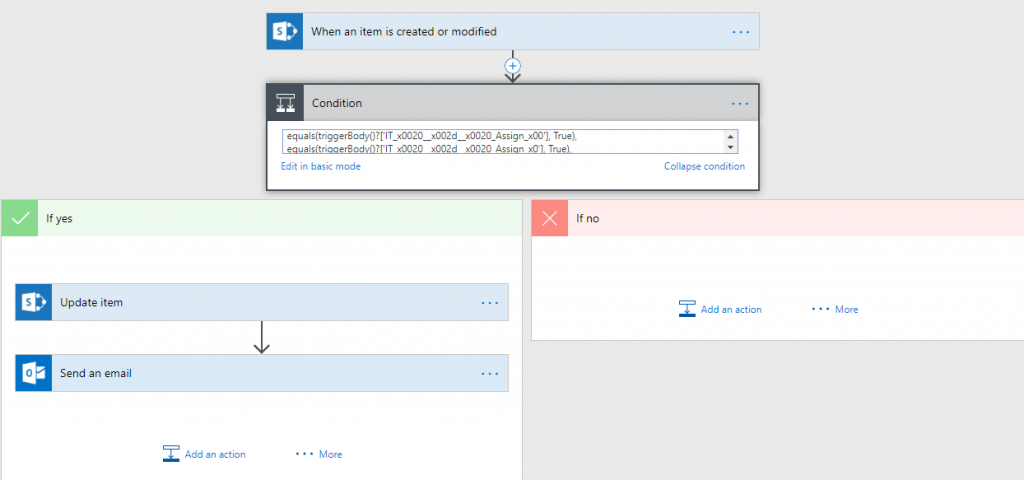
We are going to start with a blank Flow instead of using a template. After starting a blank Flow, add the trigger named “When an item is created or modified”. Enter the same URL and list name used to create the first Flow in this tutorial.
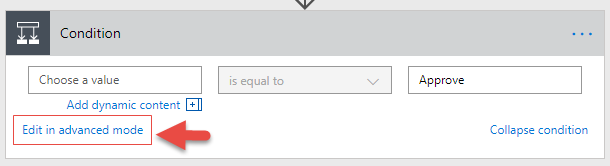
Next, click on Add Step add a new Condition block to the Flow. The tricky part here is to set the condition based on SharePoint fields value. As we can see in the screenshot below, certain fields have to be equal to “Yes” to get logical “true” outcome of the condition.
To achieve this, we need to switch the condition customization block to Edit in advanced mode.
This is what is going to be set in the condition block:
@AND (

    equals(triggerBody()?['IT_x0020_Created_x0020_AD_x0020_'], True),

    equals(triggerBody()?['IT_x0020__x002d__x0020_Assign_x00'], True),

    equals(triggerBody()?['IT_x0020__x002d__x0020_Assign_x0'], True),

    equals(triggerBody()?['Accounting_x0020__x002d__x0020_A'], True),

    equals(triggerBody()?['Accounting_x0020__x002d__x0020_E'], True),

    equals(triggerBody()?['HR_x0020__x002d__x0020_Orientati'], True),

    equals(triggerBody()?['HR_x0020__x002d__x0020_Add_x0020'], True)

)
It looks confusing but let me break it down for you to have better understanding what all this means.
@AND conditions mean everything inside of the brackets must return true in order to get overall “true” for the entire block.
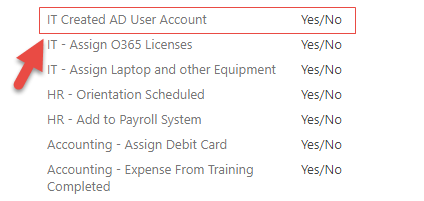
Each line inside of the brackets is a field in SharePoint. In our case, we are using a “Yes/No” SharePoint field for each task. The “Yes/No” and outcome translates into a logical language where “Yes” = true and “No”= false.
You will notice that the names of the fields are different from the display name in the form. This is because SharePoint creates an internal name which may be different from display name.
To access the internal name each field, navigate to the SharePoint list, open the Settings menu, and choose List Settings. Click on the field that you want to get the internal name for.
After navigating to the column’s details, look at the end of the URL string in your web browser, where you will find a value such as Field=IT_x0020_Created_x0020_AD_x0020_. That is the field name that must be used in the code block shown earlier.
The rest of the Flow is pretty straightforward. If the code block assesses that all of the task fields are equal to “Yes”, then we update Status field to “Complete” and send an email to the original requester.
All required Flows are built, so now we need to fine tune the SharePoint form.
Customizing the SharePoint Form Using PowerApps
The business rule requires that IT team should not be able to see HR fields and vice versa, but recruiter should see it all. To accomplish this requirement, we are going to use Microsoft PowerApps.
From your SharePoint list, click on PowerApps -> Customize forms.
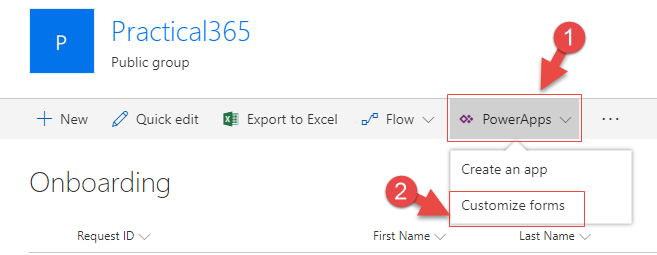
You will be redirected to PowerApps web app page.
In our business rule, we have four team members who control the onboarding process.
- Recruiter: Daler Sayfiddinov
- IT: Bill Blank
- HR: Marry Smith
- Accounting: John Doe
After you have opened the form in PowerApps, set the visibility property of each field.
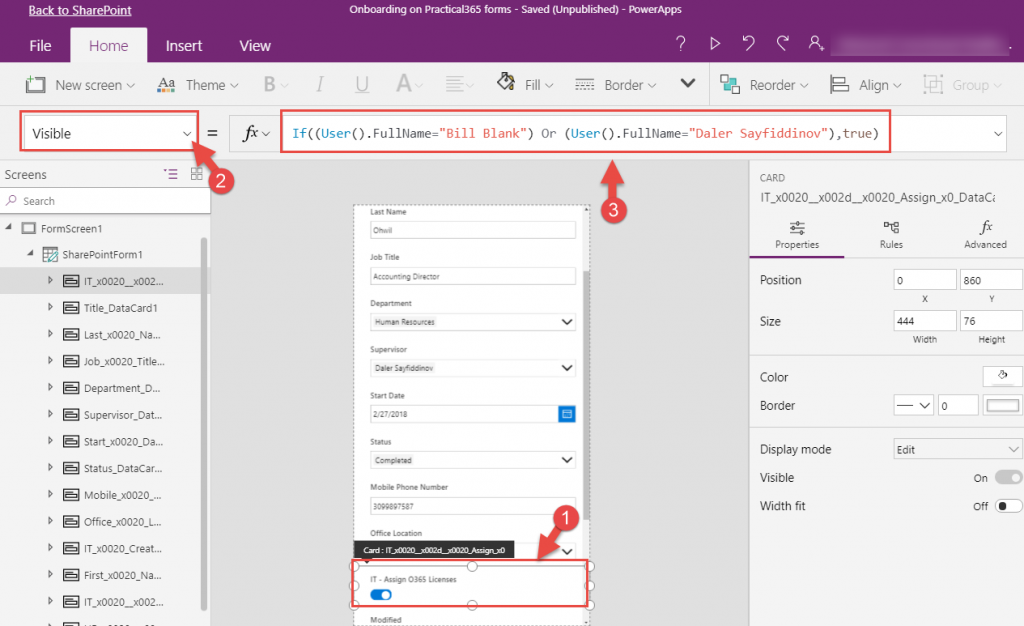
In the example shown above, the visibility of the Assign O365 Licenses is being restricted to Bill Blank and Daler Sayfiddinov by setting the following value:
if((User().FullName="Bill Blank") Or (User().FullName="Daler Sayfiddinov"),true)
Repeat this step for all fields. For example, the HR fields would be set to the following value:
if((User().FullName="Mary Smith") Or (User().FullName="Daler Sayfiddinov"),true)
For this scenario we also don’t want our end users to be able to modify the Request ID field since this is going to be our main identifier for the requests. Select the Request ID field and set the visibility to “false”.

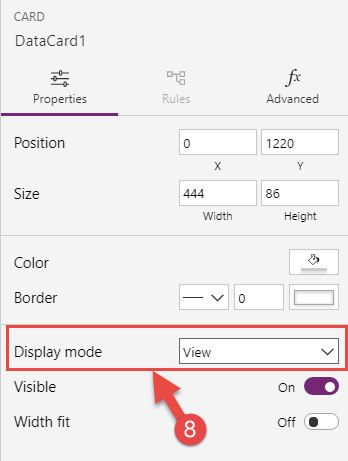
We will also need to set the Status field to read-only, so that only Flow can change the status of the request. To do that we need to select the Status field, then select Rules -> New Rule. Create a custom condition for the rule.
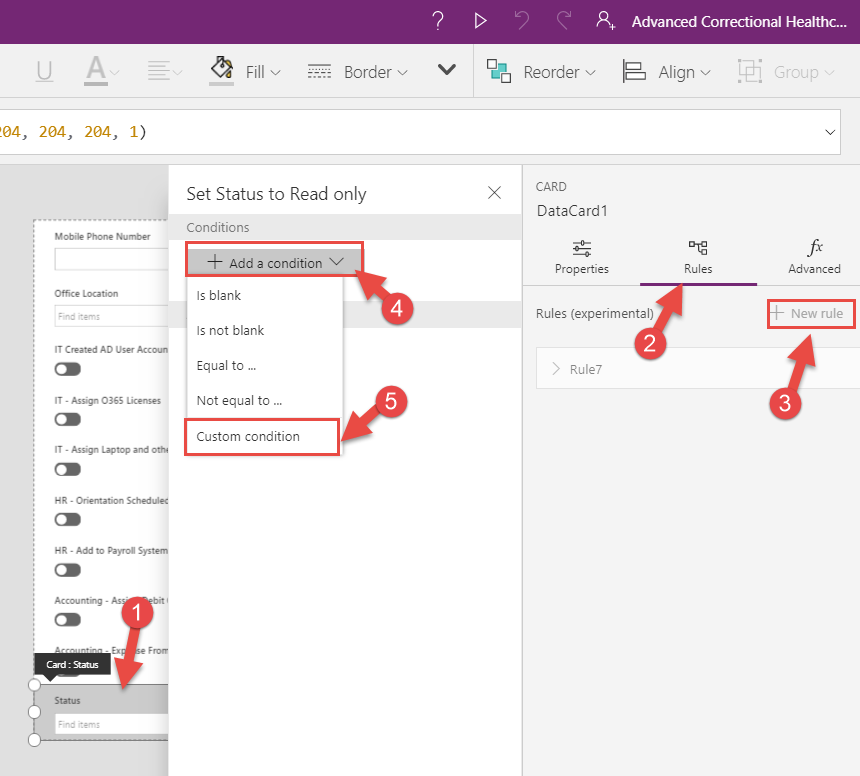
Each field in the form is referred to as a “datacard” by PowerApps. In this example, the Status datacard is “DataCard1”. The condition for the rule checks whether the datacard is visible (which will always be “true”).

The action for the custom rule sets the Display mode to “View”.
After completing all the steps, click on File -> Save, and then Publish to SharePoint.
We are all done and ready to test our onboarding solution.
Running the Onboarding Process
To see the onboarding process in action, Daler Sayfiddinov as a recruiter is going to submit a request by completing the form in SharePoint.
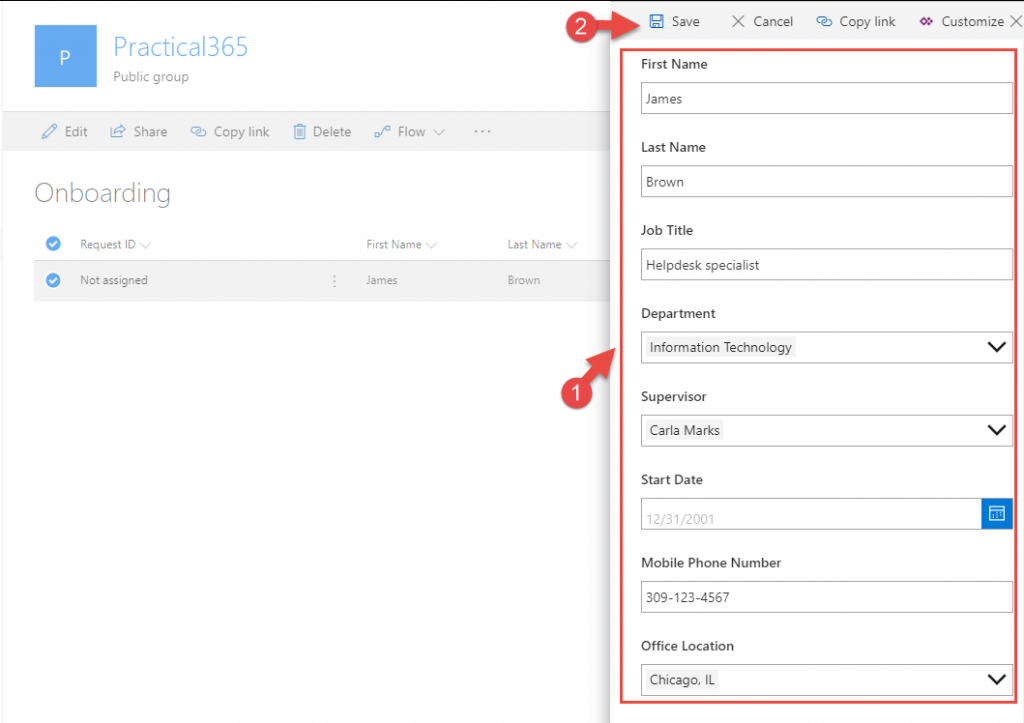
After submitting the form, the request item will appear in the view. You will notice that Request ID is still set to “Not Assigned”, because the supervisor did not approve the request yet.

Let’s log in as Carla Marks, who is the new employee’s supervisor. An approval request email has been delivered to Carla’s mailbox.
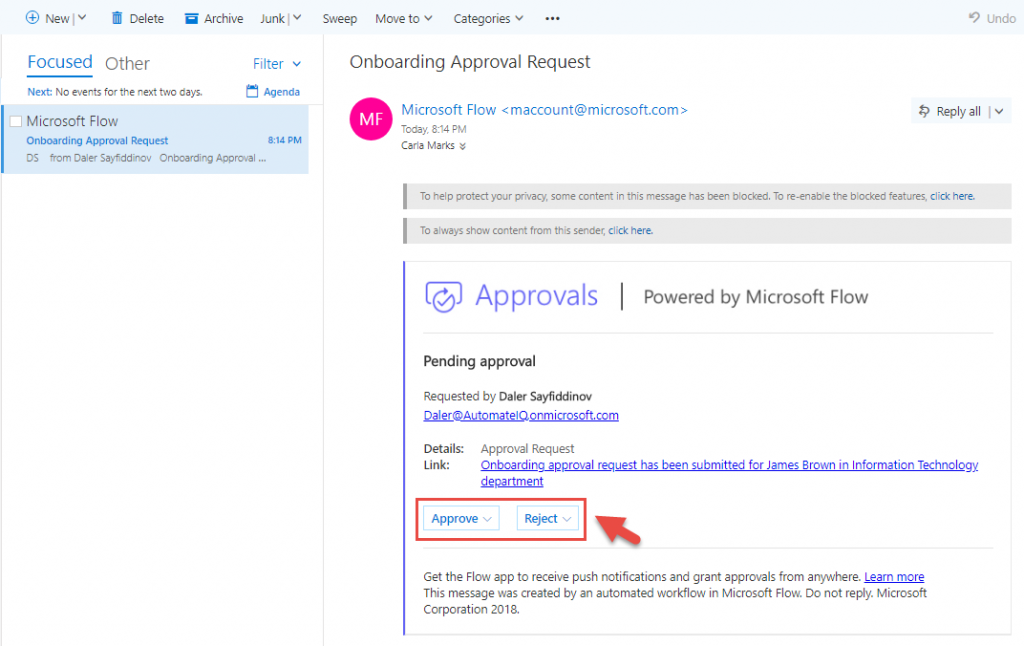
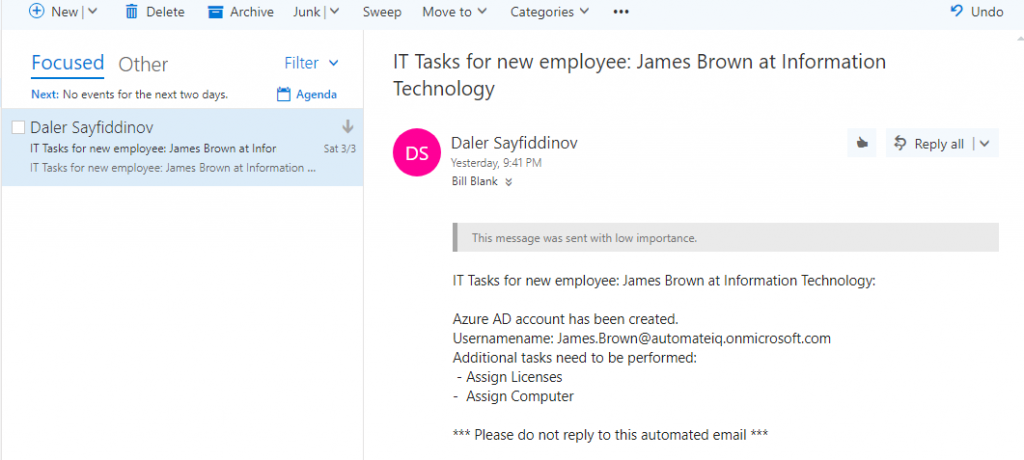
As you can see in the screenshot above, the supervisor does not have to leave Outlook to approve or reject the request. After successful approval, the Azure AD account has been created and emails have been sent to the requester confirming approval. Also HR, IT and Accounting received emails asking to complete additional tasks.
Now, let me log in as Bill Blank to see what he has received. In Bill’s mailbox, we have an email requesting additional tasks. The message of the email can be designed based on your company needs and requirements. It could just as easily be sent to a help desk email address, or you could enhance the Flow with more automated tasks, for example to assign group memberships based on the department attribute of the new user.
Let’s navigate to SharePoint to review the rest of the tasks and as we designed, Bill only has three tasks to complete.
Similar to Bill, other members of this process will receive an email with associated tasks and, thanks to the PowerApps customization we performed, the SharePoint form will display fields related to this team member only.
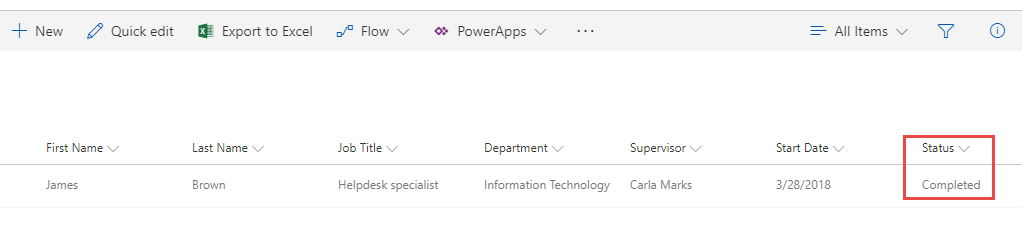
Let’s wait for all members to complete their tasks. As soon as the last task is completed, the status of the request automatically switches to “Complete” and a confirmation email will be sent to the original requester (recruiter).
Summary
In this tutorial I’ve demonstrated the automation of a moderately complex onboarding process for new staff members. The process uses SharePoint Online, Microsoft Flow, and PowerApps to establish a secure account creation process for the organization. This is an example of how you as an IT professional can leverage the tools available in Office 365 to create custom apps and workflows for your organization, all without writing a single line of code.
Photo by Jehyun Sung on Unsplash


Pingback: Creating New Microsoft 365 Accounts with PowerShell
Hi Daler,
Thank you for the great article. I just wanted use python instead of Power shell, do we have any reference script for the same.
Has there been any change from Microsoft that would simply the process?
Hello Daler, thats a great article and the one which I was looking for long time! Thank you for sharing this. I have a query though, how can we make sure that UPN is unique and there is no user with the same UPN already? I have observed that the flow gets failed if there is already an user with the same UPN.
Thanks in advance!
Hi,
Need to design a IT service user access form with three approval levels, Please let me know what is the bast way to develop that.
Hi Great Article, Any idea about user de-provisioning ?
Send Forms to the manager for User laptop/Mobile/Access Card collection and confirmation.
As
Good information. I am new to Cloud (365). My organization required us to shift to SharePoint Cloud.
Background -Current status – I have developed on premises (desktop) Share Point List and used Nintex form and workflow to submit request for legal advice to Legal Service Group. It is in production and management reports are produced. –
Questions
I have 8 sections in the form with navigation to and form each sections.
1. How to divide the form into sections. Each section has specific information (fields) to fill – example Section-1 – Requestor Details; Section 2 – Request Issue Details. Section 3 -Prioritization Details; Section 4 (Legal Advisor details) and 5. Project Reporting details; Section 6-Peer Review Section 7 Litigation Details and Section 8 Learns Learnt.
Q.2 How to hide (not visible) sections 3 to 8 from the requestor submitting the request.
Q3. When the requestor types his/her login ID ( in Section 1) the other fields likes job title, business and work units to be auto-filled by drawing the information from the Active Directory details
Action requested – Would you please answer my questions – 1,2 & 3. Appreciate your help and support
Hi,
great tutorial: Just one question: I would like to set visibility of form fields based on what Azure Security group the the user is a member of (otherwise, I need to reconfigure the form when e g recruiter leaves the organisation).
To do that, I need to change this:
if((User().FullName=”Bill Blank”) Or (User().FullName=”Daler Sayfiddinov”),true)
to … I do not know what?
Hi Daler,
Great article and something that gives us insight and makes us wonder if what we want can be achieved. While your article is a great start and gives me hope I have one question, because in our example when HR Business Partner fills in the new employee form like your Recruiter here, our HR wants that after HR Business Partner fills in what they need to fill in, Manager/Team Leader should get notification and go to this same form and fill in rest of the fields that only manager can fill. Also, manager should not see all the fields that HR BP filled, only selected, is this possible? Then when Manager fills and submits/saves, then emails go to IT, HR, Payroll with the information and they should confirm if their task is done.
Can you help out here? 🙂 Is it possible to have two people fill in same form and only after that initiate all the actions?
Thanks for posting this great article.
I am following the steps (December 2019) and things don’t match, as someone who is testing Power Automate I was wondering if anyone can update the article to reflect the ‘flow’ changes?
Hi Daler Sayfiddinov,
Thank you so much for publishing this article. I am new to SharePoint, flow so learning little bit here. I have a question under “Monitoring for Onboarding Task Completion”, when i create new blank flow, it has three choices (Automate from blank\Instant from Blank\scheduled from blank), which one do i need to select to follow you.
2nd question: when you add condition, there is no edit in advaced mode, where do i need to put @and () block script.
thanks again
Thanks Daler,
for sharing all this knowledge.
I have a question on your statement: “For this demonstration I’ll just be using my test user account. In real world scenarios I would recommend creating service accounts to use in Flows. ”
In our organisation we are a bit concerned with security and we are trying to move on to the next level thanks to Microsoft deliveries in other domains like Intune, Azure AD, Conditional Access. We try to “evangelise” our colleagues of the well founded of Multi Factor Authentication and we try to sell a password-less story for users.
As sad as it is, we cannot enforce any of those security features of any service account. At least that I know.
In practice we are allowing a username with a more or less complex password to create users in our AD (and very likely to do much more), without any chance to enforce any modern security control.
I know I may look a bit paranoid, but I take this great article to see if there is really no alternative option to service accounts nowadays.
Of course the issue is not around the automation you are achieving so brilliantly, I simply cannot resign to the idea that all this can only be achieved with service accounts.
I can understand that legacy/aged application/SW running on server are bounded by such issue, but for pure SAAS solution it is a bit disappointing.
Thanks in advance for your feedback.
Nicola
Great feedback. If you have a set of users (secure) with rights to manipulate Azure AD , you can share the Flow with them and they can run it with no issues (Make sure that Flow and SharePoint list is shared with these users).
If you want to create a more advanced solution you can use Flow and PowerShell. Basically calling PowerShell scripts stored in Azure Automation from Flow is another approach. I wrote a blog post that describes how to achieve the concept. (Actual blog post is about licensing but you can use it to do more)
here is the link:
https://www.practical365.com/microsoft-365/how-to-run-powershell-scripts-to-automate-manual-processes-in-office-365/
Hi Daler,
thanks for your feedback and for your link o the other post on automation.
Unfortunately I am not yet able to address our concerns, but Ihave made some step forward. And it is fair to share our respective feedback s.
I give it a try with Azure LogicApp instead of Flows and I managed to get half way.
I also asked Azure for support.
To recap:
We are trying to automate a workflow that monitors the creation of an item on a SharePoint List and that sends a notification email via a Logic App.
We are using Send grid connector for email notification .
But in the first logic step ” When an item is created” trigger, the only option available to connect to the relevant SharePoint site is with a username and password.
We want to achieve this without relying on users’ accounts or on service accounts and we are looking for a way to connect to SharePoint Online with a Managed identity or anything else that is not a username/password.
The reply from Azure support was
“We regret to inform that connecting to SharePoint online via Managed Identity authentication is currently not supported”
https://docs.microsoft.com/en-us/azure/active-directory/managed-identities-azure-resources/services-support-managed-identities
I believe my quest is well funded, and I trust that sooner or later we will come to a solution
Thanks
Hi Daler,
thanks this great article. is there a way to create a similar flow, but instead of creating new user, it is to block an O365 account or reset password or remove license.
it this possible?
thanks
Yes, you can achieve this by calling PowerShell scrip from Azure Automation using Flow. I wrote an article on Practical365 on how to call PowerShell from Flow. The article was written for different purpose but you can use the concept.
https://www.practical365.com/sharepoint-online/how-to-use-azure-automation-with-sharepoint-online-part-one/
Hi Daler,
Great article, but where not using this Sharepoint form, because it’s not as fancy and easy as MS Forms to create. More important, MS forms is also available for every company member.
We’re using this MS Forms for New Employee Requests. This data will be added to a sharepoint list via ms flow and a mail will be send out to the required people(IT) to create it’s account also via a separate flow.
Within this MS Form the Manager which does this request selects some other managers to approve from a drop down list. So these names will go to the Sharepoint list as plain text and not users or e-mailaddresses.
My question:
Is it somehow possible(via MS Forms or via a MS Flow based on filled in Manager names) to automaticly get people or emailaddresses in this Sharepoint list so we can create an approval Flow based on the people/addresses within this Sharpoint list?
Or do we have to create a workarround?
KR,
Tom
Yes you can achieve this many different ways. One way is If you use people picker column in Sharepoint and pass person’s name (plain text) from MS form and populate that plain text to SP people picker field, Sharepoint should accept it and after you can use object in the rest of your workflow.
Has the new article come out yet? Will it include any tips about getting this working with On-Prem AD in a hybrid environment?
New article is coming out this week. It will include steps to run PowerShell from the cloud( which you can call
From Flow). It will definitely give you directions on how to achieve your goal.
Regards, Daler
Did the new article come out showing how to do this for a Hybrid environment? All my accounts need to be created / configured on-premise first then sync to Azure using AD Connect.
Hi Jeremy,
The article on how to set up Hybrid Remote worker to run cloud stored PowerShell scripts against on-premises will be released in the next week or so.
Thanks
Oh, I forgot to comment that today the process of creating accounts and enabling mailbox either on Exchange On-premises or Exchange Online is done via powershell running on my DC server.
If you want to look at the code I can send you by email.
When new article will come out this week, it will provide with some ideas on how you can enable this logic using Azure Automation.
Daler,
Congratulations on the article!
I would like your help on how to implement your solution in the scenario I have.
In my case, I need to create users in my Active Directory in the on-premises environment, then I have to make the following decision, if the user of the trading team needs to enable their mailbox on Exchange On-Premises if the user is not of the trading team his mailbox will be created in Exchange Online.
In your solution how can I put some step to put this creation for Exchange On-Premises?
In a couple of weeks, I will be expanding this blog post and show how to assign O365 licenses. Stay tuned.
Daler
Great post – thanks Daler! What about getting 0365 licenses automatically assigned as soon as user has been created in Azur AD? What’d be your recommendation? It’d be fantastic getting this step included into the same flow.
Blog post is coming next week.
I added a step in the flow
to run PowerShell remotely.
Just check Practical 365 website
Hi Ahmad,
To solve your licensing issue you will have to use Azure Runbook powershell script and call it from Flow. I am writing a blog post on how to do that in the next couple of weeks.
To solve the second task, you have two options:
1. Use Get-AD user and the Update AD user actions to disable user using Flow
2. Or use Azure Runbook powershell to decommission AD user Account and call the script from Flow.
If you will follow my upcoming blogpost on licensing using Azure Runbook powershell, then you be able to figure out the rest.
Daler
Hi Daler,
Thanks for this article, I just have 2 tasks please help solve them :
1. after creating Azure AD user, it doesn’t has proper O365 Licences, so how to assign O365 license to this user using the same flow, so it will be next step after creating Azure AD user?!
2. If I want to make same flow just instead of creating user it should delete user (in case of resignation) so how to do it ?
Appreciate your support!
Hi Daler,
Great and useful article.
What if the UPN is first name initial last name? How do you go about creating that email address in the Azure Account creation flow?
You will have to use Compose action to manipulate the string. It all depends how you store employee’s name. There are many ways to achieve this.
For example, if you store employee’s name in two separate SharePoint columns (FirstName and LastName), before you create user account in Azure AD, create a variable called “Name” and store data from SharePoint column FirstName. Next add a Compose action and add this expression (make sure to switch to Expression tab of the Compose Action)
Expression : first(variables(‘Name’)) where “Name” is a variable name. This action will extract first letter.
Next add another Compose Action and use Concat expression. to combine SharePoints Lastname field with the output of your Compose action and domain name.
Daler
Hi Daler,
Thanks for the steps in automating onboarding process. Please how do i automate users into department groups?
To do that you will have to use Azure actions in Flow. When you create a user account in Flow, then you will have to get that user’s internal id. Next, you will need to use get group action and again you will need to know that group’s id. And the third step is to add a user to a group action using data from two previous steps.
I hope that helps.
Regards, Daler
Please can you help on this? Your guide is out of date.
Thankyou, Conditions Response is no longer available either. Can you update this guide please?
Thanks
Hi, this is great but I can’t find “Start an approval” at all, all I have is Create an Approval (V2), Start and wait for an approval, Start and wait for an Approval (V2), Wait for an approval (V2).
And even when i choose one of these and see the Approval Type, how on earth do you enter in that text (Anyone from the assigned list) because its invalid.
Thanks,
Hi, either use “Start approval when a new item is added” Flow template or add Create an Approval (V2) and select “Approve/Reject – Everyone must approve” from approval type dropdown.
Microsoft constantly updates the product which affects the user interface.
Thank you
Don’t users need special permissions in Azure AD to create new user accounts?
Yes, you will have to run the flow using an account which has this privileges . I usually have service account with appropriate rights.
Regards,
Daler
Im unable to understand this.
1. Update the Request ID SharePoint field from “Not Assigned” to “Unique ID + Date”
Are you able to post your full flow, im not sure how i can create a Unique ID + Date.
The article is really good.
If I’m correct, I think he meant that literally. Just change the text???
That didn’t work out as planned so I pulled the data dynamically from SharePoint 😀
Pingback: download
Hi Daler,
It’s Gr8 Article….
I was about implement the same, so before that i was check all pre-requisites but i have found that PowerBI service is only available on Office365 E5 plan…. So can you let me i know creating this flow we need to have PowerBI Service?
Regards,
Nitin J Panchal
Hello Daler. Thank you for putting this article together. I have already utilized quite a bit of it.
You had briefly mentioned the ability to add a user to a group based on their department. I have not been able to find that in the available Flow actions. The closest I’ve found is a static add to group function that requires the ID for both group and user. Have you made any other guides with that would explain how to do that part? I am still searching but I may have exhausted my search skills already.
Thanks again!
Pingback: dasar permainan judi bola online
Hello sir,
Im new in SP & Powerapps. Thank you for a great article. But, Im stuck on this steps…
if((User().FullName=”Bill Blank”) Or (User().FullName=”Daler Sayfiddinov”),true)
I got “ParenClose” error. Pls. help me.
And pls. add more guide to following steps.
*Update item
*update AD account status
Thank you.
Great article, i’m learning a lot from this guide.
Thank you!
Hi,
Great write up!
How do i create the Send emails to IT,HR,Accounting. I cannot seem to get this to work. The email ends up with no information on the list items.
Please advise? Your assitance is greatly appriciated!
Great article Daler!!!
As always, great job! You are AWESOME SAUCE!
Great article..
Good stuff, but I’m confused on the ID portion. It states to use Unique ID + Date and I can’t figure out where that info is coming from other than not assigned. Do we have to use this?
I’m stuck on that part as well.
Thanks for the article. I really think that everything except the account creation can be used fine in production with larger scale user base. As of the above comments, many use hybrid deployment, also there is a challenge to find out if a given UPN is not already used and what is done if an error occurs, etc. But the whole approach shows potential, especially when Microsoft will give use more power to also perform actions on-premise, or even executing powershell scripts (passing the credentials).
Excellent contribution Daler!
Great article, but how do you handling the case when the organzation hired a second John Smith?
Great, question..
Practically, I would add Middle initial field in the SharePoint form as an additional differentiation between users and create user accounts in Azure AD as First.MiddleInitial.Lastname.
But if you want to handle it differently, then you would add some logic in your SharePoint form. For example you will set additional calculated field FirstName+Lastname, and set this field as unique filed in SP, then every time when you submit new request SharePoint will check and throw an error if name already exists.
You can also handle it in Flow by checking if user exists in Azure AD first (Get User Action in Flow) and then decide either to send an email to requester or do something else.
Thank you
Clever. Thank you.
Absolutely incredible article . Recommend it to everyone, easy to read and follow, amazing job !
Great article and very easy to follow.
Thank you
Awesome article! Great job! This will be very beneficial to help others. The step by step instructions was particularly helpful.
Great article and well explained step by step how to complete this task!
Great article!!! =D
Paul,
Thank you for the great article. Can this only be used on Cloud only environment? How about a DirSync/ Hybrid environment?
ironically my name matches the original requestor and the same is my query as well…
Does it suit a hybrid deployment and what would be the process round Re-Hires wherein we are needed to provide their Old accounts ?
This is great question:
Steps to accommodate this use case:
– Create additional field in your SharePoint form (Re-hire: Yes/No). This filed will differentiate between new hire and re-hire
– Add additional logic in your Flow based on Re-Hire field
– If Re-Hire= “Yes” then use Azure AD Actions in Flow. Flow has two Actions that you would need to use: “Get-User” and “Update User”
– Using “Get-User” query user account based on First and Last name of SharePoint form
– Then update using “Update User” action – set Account Enable = Yes.
For more details on available Azure AD actions visit this link: https://us.flow.microsoft.com/en-us/connectors/shared_azuread/azure-ad/
Thank you
Yes, currently this use case is only for Azure Active Directory (Cloud AD). Hopefully in a near future Microsoft will allow us to create an on premises connector and ability to manipulate on premises AD user accounts without huge effort.
Thank you for your comment.