
This article provides guidance for configuring Exchange Server 2019 as an anonymous relay and updates the 2016 and 2013 articles covering this scenario. We document how to configure Exchange Server 2019 as an anonymous relay within your own network using your internal network ranges to limit who can relay email.
What Anonymous Relay Does
Anonymous relay is a common requirement for organizations which want to allow services or applications to send SMTP email, including Multifunction devices such as printers and software applications. Organizations using hybrid deployments can also benefit from the ability to relay email anonymously using Exchange 2019 servers instead of a generic SMTP server. Microsoft’s documented pre-requisites for Exchange hybrid deployments include support for Exchange Server 2019, which further strengthens the case for using Exchange 2019 servers.

Test Framework
If you’d like to test this scenario in a lab, then we have a treat for you. We created a reproducible lab using the AutomatedLab framework. The Exchange 2019 lab for our scenario includes a Domain Controller, Exchange 2019 server and a Windows 10 client machine. These lab scenarios are NOT meant to be connected to the internet, but to replicate the steps outlined in this article.
The AutomatedLab framework provides extensive guidance on how to get started, which I’m not going to repeat here. However, here at Practical 365 we have done a fair bit of work to provide a repeatable experience to get started. We have created a section on getting started, which will grow and become more detailed as the update articles progress. You can find the guidance here.
The Practical 365 follow along lab configuration
Our lab contains three machines:
| Name | Role | IP Address |
| Lab2019DC1 | Windows Server 2019 Domain Controller | 192.168.12.3 |
| LAB2019EX1 | Exchange Server 2019 on Windows Server 2019 | 192.168.12.4 |
| LAB2019Client | Windows 10 Domain joined client | 192.168.12.5 |
Internal relay or open relay?
An Internal relay is an SMTP server or service configured to accept email from an internal source and relay it onward to a destination. That destination could be your on-premises Exchange organization, an Office 365 tenant, or if your IT policies allow, external email domains.
An open relay is a misconfigured email server allowing connections from anywhere and accepting email for any domain. Open relays tend to be found by the purveyors of spam, who take over the system to send large quantities of email and end up being blocked or blacklisted.

Handling SMTP Traffic
When configuring an anonymous relay, we should know where SMTP requests come from, either because we have designated subnets of allowed services, such as servers, printers, applications, etc. or in a less structured environment, we know the individual IP addresses of the machines which require SMTP relay. Obviously clearly defined subnets are easier to work with, however, we can accommodate a list of IP addresses as well. We will cover both scenarios further below.
Name Spaces
Name spaces are an important design consideration allowing you to future proof a service, as well as scale it out at a later date. Consider that we may design an SMTP name space called relay.company.com as a load balanced name space, using either a DNS alias or a load balancer. We could also add a geographical component, such as relay-sea.company.com or relay-lhr.company.com, in this case using the Seattle and London Heathrow airport codes as part of the naming convention.
Why do we care about creating a name space if we only have a single machine? We do this to future proof our design by abstracting the service we create from the machine name delivering the service.
Consider a branch office scenario in Seattle with an Exchange 2013 server which we would like to upgrade to Exchange 2019. If our printers and applications were configured to use EXSEA2013 as the SMTP relay, as opposed to SMTPSEA.company.com, then we need to reconfigure many points configured to point towards a server, as opposed to swapping out the old server for a new one behind a name space.
In our lab, we first create a CNAME record: mail.practical365lab.com pointing to our Exchange 2019 server, LAB2019EX1 (Figure 1), using the DNS console on Lab2019DC1:
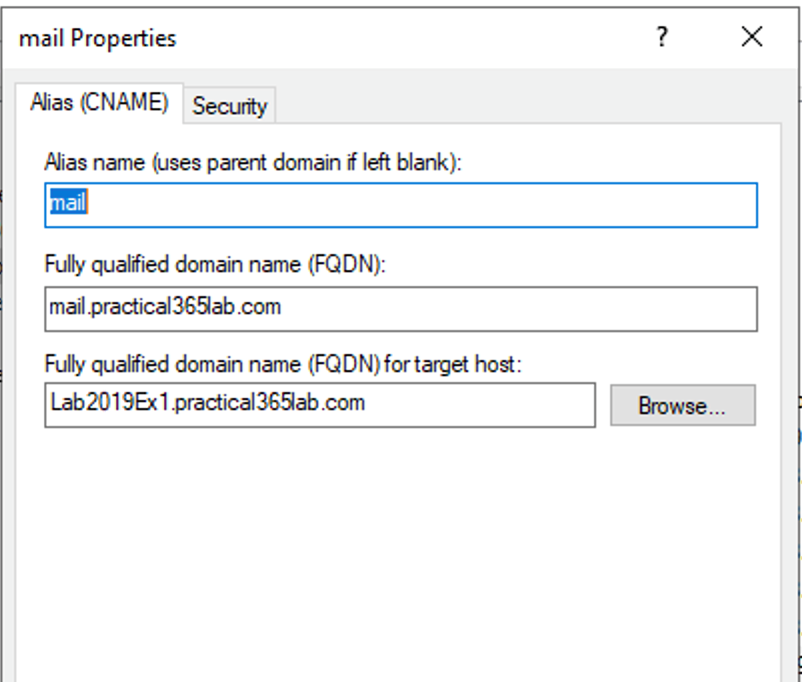
Figure 1: CNAME record for our namespace
Exchange 2019
The Exchange Server 2019 architecture deploys Exchange servers as a single building block, containing front end and back end roles. Front End Transport and Transport services are co-located on the same server. When you install a new Exchange 2019 server, several receive connectors are created, including the default receive connector to allow Exchange to receive email from the internet. We’ll examine details of the default receive connectors briefly and then ignore them as we create a dedicated Anonymous Relay connector.
Let’s start by examining the default connectors on our Exchange 2019 server (LAB2019EX1) via PowerShell and the Exchange Administration GUI.
Get-ReceiveConnector

[PS] C:\>Get-ReceiveConnector

Identity                                      Bindings                  Enabled
--------                                      --------                  -------
LAB2019EX1\Default LAB2019EX1                 {0.0.0.0:2525, [::]:2525} True
LAB2019EX1\Client Proxy LAB2019EX1            {[::]:465, 0.0.0.0:465}   True
LAB2019EX1\Default Frontend LAB2019EX1        {[::]:25, 0.0.0.0:25}     True
LAB2019EX1\Outbound Proxy Frontend LAB2019EX1 {[::]:717, 0.0.0.0:717}   True
LAB2019EX1\Client Frontend LAB2019EX1         {[::]:587, 0.0.0.0:587}   True


[PS] C:\>
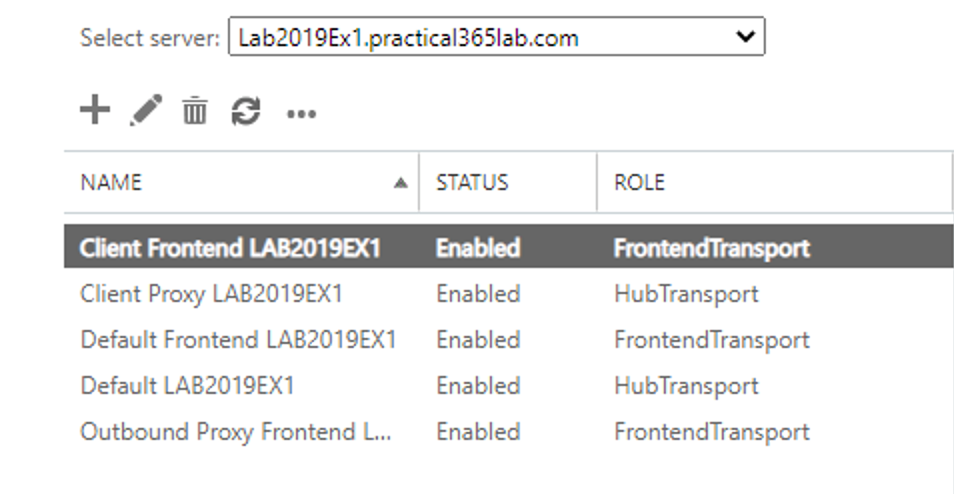
In the Exchange Admin Center navigate to mail flow and then receive connectors. Select the server that you want to view the receive connectors:
Dedicated Receive Connector
We are going to create a dedicated received connector for anonymous relay from specific internal IP addresses. This is a better idea than modifying the default receive connector configured to receive email from the internet. Not modifying the default receive connectors prevents servers from inadvertently becoming open relays.
In our lab, our internal address range is 192.168.12.0/24, however we don’t want to configure our connector to accept connections from the entire subnet. For the sake of the article, we will assume that AB2019Client with IP address 192.168.12.5 is our application server/Multifunction Printer. For the sake of demonstration, we assume that the 192.168.20.0/24 range is configured for printers requiring SMTP relay services and configure our connector accordingly. This allows us to demonstrate adding cherry picked IP addresses as well as entire subnets to secure our connector.
Issue the following PowerShell command to create and configure the connector:
#Create a new Front End receive connector called "P365 Anonymous Relay"
New-ReceiveConnector -Name "P365 Anonymous Relay" `
-TransportRole FrontendTransport -Custom -Bindings 0.0.0.0:25 `
-RemoteIpRanges 192.168.12.5, 192.168.20.0/24

#Configure "P365 Anonymous Relay" to be used anonymously
Set-ReceiveConnector "P365 Anonymous Relay" -PermissionGroups AnonymousUsers
Get-ReceiveConnector "P365 Anonymous Relay" | Add-ADPermission -User "NT AUTHORITY\ANONYMOUS LOGON" `
-ExtendedRights "Ms-Exch-SMTP-Accept-Any-Recipient"

#Configure "P365 Anonymous Relay" as externally secured
Set-ReceiveConnector "P365 Anonymous Relay" -AuthMechanism ExternalAuthoritative `
-PermissionGroups ExchangeServers
Below is the PowerShell output for the above commands:
[PS] C:\>#Create a new Front End receive connector called "P365 Anonymous Relay"
[PS] C:\>New-ReceiveConnector -Name "P365 Anonymous Relay" `
>> -TransportRole FrontendTransport -Custom -Bindings 0.0.0.0:25 `
>> -RemoteIpRanges 192.168.12.5, 192.168.20.0/24

Identity                        Bindings     Enabled
--------                        --------     -------
LAB2019EX1\P365 Anonymous Relay {0.0.0.0:25} True


[PS] C:\>
[PS] C:\>#Configure "P365 Anonymous Relay" to be used anonymously
[PS] C:\>Set-ReceiveConnector "P365 Anonymous Relay" -PermissionGroups AnonymousUsers
[PS] C:\>Get-ReceiveConnector "P365 Anonymous Relay" | Add-ADPermission -User "NT AUTHORITY\ANONYMOUS LOGON" `
>> -ExtendedRights "Ms-Exch-SMTP-Accept-Any-Recipient"

Identity             User                 Deny  Inherited
--------             ----                 ----  ---------
LAB2019EX1\P365 A... NT AUTHORITY\ANON... False False


[PS] C:\>
[PS] C:\>#Configure "P365 Anonymous Relay" as externally secured
[PS] C:\>Set-ReceiveConnector "P365 Anonymous Relay" -AuthMechanism ExternalAuthoritative `
>> -PermissionGroups ExchangeServers
[PS] C:\>
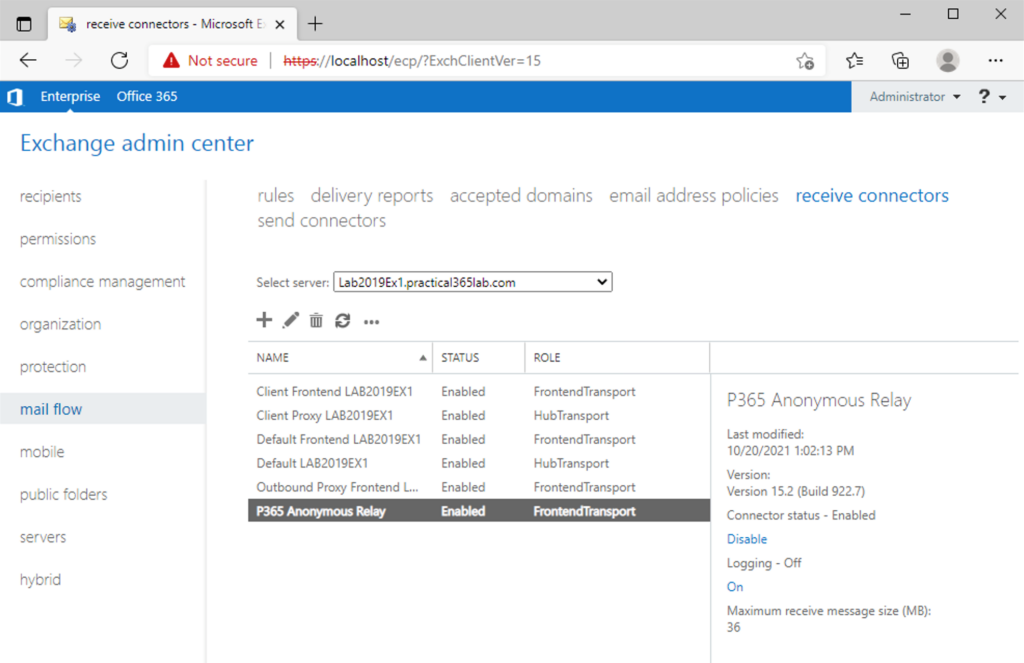
We can access the connector via the Exchange Administration Console, by navigating to mail flow and then receive connectors:
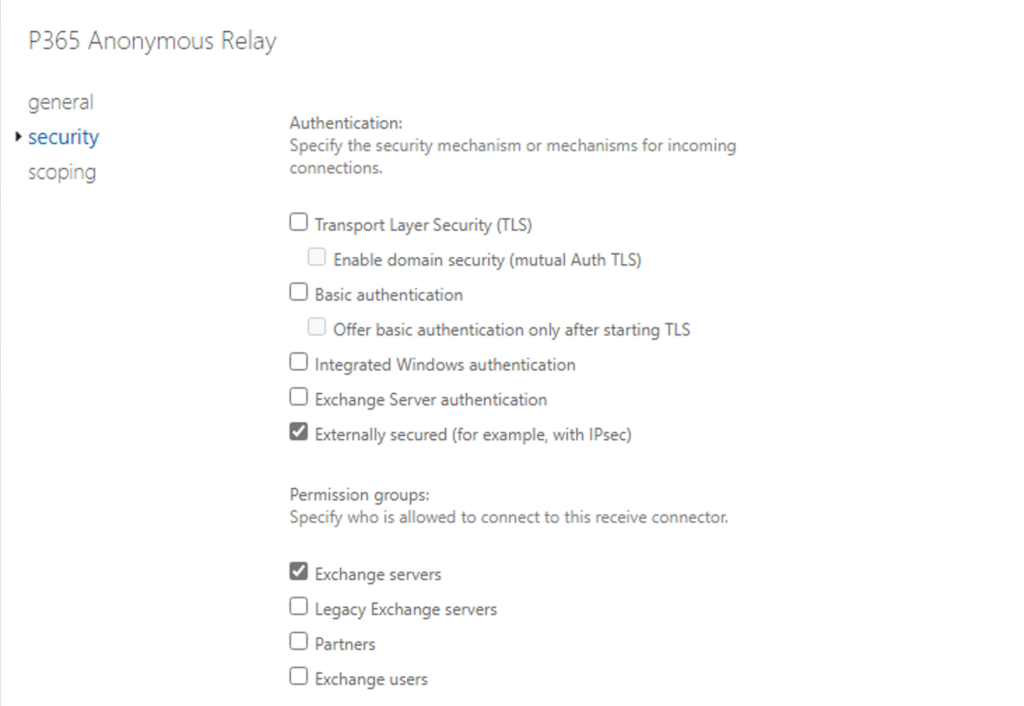
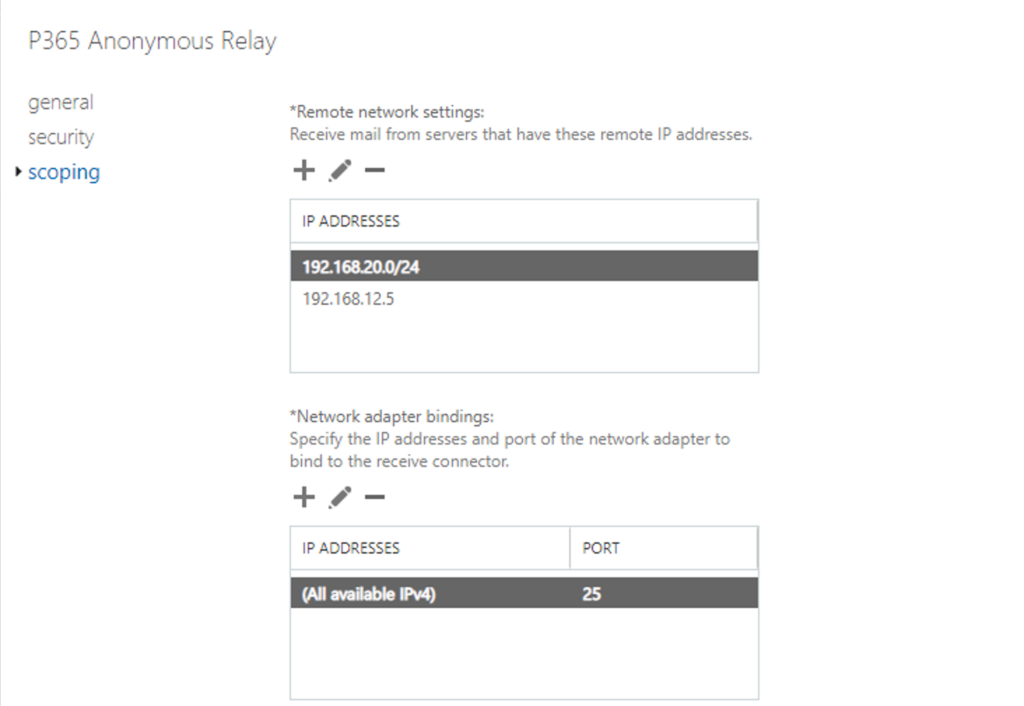
Double click on the new connector, click on security to validate and then scoping to view the security:
And network settings:
How do we know it worked?
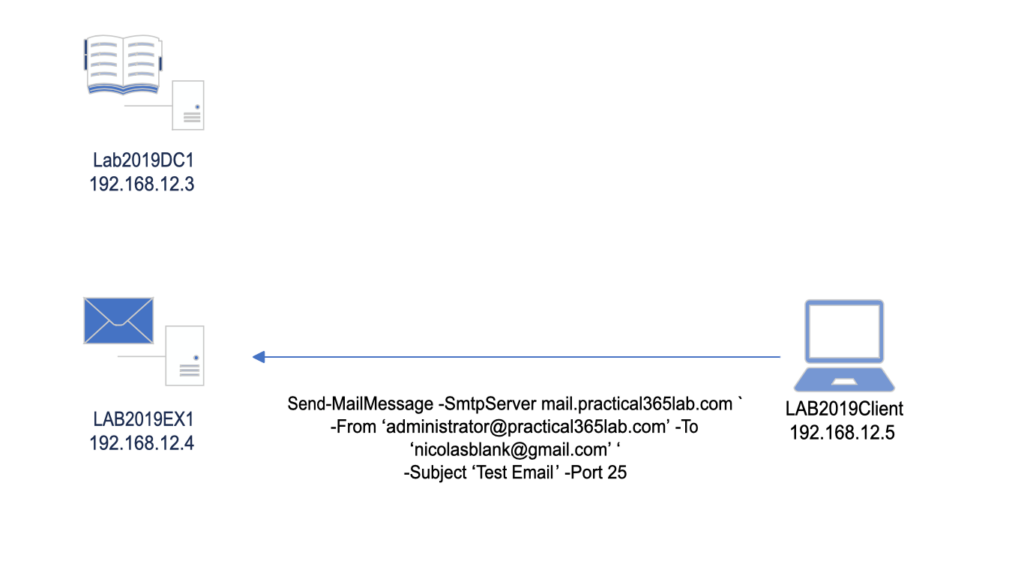
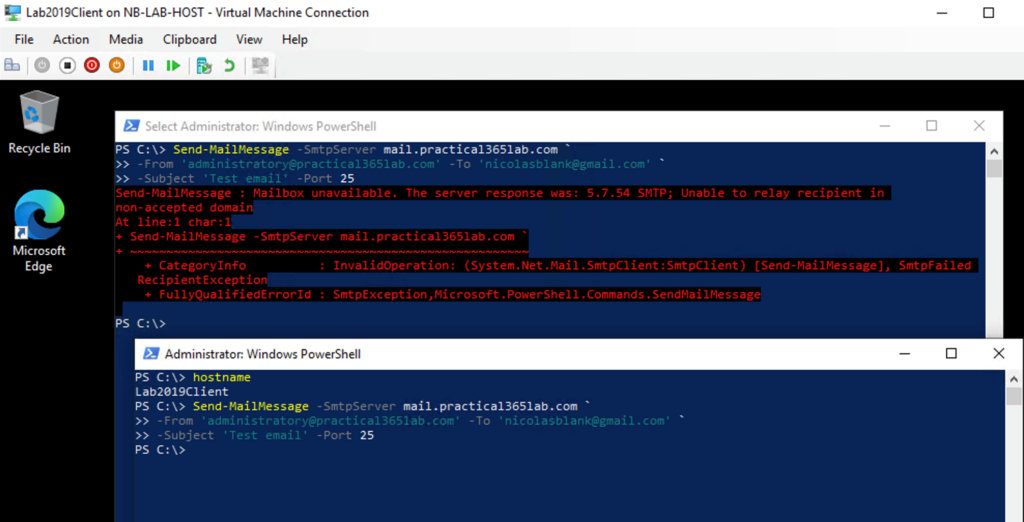
Below we see a test from our application server Lab2019Client using Send-MailMessage to test our connector from the LAB2019Client machine. Before we created the connector, we were unable to relay email anonymously, after creating the connector, the test succeeds.
Testing using PowerShell
Figure 6 below shows the output of our testing using PowerShell’s Send-MailMessage cmdlet:
Send-MailMessage -SmtpServer mail.practical365lab.com `
-From ‘administrator@practical365lab.com’ -To ‘nicolasblank@gmail.com’ ‘
-Subject ‘Test Email’ -Port 25
Testing using Telnet
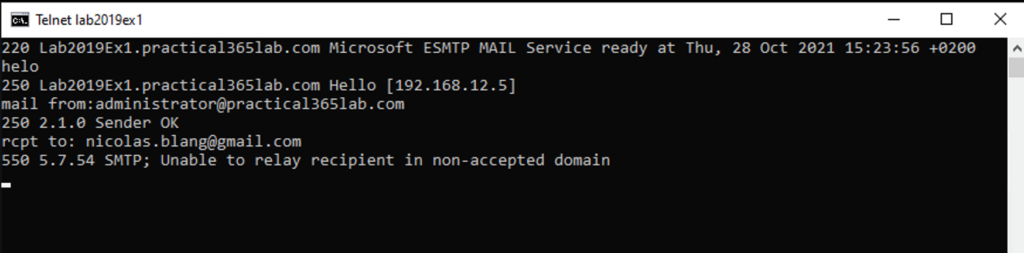
Testing using Telnet – before configuring receive connector shown below in Figure 7. We expect our telnet test attempting to relay mail via the Exchange 2019 server to fail, and it does.
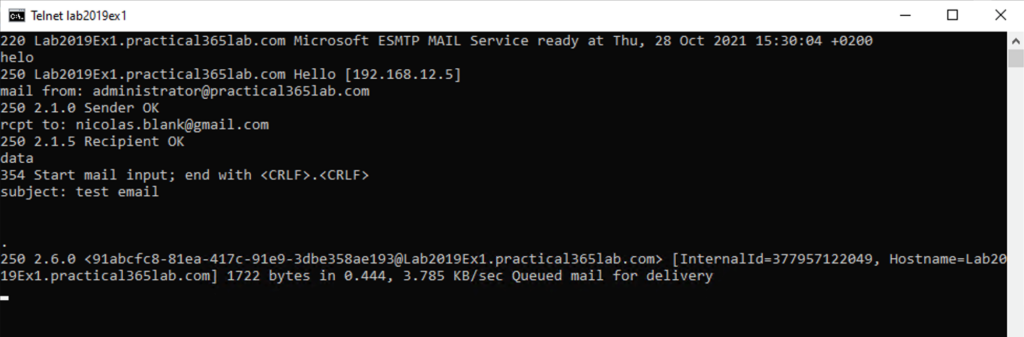
Testing using Telnet – after configuring receive connector shown below in Figure 8. This test concludes successfully with the mail message received by Exchange 2019 and queued for delivery.
Ongoing maintenance
Since we created a DNS alias for mail.practical365lab.com, we can replace the Exchange server responsible at any time with a newer version, or configure multiple Exchange servers behind a Virtual IP Address hosted by a load balancer.
Since we used PowerShell to create the connector, we are able to replicate the creation logic to as many servers as we need to.


Great stuff Nic. Clear and to the point. Sadly not as easy as it should be really and often Organisations just end up defaulting to an open position due to the lack of ease to set this up.
The isuse we are havoing is wehn we install Exch 2019, clients want to connect to that server and we don’t wnat that – only SMTP – is an EDGE TRANSPORT not a betetr choice on the Intranet to relay email from Oracle, SQL and Printers ?
Hi Peter,
Exchange 2019 can only be found by clients if it can be found, specifically via Autodiscover. Consider deleting the Autodiscover SCP record in Active Directory and in DNS that’s pointing towards Exchange 2019, if they exist that is.
Listen here. These are the worst instructions I have ever seen in my entire life.
What makes you say that? These instructions are accurate and super clear to me. What didn’t you like about them?
Well-written and clear article.
We have a hybrid environment with an Exchange 2016 on-premises server.
The default Anonymous Relay connector has been modified to use the scope to limit access. I have been successful using this to send email external addresses, but not internal.
I slightly modified your PowerShell commands so that the new connector was on port 26. I am still unable to send mail to internal (o365) recipients. Does it work for you?