Learning to Create and Update Tasks in a Planner Plan Using PowerShell
One of the most useful ways of tracking changes made by Microsoft to the Microsoft 365 workloads is to synchronize message center notifications from the Microsoft 365 admin center to Planner. This ability to synchronize update post to Planner first appeared in 2020 and I have been using it ever since. Although synchronization is easy to setup and configure and generally works well, I decided that it would be a nice learning challenge to replicate the synchronization using PowerShell and cmdlets from the Microsoft Graph PowerShell SDK.
This article describes my experience of using the Graph SDK to synchronize notifications posted to the Microsoft 365 admin center to become tasks in a Planner plan. The concepts and techniques explored here can be used to update any Planner plan. You can run the script in an interactive Graph SDK session if your account is a member of the group that owns the target plan. If not, you’ll have to use application permissions with a registered Entra ID app and authenticate with a client secret or X.509 certificate.

Synchronization 101
The basic idea is:
- Define a target plan.
- Find new announcement items.
- Create new tasks for the announcement items in the target plan.
I wanted to give my version of the synchronization some bells and whistles that the standard version doesn’t support, so I added:
- Automatic assignment of tasks to designated team members.
- Automatic update of tasks with labels (Planner supports up to 25 different labels per plan).
- Add a target date for each task.
Let’s see how these steps unfold.
Defining a Target Plan
To make things simple, the script defines two variables for the target group and plan. The target group (which owns the plan) is defined by its group identifier. The target plan is defined by its display name:
$GroupId = '78b47932-b35f-4b26-94c2-3228cb234b07'
$TargetPlanName = 'Admin Task Assignment'
Finding New Microsoft 365 Message Center Notifications
Message center notifications are called service announcement messages, part of the service health and communications Graph API. The SDK cmdlet to retrieve service announcement messages is Get-MgServiceAnnouncementMessage. Another example of using this cmdlet is to figure out how many announcements made by Microsoft end up being delayed for one reason or another.
This code shows how the script fetches service announcements and then filters the items to find those with a start date greater than the check date. Logically, to make sure that synchronization works as it should, the check date should be the date of the last run.
[array]$AllAnnouncements = Get-MgServiceAnnouncementMessage -Sort 'LastmodifiedDateTime desc' -All
[array]$AnnouncementsForPeriod = $AllAnnouncements | Where-Object {$_.StartDateTime -as [datetime] -gt $CheckDate}
If ($AnnouncementsForPeriod.Count -eq 0) {
    Write-Host ("No new message center posts found since {0} - exiting" -f $CheckDate)
    Break
} Else {
    Write-Host ("{0} message center posts found to process..." -f $AnnouncementsForPeriod.count)
}
The next step in the script creates or updates tasks. We’ll come back to how that happens soon.

Automatic Assignment to Plan Members
For simplicity’s sake, let’s assume that a plan belongs to a Microsoft 365 group. The members of the group are also plan members who can be assigned tasks. The script does this by defining an assignee for each category of service announcement that it expects to process. Categories include Exchange, Teams, SharePoint, Viva, and so on. Assignments are made by finding a member of the plan listed in the membership information returned by Get-MgGroup. This gives us a member display name that we can use with Get-MgUser to return a full user object, including the object identifier (a GUID) that’s used to assign a task.
$SharePointAssignee = $PlanMembers.additionalProperties | Where-Object mail -match 'Rene.artois@office365itpros.com'
$SharePointAssignee = (Get-MgUser -UserId $SharePointAssignee.userPrincipalName) | Select-Object -First 1
Later, the script uses a Switch statement to interpret the services described in a service announcement to assign responsibility to a group member. If everything works, the script should create a task for any announcement for SharePoint Online and assign it to the SharePoint assignee.
Automatic Assignment of Labels
As mentioned earlier, a plan can use up to 25 labels. Each label has a color and an assigned display name (by default, the color) that can be customized for use within a plan. When the standard synchronization runs, it does not assign a label to the tasks it creates. Before the script can do so, someone needs to define the labels (easily done in the create task dialog) and we need to include details about the labels in the script.
The Planner GUI only shows labels with whatever customized names are set up for a plan. To discover the label numbers, we need to example the categoryDescriptions setting for the plan. Here’s how to find this information:
$Uri =("https://graph.microsoft.com/beta/planner/plans/{0}/details" -f $TargetPlan.id)
$Data = Invoke-MgGraphRequest -Uri $Uri -Method GET
$Data.Categorydescriptions

Name                           Value
----                           -----
category17                     Microsoft Viva
category7                      SharePoint Online
category6                      Microsoft 365 Apps
For instance, this tells us that to apply the label for SharePoint Online to a task, we include a reference to category7, and so on. Within the properties of a task, the appliedCategories property contains the labels assigned to that task. A task can have up to 25 labels, but the script only assigns the label matching the bucket chosen for the task.
Creating Tasks
Before the script can create a new task, several hash tables must be populated with the settings for the new task. The script uses hash tables for:
- Task parameters.
- Assignments.
- Labels.
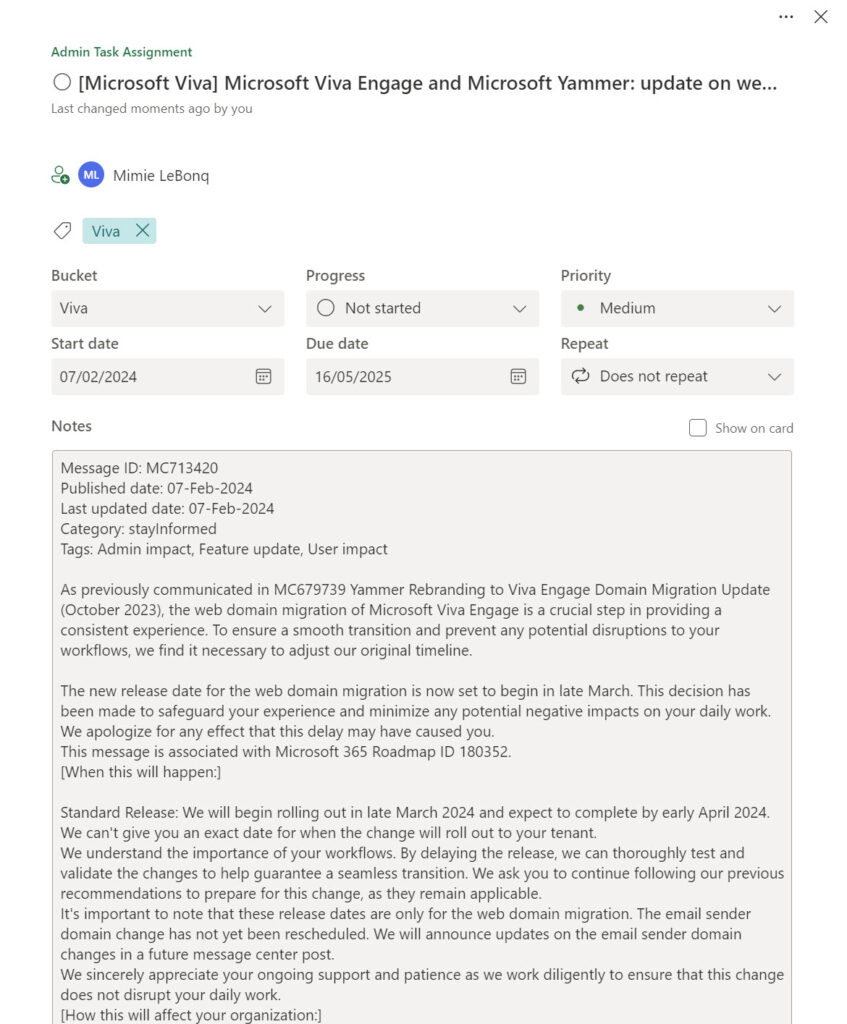
- Description (the body of the task holding a free-text description about the task details). The script does some processing to remove HTML tags from the body included in a service announcement. It also adds some details to the top of the description that appear in tasks created by the regular synchronization. These details include the message center identifier (for example, MC712150), dates for publication and last update, categories, and tags (Figure 1).
Creating a new task is done by running the New-MgPlannerTask cmdlet. All the parameters for the new task are specified in a hash table. Here’s the snippet of code covering the creation of a new task.
$TaskParameters = @{}
    $TaskParameters.Add('planId',$TargetPlan.Id)
    $TaskParameters.Add('bucketid',$TargetBucket)
    $TaskParameters.Add('title', $TaskTitle)
    $TaskParameters.Add('assignments', $TaskAssignments)
    $TaskParameters.Add('priority', '5')
    $TaskParameters.Add('startDateTime', $Announcement.LastModifiedDateTime)
    $TaskParameters.Add('details',$TaskDescription)
    $TaskParameters.Add('appliedCategories', $TaskLabels)
    # If an end date is given, use it as the due date for the task
    If ($Announcement.EndDateTime) {
        $TaskParameters.Add('dueDateTime', $Announcement.EndDateTime)
    }

    $NewTask = New-MgPlannerTask -BodyParameter $TaskParameters
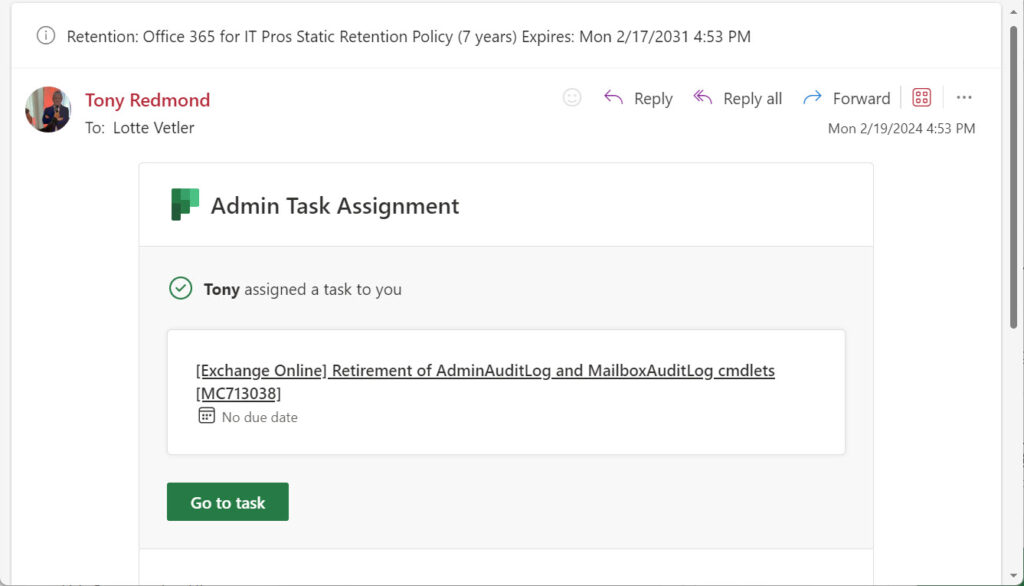
When Planner detects the creation of a new task, it automatically sends email to the task assignees to tell them that they have a new task (Figure 2). The same happens for tasks created using the Planner browser app and Tasks in Teams. It doesn’t happen when the Planner mobile app creates new tasks.
Updating Previously Assigned Tasks
The script also includes code to handle updates for previously assigned tasks. This is done by comparing the set of uncompleted tasks in the plan (retrieved with the Get-MgPlannerPlanTask cmdlet) against the set of service announcements that is stored between runs of the script in a CSV file. If an update is found, the script updates the task using the Update-MgPlannerTask cmdlet. If necessary, the task description is updated using the the Update-MgPlannerTaskDetail cmdlet.
The last thing that the script does is to export the set of service announcements to the CSV file in preparation for the next run. In truth, synchronization of updates against existing tasks is the code that I have the least confidence in because I didn’t spend as much time working on it. Consider it a challenge to check and improve the code if you have the time and interest.
Getting and Running the Script
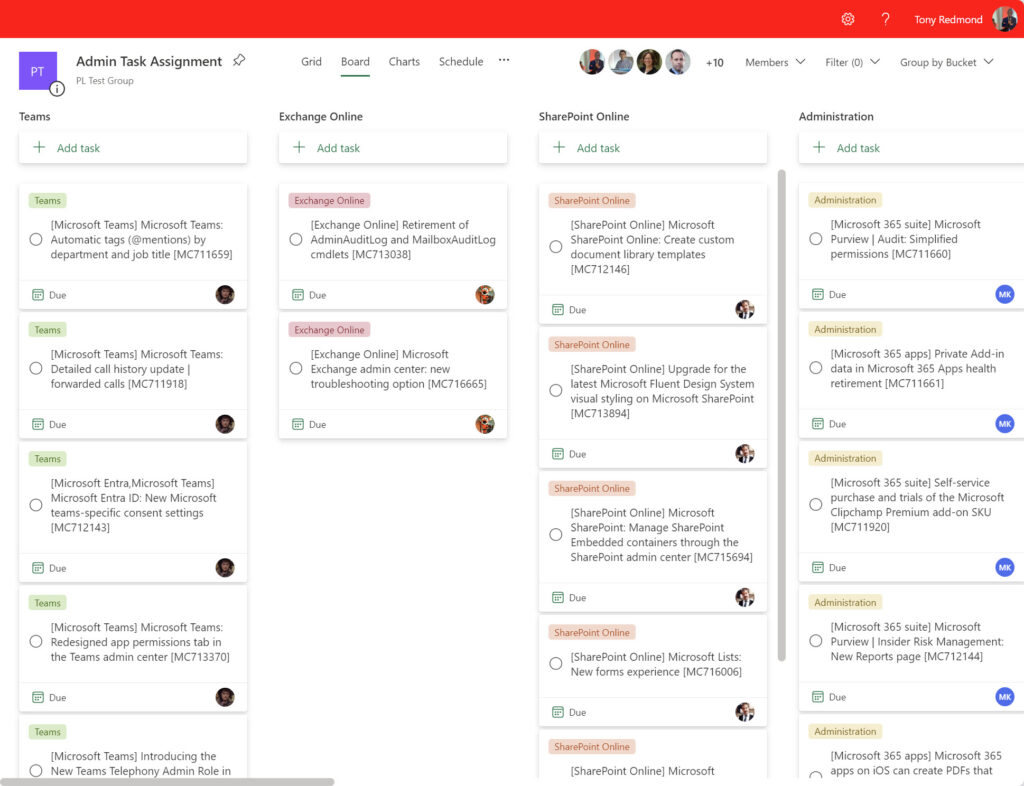
Figure 3 shows the outcome: a set of tasks created in a Planner plan assigned to designated responsible individuals and with an appropriate label. In short, the script works (famous last words). At least, it does for me.
You can download the full script from GitHub. To run the script interactively, the account that signs in with Connect-MgGraph must be a member of the group that owns the plan. This is because the Graph SDK cmdlets use delegated permissions for interactive sessions. On the other hand, if the script runs interactively using an app and certificate thumbprint for authentication or runs using a managed identity as a scheduled Azure Automation runbook, the cmdlets can use application permissions and can access any plan.
Interactive sessions use the Tasks.ReadWrite permission. The application permission is Tasks.ReadWrite.All. The logic here is that the first is permission to work with tasks in plans the signed-in user has access to. The second accommodates access to all plans by a background process (here’s an example of using application permissions to analyze Planner tasks). Remember that if you use Azure Automation runbooks, the service principal for the automation account must have consent for all the required permissions.
There was more work than I expected to create and debug the script. Part of that is due to the somewhat obscure way Planner goes about its business. Part is due to a lack of documentation. In any case, the pain of chasing down dead ends and flawed ideas soon passes. The normal caveat applies that this code is designed to illustrate a principal rather than being a fully-fledged solution. Even so, enjoy working with Planner through PowerShell.


how about checklist items?
You can add checklist items to a task using the https://learn.microsoft.com/en-us/graph/api/resources/plannerchecklistitem?view=graph-rest-1.0 resource.