The Text-Only Version of Sensitivity Labels
Entra ID Classifications have been a feature of Office 365 Groups (now Microsoft 365 Groups) since their introduction in 2015. They’re a text-only zero-intelligence method to mark a group with a visual indicator of the sensitivity of the content likely to be found in group discussions or the group SharePoint Online site. Microsoft has done nothing to develop classifications since 2017 or thereabouts because their focus is firmly set on sensitivity labels.
Obviously, sensitivity labels – or rather, the container management version of sensitivity labels, are much more powerful, but the salient fact remains that not every Microsoft 365 tenant has access to sensitivity labels because organizations need Office 365 E3 or above to use Purview Information Protection.
All of which means that many Microsoft 365 tenants are limited to classifications if they want to apply visual markers to Microsoft 365 Groups, or as termed in Microsoft documentation, “classic Microsoft Entra classifications.”
Users who create new groups require Entra ID P1 licenses if the organizations decides to apply a default classification to new groups or require users to select a classification from a predefined list. This decision might have made sense in 2016 when Microsoft was looking for value to include in Entra ID P1. It makes zero sense today because of the lack of development for classifications, which remain simple text labels.

Updating The Groups Policy with Entra iD Classifications
Details about available classifications are defined in the tenant’s Groups policy, an object managed by Entra ID. Tenants use the default template unless they need to make a change to the Microsoft 365 default values. To create a tenant-specific version of the Groups policy, use these PowerShell commands after signing into the Microsoft Graph PowerShell SDK with the Directory.ReadWrite.All permission:
$PolicyId = (Get-MgBetaDirectorySettingTemplate | Where-Object {$_.DisplayName -eq "Group.Unified"}).Id
New-MgBetaDirectorySetting -TemplateId $PolicyId
The first change you might make is to define the ClassificationList setting. This holds a list of classifications in a comma-separated list within quotes without spaces between the values. For example:
“General Usage,External Access,Internal Only,Confidential”
Clients show the list as defined. If you want it to be defined in alphabetical order, you must make sure to order the classifications.
No GUI is available to manage the Entra ID Groups policy. Everything must be done using PowerShell. The commands shown below update the classification settings for a tenant using the following steps:
- Fetch the existing settings.
- Update the DefaultClassification setting to be “Confidential.” The default classification must exist in the classification list. Entra ID applies the default classification to a new group if the owner does not select another classification.
- Update the variable holding the ClassificationList setting with a comma-separated list of classifications. Some tenants use over 100 classifications, but it is often wiser to have a more restricted set so as not to confuse users.
- Update the variable holding the ClassificationDescriptions setting with more expanded explanations of what each classification means.
- Run the Update-MgBetaDirectorySetting cmdlet to update the Groups policy with the new settings.
# Fetch current directory setting and extract values
$TenantSettings = Get-MgBetaDirectorySetting | Where-Object{$_.DisplayName -eq "Group.Unified"}
# Extract the values so that we can update them
$Values = $TenantSettings.Values
# Update the values for the default classification and the set of classifications
($Values | Where-Object Name -eq 'DefaultClassification').Value = "Confidential"
($Values | Where-Object Name -eq 'ClassificationList').Value = "General Usage,External Access,Internal Only,Confidential"
# Add the descriptions
($Values | Where-Object Name -eq 'ClassificationDescriptions').Value = "General Usage:Anyone can access,External Access:Available outside the company,Internal Only:Must not be shared with external people,Confidential:Can only be disclosed with management permission"

# Now update the Groups policy in Entra ID
Update-MgBetaDirectorySetting -DirectorySettingId $TenantSettings.Id -Values $Values
Assigning and Changing Entra ID Classification Settings in the Groups Policy
Usually, the person creating a new group selects the value that best describes the information held in the group from the list defined in the policy. Assigning a classification to a group is optional and does not affect how the group works. Adding or updating a new classification or removing a classification from the list defined in the policy does not affect classifications placed on existing groups.
The ClassificationDescriptions setting is associated with the classification list. Although you do not need to provide descriptions, it is a good idea to give people a hint to help them choose the most appropriate classification for a new group or team. The name might be enough, but if not, you can give some extra information for each classification in the form of a short description. Entra ID does not complain if you input long descriptions (say, more than 100 characters), but the space reserved to display descriptions in the user interface of applications like Outlook might, so it is best to keep descriptions short and snappy. Make sure to include a description for each classification in the ClassificationList setting.
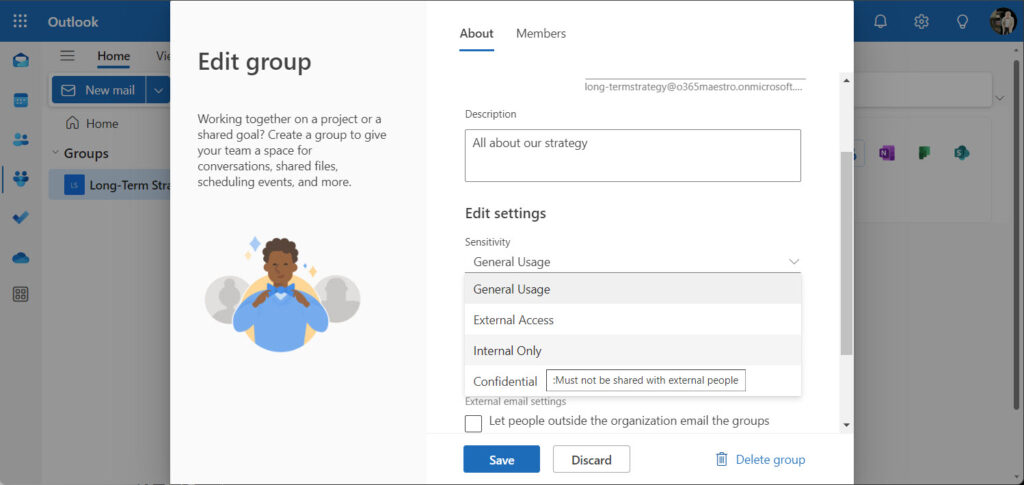
Figure 1 shows the set of classifications available for assignment to an Outlook group with OWA. As the user moves up and down through the list, OWA displays the description for the classifications.
Managing Entra ID Classifications Given to Microsoft 365 Groups
You can find the classifications assigned to Microsoft 365 groups using the Get-UnifiedGroup cmdlet from the Exchange Online management module:
Get-UnifiedGroup -ResultSize Unlimited | Where-Object {$_.Classification -ne $Null} | Format-Table DisplayName, Classification
To change a group’s classification post creation, tenant administrators or group owners can edit the property through a client. For example, in the Teams desktop or browser clients, use Manage team and then change the setting. In the SharePoint Online browser app, the classification is available in Site information, while in OWA and Outlook you can change the classification through the Edit group option. Alternatively, use the Set-UnifiedGroup cmdlet to make the change. Make sure that you use a value from the list in the policy as otherwise, the cmdlet will fail:
Set-UnifiedGroup -Identity Hydra -Classification "General Usage"
Groups created with PowerShell do not have a classification unless one is specified using the New-UnifiedGroup cmdlet. To fix the problem, you can run this command to assign a default classification to all unclassified groups:
Get-UnifiedGroup -ResultSize Unlimited | Where-Object {$_.Classification -eq $Null} | Set-UnifiedGroup -Classification "Internal Only"

Switching from Classifications to Sensitivity Labels
Microsoft doesn’t offer an automated migration process to replace classifications assigned to groups with sensitivity labels, so this is a task that must be done manually or with PowerShell. Clearly the second option is preferable if more than a few groups must be updated.
To begin, you should understand how classifications are used within the organization and figure out which sensitivity label is the most appropriate replacement for each classification. After you know what labels will replace different classifications, it’s possible to write some PowerShell to read classifications from groups and update the groups with the most appropriate label.
Next, the tenant must be enabled for sensitivity labels. This is done by updating the Groups policy to set the value of EnableMIPLabels to true:
$TenantSettingsId = (Get-MgBetaDirectorySetting | Where-Object {$_.DisplayName -eq "Group.Unified"}).Id
$TemplateId = (Get-MgBetaDirectorySettingTemplate | Where-Object {$_.DisplayName -eq "Group.Unified"}).Id
Update-MgBetaDirectorySetting -TemplateId $TemplateId -DirectorySettingId $TenantSettingsId -Values (@{'name'='EnableMIPLabels';'value'='true'} | ConvertTo-Json)
We’re then ready to update groups to use sensitivity labels. The script shown below uses a simple Switch statement to select which sensitivity label to assign based on the classification assigned to a group. After selecting the label, the script calls the Set-UnifiedGroup cmdlet to update the group. The classification for each group remains unchanged.
# Switching starts…
$PublicLabel = "2fe7f66d-096a-469e-835f-595532b63560"
$InternalLabel = "27451a5b-5823-4853-bcd4-2204d03ab477"
$SecretLabel = "81955691-b8e8-4a81-b7b4-ab32b130bff5"
$ConfidentialLabel = "1b070e6f-4b3c-4534-95c4-08335a5ca610"

# Find groups in the tenant that haven't already been assigned a sensitivity label
$Groups = Get-UnifiedGroup -ResultSize Unlimited | Where-Object {$_.SensitivityLabel -eq $Null}
If ($Groups.Count -eq 0) {
   Write-Host "Congratulations - you've switched over to sensitivity labels"
} Else {
   ForEach ($Group in $Groups) {
   Switch ($Group.Classification) {
      "General Use"     {$LabelToApply = $InternalLabel}
      "External Access" {$LabelToApply = $PublicLabel}
      "Internal Only"   {$LabelToApply = $SecretLabel}
      "Confidential"    {$LabelToApply = $ConfidentialLabel}
       Default          {$LabelToApply = $InternalLabel }
    }
    Write-Host "Processing" $Group.DisplayName
    Set-UnifiedGroup -Identity $Group.DistinguishedName -SensitivityLabelId $LabelToApply
    }
}
The script defines variables to hold the immutable identifier for several sensitivity labels You can discover these values by running the Get-Label cmdlet (after connecting to the compliance endpoint). For example:
Connect-IPPSSession
Get-Label | Format-Table ImmutableId, DisplayName
Once a container management sensitivity label is assigned to a group, the group inherits the management settings defined in the label. For instance, a group might be blocked for the addition of new guest members (existing guests are unaffected).
It can take several days for the new label settings to synchronize from Exchange Online to SharePoint Online and Teams. To check that the right label is assigned to a site, you can run the Get-SPOSite cmdlet and examine the SensitivityLabel property. For example:
Get-SPOSite -Identity https://office365itpros.sharepoint.com/sites/BankingTeam | Format-Table Title, SensitivityLabel

Title        SensitivityLabel
-----        ----------------
Banking Team f5b1ba01-59f5-4ba0-b73b-f60e348cdc6e
Entra ID Classifications Can Do a Job
Classifications are simple text-based visual markers that have none of the intelligent capabilities of sensitivity labels or their integration into the Microsoft Office apps. Nevertheless, classifications can do a job if deployed in the right way. Personally, I would always use sensitivity labels because of the flexibility they offer (even to the level of giving colors to labels), but sometimes that choice just isn’t available.


Thanks for replying. I went back to version 2.10.0 and it allowed me to get the GUIDs again. I had updated to the latest version of the modules before I began. When I ran it after the update (without parameters) I received this error: –
Get-MgBetaDirectorySettingTemplate : One or more errors occurred.
At line:1 char:1
Looking into the documentation, the -DirectorySettingId was required which gave me a paradox.
Odd. I used version 2.22.0 and all worked like a charm.
Graph documentation is full of errors. Trust what you see happen in front of you.
We had 2.22.0 too. Weird! Thanks for looking into it, I now need to play catch-up on the project after losing those few hours!
It seems like Microsoft have changed the requirements for the Get-MgBetaDirectorySettingTemplate cmdlet, the directoryIDsettingID setting is now a requirement I had to install an older version of the Ms Graph modules to get this working.
Hi Tony, thanks for this. It seems like Microsoft have changed the requirements for the Get-MgBetaDirectorySettingTemplate cmdlet, the directoryIDsettingID setting is now a requirement, but I can’t seem to get this without running the command. I tried through the old Get-AzureADDirectorySettingTemplate method, but it seems this command has been removed (probably in favour of the MgGraph command). Have you got any ideas on getting around this paradox?
I can run Get-MgBetaDirectorySettingTemplate without any parameter:
Get-MgBetaDirectorySettingTemplate
DeletedDateTime Id Description
————— — ———–
08d542b9-071f-4e16-94b0-74abb372e3d9 Settings for a specific Unified Group
4bc7f740-180e-4586-adb6-38b2e9024e6b …
5cf42378-d67d-4f36-ba46-e8b86229381d …
62375ab9-6b52-47ed-826b-58e47e0e304b …
80661d51-be2f-4d46-9713-98a2fcaec5bc …
898f1161-d651-43d1-805c-3b0b388a9fc2 …
aad3907d-1d1a-448b-b3ef-7bf7f63db63b …
dffd5d46-495d-40a9-8e21-954ff55e198a …
And $TemplateId = (Get-MgBetaDirectorySettingTemplate | Where-Object {$_.DisplayName -eq “Group.Unified”}).Id works just fine. What version of the SDK are you using?