Recently, while working on some Content Searches, a question came up on how to perform selective deletion of OneDrive documents found in the searches. While you can remove email using a content search action, Office 365 doesn’t include a method to cleanup OneDrive documents found by content searches.
The question is how to remove some but not all the OneDrive documents found by a content search. This article demonstrates how to use PowerShell to view the set of files, and then select files to remove.
Base Content Search
First, we need to run a Content Search. In the Microsoft 365 Compliance Center, go to the Content search section and create a new search. Enter “Exchange” as a keyword for the search and choose the target OneDrive search locations. The search starts and creates a preview set of results. Depending on the number of search locations, this could take some time to complete.
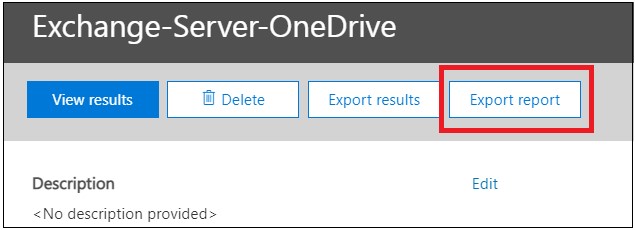
Once the search completes, we can examine the preview results. Once you are happy that the search finds the right items, generate a report of the results by selecting ‘Export Report’:
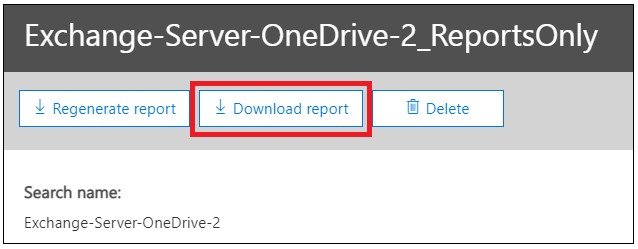
Once the report is exported, we can download the CSV file generated:
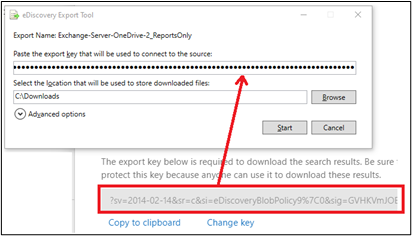
Downloading the report requires a key (Figure 3), which can be copied from the search details and pasted into the Microsoft Export utility:
Now that the search is completed and report downloaded, we can utilize that CSV file to determine which OneDrive files to delete.
Reviewing Findings and Selective OneDrive Removal
The next task is to present the export data from the CSV file in a useable fashion. To do this, we use PowerShell to group the files by user OneDrive address and allow the reviewer to select one, some, all, or none of the files for removal. We use cmdlets from the SharePoint Online and PNP PowerShell modules to perform OneDrive file operations with the permissions needed to execute these tasks. The full script is available to download here from GitHub. Now, I’m going to highlight some important parts.
CSV File
Our downloaded CSV file is in a format like that shown below:

Overall Script Process
The export file is not sorted or in a format that we can use, so first need to process the data to generate something more usable. In the code below we ask for the CSV file name, pull key elements (User and File) from the input file and store this data in a variable called $Table. Finally, sort the $Table variable by User and store the results in a variable called $SortedResults:
$CSVName = Read-Host "Please specify a CSV file to import [i.e. Results.csv]"
$CSV = Import-Csv $CSVName
$Table = Foreach ($Line in $CSV) {
    $User = $Line.Location
    $FullFilePath = $Line."Original Path"
    $Type = $Line.Type
    $File = $FullFilePath.Split('/')[-1]
    New-Object -TypeName PSCustomObject -Property @{
        User = $User
        File = $File
    }
}
$SortedResults = $Table | Sort-Object User,File
Connect to SharePoint Online
Now that we have good data, we can connect to SharePoint Online. Make sure to use the correct tenant name to connect to the SharePoint Online admin endpoint (in brackets – first line of code):
$SharePointURL = 'https://<tenant domain>-admin.sharepoint.com'
$GAUPN = Read-Host "Please enter your Global Admin account UPN"
$Password = Read-Host -assecurestring "Please password for Global Admin account specified above"
$Credentials = New-Object -typeName System.Management.Automation.PSCredential -argumentlist $GAUPN, $Password
Connect-SPOService -Url $SharePointURL -Credential $Credentials
Once connected, we can begin processing the CSV file. We use some rules to process data as we loop through the items in the file. First, the loop is a foreach loop, where each line is read separately, and actions are taken within each loop. Overall, the steps in the script we will operate are:
- The Foreach loop groups each line for a single user into a variable.
- Permissions are granted for the script operator (Site Collection Admin) for the script to perform its tasks.
- Once permission is granted, a connection is made to the user’s OneDrive account.
- While connected, the ID of the file is queried and stored as it is needed to identify the file for removal.
- When a change of user is detected, the current file list takes these steps.
a. Step 1 – Display files with Out-GridView
b. Step 2 – Use the output from Out-GridView to start removing files.
c. Step 3 – Allow the operator to not delete the file (are you sure? option) - After a user’s files are processed, the Foreach loop moves on to the next user
- Steps 1-6 continue until the last user is detected (last line of the CSV file)
- Script exits.
Accessing a User’s OneDrive
To remove files from a user’s OneDrive account, we need to connect directly to their OneDrive URL (in the CSV file). Once connected we grant site collection admin permission. These two tasks can be completed with the below script:
Connect-PnPOnline -Url $UserOneDrive -Credentials $Credentials
Set-SPOUser -Site $UserOneDrive -LoginName $GAUPN -IsSiteCollectionAdmin $True
Out-GridView and Remove-PnPItemListItem
For step 5 of the overall process listed above, we need to display the files to the operator, store the files chosen and then allow the user to decide about file removal. First, displaying the file using Out-GridView:
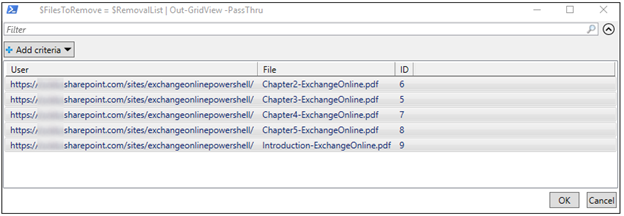
$FilesToRemove = $RemovalList | Out-GridView -PassThru
• $FilesToRemove: (a routine to?) will store any files that were selected by the operator.
• $RemovalList: Original list of all files from the CSV
• -PassThru: This option allows for the return of selected options from the Out-GridView cmdlet, which will then be stored in the $FilesToRemove variable.
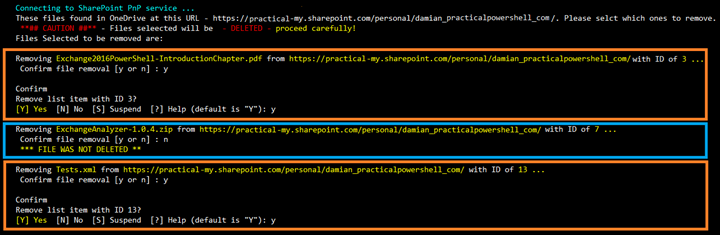
After selecting files, each is listed, and the operator can choose if the file should be removed:
Write-Host "Removing $File from $User with ID of $SubID ..." -ForegroundColor Yellow
$ConfirmRemoval = Read-Host " Confirm file removal [y or n] "
If ($ConfirmRemoval -eq 'y') {
Remove-PnPListItem -List Documents -Identity $SubID
} Else {
Write-Host " *** FILE WAS NOT DELETED **" -ForegroundColor Yellow
}
Operator View
Now that we have examined some important code sections, let’s review the overall process for the file removal. After downloading the CSV file and processing its contents, we can use it as a basis for removing files. When we run the script, the first thing is to connect to the target tenant. We are also asked for the results CSV file that we downloaded from the search. Then the script shows the files to review and/or remove using the Out-GridView cmdlet:
After selecting some files, we can decide to remove or not remove the files, below are some examples:
Prerequisites
Before you can run the script, you need to consent to using the PnP PowerShell Module because it uses OAuth authentication. If we do not grant consent for the app, an error like this will be displayed:
Connect-PnPOnline : AADSTS65001: The user or administrator has not consented to use the application with ID
'31359c7f-bd7e-475c-86db-fdb8c937548e' named 'PnP Management Shell'. Send an interactive authorization request for this user and resource.
To use the PnP Module, we need to follow these steps:
$URL = 'https://<tenant>-my.sharepoint.com/personal/user_yourdomain_com'
Connect-PnPOnline -Url $Url -PnPManagementShell
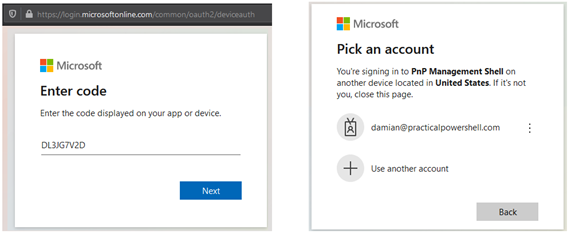
Running these cmdlets will display a one-time passcode to enter into https://microsoft.com/devicelogin. We can then enter and pick an account with rights to grant permission:
We will then need to approve consent for the cmdlets:
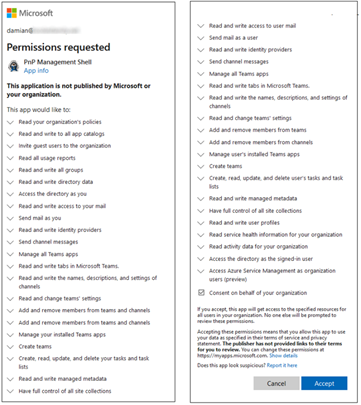
The large permission list is due to the fact that the PNP module will need access to several workloads in a tenant, from Teams to SharePoint and including Planner and Flow as well. As such, the module will need a wide arrange of permissions to operate. Remember that this consent only allows the module to be used in a tenant and that it’s usage can be restricted.
After granting consent, we can use the PnP Module to connect to OneDrive and manage files.
Why PNP Management shell?
The PNP Management Shell is a powerful set of 500+ PowerShell cmdlets which allows access to SharePoint Online objects, including the ability to manipulate files stored in OneDrive accounts. We can also remove the Records Tag using the Clear-PnPListItemAsRecord cmdlet. This action is the PowerShell version of selecting an item in a SharePoint library and choosing the ‘Undeclare Record’ option that is available in SharePoint Online.
Auditing
From an overall tracking perspective, SharePoint Online captures details of any file removed by the script in the Office 365 Audit Log. Search for ‘Deleted File’ and details of the deleted file(s) will appear in the log.

Conclusion
The script described here is designed to handle the tedious process of taking report data for a content search and use it to drive a document deletion process. There is no equivalent in the Microsoft 365 Compliance Center currently. To run the script, you need cmdlets from the Exchange Online (connected to the compliance endpoint), SharePoint Online, and PnP modules. Lastly, an administrator must grant consent to use SharePoint PnP Module cmdlets in the tenant. All these conditions must be met prior to working with this script.
Sample Code
In order to help you build your own code for this solution, sample code for the operation for this solution has been posted in GitHub.
Use this code with care as it performs several tasks that should only be done by those that understand their implications:
- Grant access to PNP Management Shell access to your tenant
- Use of Remove-PnPListItem, which removed files from a user’s OneDrive
- Granting of SiteCollectionAdmin permissions to a user’s OneDrive


Can’t authenticate with PoSH cmdlets as written: https://learn.microsoft.com/en-us/answers/questions/2103105/connect-pnponline-the-term-connect-pnponline-is-no
Well, it’s an article from 2021 and change happens all the time. PnP changed the way it authenticates with Entra ID last year: https://office365itpros.com/2024/08/29/pnp-powershell-changes-app/
Hello Damian,
Firstly, this is a great script, still functional and helped a lot. Thanks a ton.
I found trouble running it on few versions of the PnP module so below modules were still compatible with PS 5.1*
16.0.24908.12000 Microsoft.Online.SharePoint.PowerShell
3.29.2101.0 SharePointPnPPowerShellOnline
Possible suggestions for fellow admins for bulk actions:
#Adding “-Force” as the script already has a confirmation prompt which again can be bypassed but the below does help.
Remove-PnPListItem -List Documents -Identity $ID -Force
#Adding “-PageSize 5000” when this is not set the script starts to fail for OneDrive sites with large number of files.
Get-PnPListItem -List Documents -Fields ‘ID’ -PageSize 5000).FieldValues
As this still uses the PnPShell it is a bit time consuming for bigger sites.
Due to time constraint, I later found the “ExportItemId” column in the eDiscovery results file was nothing but the ETag value which can be used to find the ListItemId(ID) and can be easily used to match and remove items using graph module (Remove-MgSitelistItem).
This reduces the processing time drastically it took around 1 hour for a 5TB site to be processed. Also, it can be done using the Azure application with Sites.ReadWrite.All “application” permission which removes the requirement of adding the service account to each site as site collection administrator. Below are some sections of my script which might be of help.
$ListId = (Get-MgSiteList -Site $siteid | Where {$_.DisplayName -eq “Documents”}).Id
$AllFiles = Get-MgSiteListItem -SiteId $siteid -ListId $listid -All
$AllSiteFiles = $AllFiles | Select Id, Name, Weburl, @{l=”Etag”; e={$_.etag.Split(‘,’)[0].Trim() -replace ‘”‘}}
#Id = Listitemid
Thanks again….!!
Hi Damian,
Great script, however I need help on how to run this script for multiple users found in the content search? Also I guess you are missing the $useronedrive variable?
Thanks.