Using the Right Tool for the Right Job
When it comes to managing a Microsoft 365 environment, the Microsoft Graph API (and the associated Graph PowerShell SDK) is the go-to tool for scripting and automation. Specifically for SharePoint Online, the Graph API meets and satisfies the need to access and manage data held in SharePoint Online (for example: reporting of files in document libraries or managing lists in SharePoint Online sites) however it doesn’t really address the need to manage the tenant infrastructure like sites and OneDrive accounts.
While the Microsoft Graph API offers a broad range of functionality across Microsoft 365, it doesn’t have the depth in SharePoint Online required by tenant administrators who need more control over their SharePoint sites. For example, it’s currently not possible to create a SharePoint Online communication site through the Graph API because site creation through the Graph is based on the creation of a Microsoft 365 Group.
That’s where PnP PowerShell comes in. PnP PowerShell is an open-source, community-driven PowerShell module. PnP PowerShell aims to help SharePoint administrators and developers by providing a set of PowerShell-based tools that interact with SharePoint and other areas of Microsoft 365. Administrators only need to understand familiar PowerShell cmdlets, reducing the need for knowledge of more advanced tools such as the SharePoint Online REST API or Client-Side Object Model (CSOM).
In this article, I explain how to get started using PnP PowerShell, and review some practical examples of where the module can immediately add value for tenant administrators.

Installing the Module and Preparing Your Environment
The installation documentation for the PnP PowerShell module is very clear so I won’t repeat that detail here. The high-level steps required to get started with PnP PowerShell are:
- Install PowerShell 7.2 or later (PnP PowerShell is only supported in PowerShell 7)
- Install the PnP PowerShell module using the cmdlet “Install-Module PnP.PowerShell”
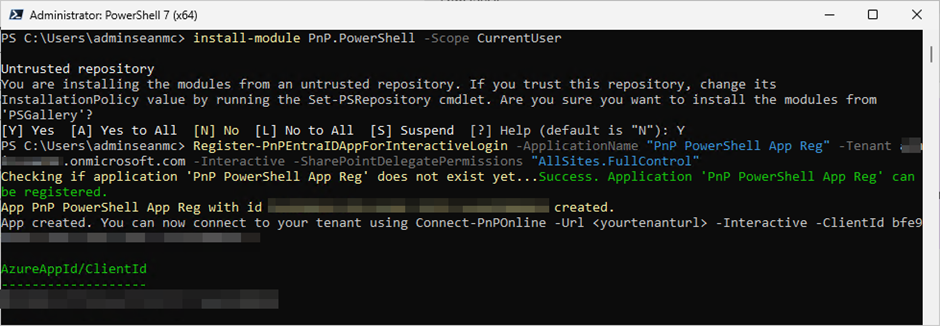
- Create an app registration in Microsoft Entra using the cmdlet “Register-PnPEntraIDAppForInteracticeLogin”
If you’ve used PnP PowerShell before, it’s likely you have used the multi-tenant application to authenticate. This application is now retired, so creating your own app registration is mandatory to use PnP PowerShell.
The process for installing and configuring the PnP PowerShell module is shown in Figure 1. In this example, the delegated permission “AllSites.FullControl” is added, this is a highly permissive permission entry which I use for demo purposes here. In production, it’s recommended to limit consent to only the permissions you need.
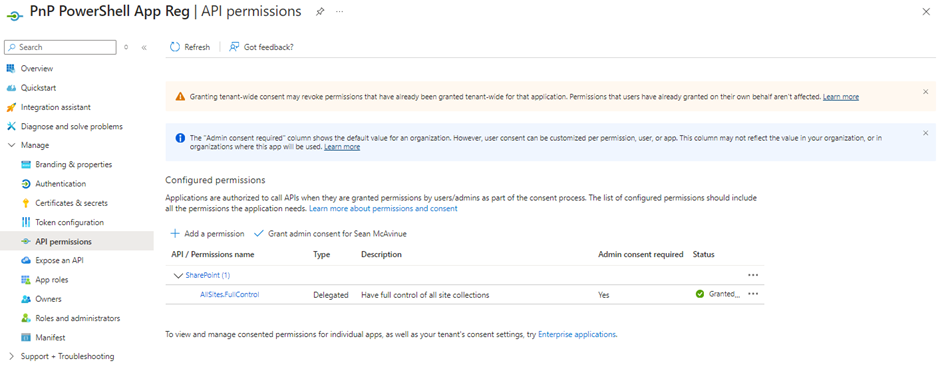
Once created, the app registration is visible from the Microsoft Entra admin center and permissions can be added and removed if required (Figure 2).
The client identifier for the app (also shown in the PowerShell output) is used when connecting to SharePoint Online. For example:
Connect-PnPOnline "<TenantDomain>.sharepoint.com" -Interactive -ClientId "<ClientID>"
This cmdlet creates an interactive session connected to the tenant with delegated permissions. Like all Graph connections, delegated permissions mean that access to data is limited to whatever the signed-in account can access.
Basic Tasks
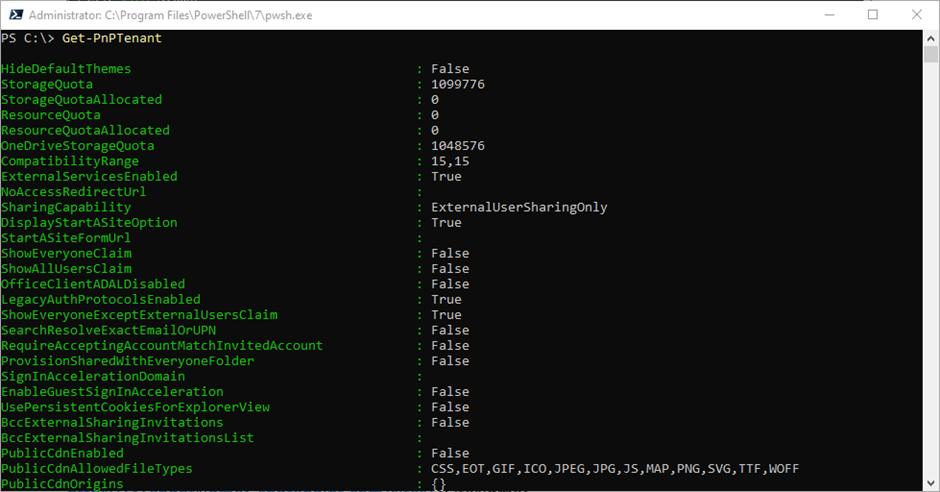
Before exploring more complex examples, let’s look at doing some basic tasks through PnP PowerShell. For example, the cmdlet Get-PnPTenant is a great way to explore the SharePoint Online tenant configuration (Figure 3). Information such as details of the tenant sharing policy, link types, and access control settings are available through this single cmdlet.
For anyone familiar with working with SharePoint Online through the Microsoft Graph API, a common limitation people struggle with is listing all SharePoint sites in the tenant. This is a basic requirement but not possible when using delegated permissions with the Microsoft Graph.
Use the following cmdlet to enumerate all sites in the tenant:
<em>Get-PnPTenantSite</em>
Use the switch -IncludeOneDriveSites to OneDrive personal sites in the output.
The Get-PnPTenantSite cmdlet is also very useful for finding the sites that you are looking for quickly. For instance, the –Template parameter specifies the type of site to return, such as returning all Teams channel connected sites or returning sites that have been archived:
#Return Team channel connected sites

Get-PnPTenantSite -Template "TEAMCHANNEL#1"

##Return Archived Sites

Get-PnPTenantsite -Detailed -Filter "ArchiveStatus -eq 'FullyArchived'"

##Exclude Archived Sites

Get-PnPTenantsite -Detailed -Filter "ArchiveStatus -eq 'NotArchived"
The results from Get-PnPTenantSite go beyond what is returned from the Microsoft Graph, including details on site features and configuration and sharing configuration.
Working with Sites
I mentioned earlier that creating a SharePoint site through the Microsoft Graph API happens as a result of creating a Microsoft 365 Group. Only SharePoint sites with the #Group0 template can be created in this manner. Creating sites with templates other than #Group0 is not an issue through PnP as the site is created directly on SharePoint. A simple example is to create a new, blank Communication site as shown below:
New-PnPSite -Type CommunicationSite -Title "Communication Site” -Url https://<TenantName>.sharepoint.com/sites/communicationsite
Creating a blank site is a good start, but one of the main benefits of PowerShell is to automate tasks. Customizing the SharePoint site post creation requires you to connect to the site using PnP PowerShell and update the various components. In the below example, we perform the following tasks:
- Connect to the new site
- Update the site theme to Gray
- Update the page layout to the Article style
- Add a text web part with some placeholder text (I’ve omitted the text from the code and used a variable)
- Add a new document library named “Important Documents”
- Added a new document library web part, linked to the new document library in the second position on the page
- Add a user to the Site Owners group
##Set the Theme to Gray

Set-PnPWebTheme -Theme "Gray"

##Connect to the site

Connect-PnPOnline -Interactive -ClientId "<ClientID>" -Url "https://<TenantName>.sharepoint.com/sites/<SiteName>"

##Set Page Layout to Article

Set-PnPPage -Identity "home.aspx" -LayoutType "Article"

##Add Text Web Part

Add-PnPPageTextPart -Page "Home.aspx" -Text $Text

##Add a new document library

New-PnPList -Title "Important Documents" -Template "DocumentLibrary"

##Add Document Library Web Part

$DocumentLibrary = Get-PnPList -Identity "Important Documents"

Add-PnPPageWebPart -Page "Home.aspx" -DefaultWebPartType List -Section 1 -Column 1 -Order 2 -WebPartProperties @{isDocumentLibrary="true";selectedListId=$DocumentLibrary.Id}

##Get Owner Group for the site

$Group = Get-PnPGroup | ?{$_.title -like "*Owners"}

##Add user to Owner group

Add-PnPGroupMember -LoginName "username@domain.com" -Identity $Group.title
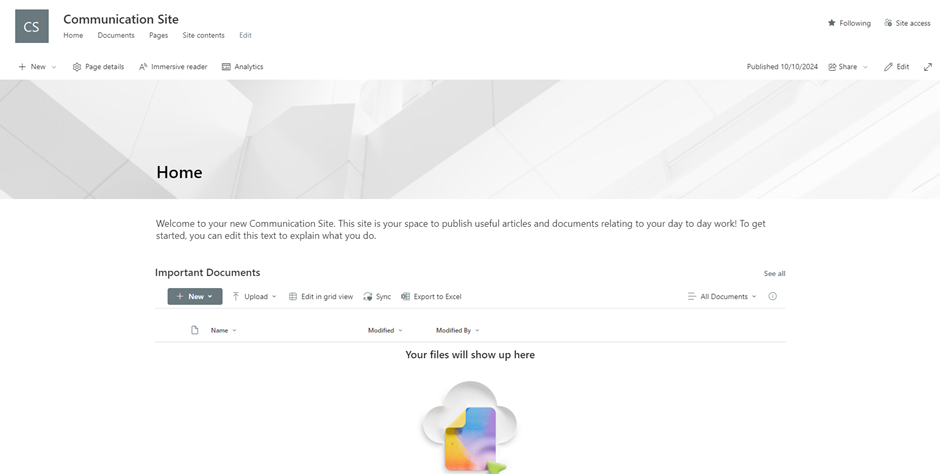
After the modifications are complete, the site appears as shown in Figure 4.
As I mentioned previously, PnP PowerShell requires a dedicated app registration. When building out scripts like the above, make sure to add the required permissions on both SharePoint and the Microsoft Graph to avoid running into errors.

Site Templates
Customizing sites through PowerShell is useful, but most organizations prefer to have a standard look and feel available for all new sites. That’s where site templates come in. Site Templates (Previously called site designs) are pre-defined site configurations for SharePoint sites that are packaged and made available to apply to new or existing sites in the tenant.
Note: For a full list of what is saved as part of a site template, check out the documentation here.
Using the site created previously as an example, the below cmdlets connect to the site and export the site template for that site, including the changes that were made.
Connect-PnPOnline -Interactive -ClientId "<ClientID>" -Url "https://<TenantName>.sharepoint.com/sites/<SiteName>"

Get-PnPSiteTemplate -Out c:\temp\CommunicationSitetemplate.xml
With the template saved locally, the Invoke-PnpSiteTemplate cmdlet can apply the template to a newly-created site. Here’s how:
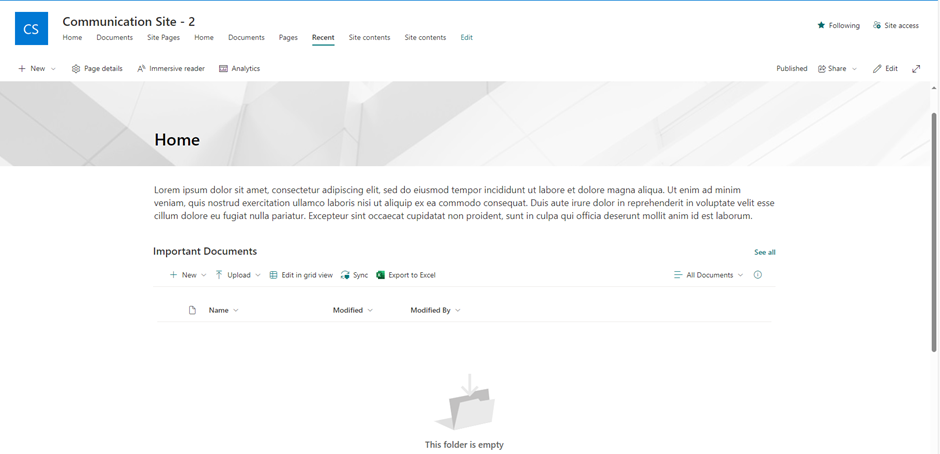
New-PnPSite -Type CommunicationSite -Title "Communication Site - 2” -Url https://<TenantName>.sharepoint.com/sites/CommunicationSite2

Connect-PnPOnline -Interactive -ClientId "<Client ID>" -Url https://<TenantName>.sharepoint.com/sites/CommunicationSite2

Invoke-PnPSiteTemplate -Path c:\temp\CommunicationSitetemplate.xml
The new site is then created as shown in Figure 5, with the same configuration as the site the template was created from.
Site templates aren’t limited to being provisioned through PowerShell. The Add-PnpSiteDesign cmdlet publishes the template used above for use when creating new sites manually.
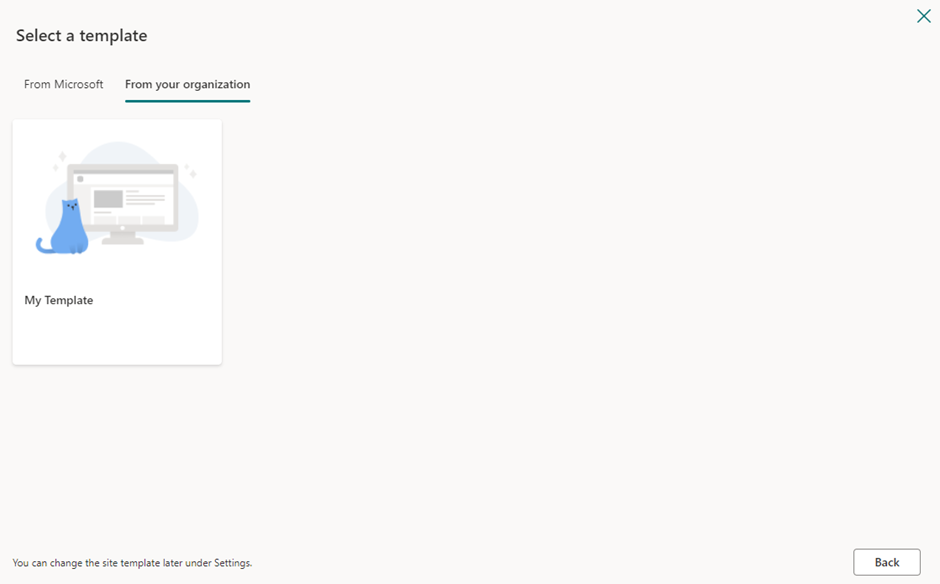
<em>Add-PnPSiteDesign -Title "My Template" -SiteScript C:\temp\CommunicationSitetemplate.xml -WebTemplate "CommunicationSite"</em>
Once the template is saved by Add-PnPSiteDesign, it is available for selection when creating a new site under the “From your organization” tab as shown in Figure 6.
In addition to creating your own templates, the SharePoint Look Book contains a list of pre-created templates for a wide range of needs. To deploy one of these templates, download the template file from GitHub (Links available here).
These downloaded templates can be used in the same manner as custom templates. They can either be applied directly to sites using Invoke-PnPSiteTemplate or by saving to the organization templates using Add-PnPSiteDesign.
Summary
PnP PowerShell offers a large amount of flexibility when it comes to configuring SharePoint and customizing sites. In this article, I explained some of the basic tasks that PnP can help with, but that’s just scratching the surface of what’s available.
If you are a tenant administrator who needs to interact with SharePoint, it’s definitely worth exploring what value PnP PowerShell can add to your day-to-day tasks. While the downside is that PnP PowerShell is not officially supported by Microsoft (as it’s a community driven initiative, not a Microsoft tool), it fills many gaps that Microsoft has yet to provide a robust solution for.


Can you share, how to check site contents and it’s folders and files
Hi Sean,
I want to generate the report of all the users access for all the lists and libraries in the sharepoint using PnP powershell script
could you please help me ?
Hello Sean,
Very useful your article. I’m facing some problems managing templates with pnpPowershell from Azure Automation (runbooks). It seems that involved cmdlets are always expecting to get or store these templated from/to file system but not on SharePoint Site and I can’t use file system from Azure.
For instance, this error: Error: The filename, directory name, or volume label syntax is incorrect. : ‘C:\app\https:\XXXXX.sharepoint.com\sites\XXXXXX\SiteAssets\templateSite.pnp’
when trying to save a template: Save-PnPSiteTemplate -Template $getTemplate -Out $SchmaXMLPath
or maybe directly: Get-PnPSiteTemplate -Out $SchmaXMLPath
Any hint or help? Thank you in advance.
Hello! I’m trying to use the site templates with PowerShell PnP, but I dont know exactly what permission does my entra id application needs?.. Also my security team doesn’t want to grant the permissions AllSites.FullControl, Can this be done without that permission?
Any help will be apreaciatted 🙂
Hi Tom,
Take a look at the -ReturnConnection parameter when connecting, this should do what you want and will be detailed in my follow up article
Sean, nice write-up. I’m experiencing an issue after the retirement of the retirement of the multitenant app. We’ve followed the instructions to create an app id and given my SPO admin account permissions. This has resolved some issues. However, we have many scripts that perform maintenance and monitoring of our SPO sites that begin with getting the URLs for all the sites – then it must perform commands against each site. With this security change, I am now prompted to login for every site just to see if there’s a condition to examine or change. We have over 1,800 SPO site. Is there any way around having to use the -interactive property on connection – aside from granting the new client ID full control permission independent of the user running the script?
Same issue we are facing, Infect not able to register App with delegate permission
I have not set this up yet but from the PNP.powershell page (https://pnp.github.io/powershell/articles/registerapplication.html) towards the bottom it talks about how to use PnP PowerShell with a script that will run without requiring user interaction. That is on my plan to test.
That’s correct – it would then run under application permissions. Depending on what you want to do it’s important to know the right way to authenticate
Great article, thanks!
The only thing I can suggest is to replace this line:
$Group = Get-PnPGroup | ?{$_.title -like “*Owners”}
with
$Group = Get-PnPGroup -AssociatedOwnerGroup