Updating SharePoint Online Files Report Script to Use the Graph PowerShell SDK
In July 2022, I wrote about using the Graph APIs to report files in a SharePoint Online document library. The script structure was straightforward: select a site, select a document library within the site, and report the files and folders found within the library. It was my first opportunity to work with SharePoint Online using Graph APIs and was an invaluable learning experience.
Time and technology move on and it’s possible to do the same job with the Microsoft Graph PowerShell SDK. I prefer using the Graph PowerShell SDK when possible because it’s easier to work with. Cmdlets renew access tokens when necessary and take care of pagination when fetching data. Cmdlets output PowerShell objects, and so on. Sure, the Graph PowerShell SDK has some irritating foibles, but generally I try to use its cmdlets instead of Graph API requests whenever possible.
Microsoft released V2 of the Graph PowerShell SDK in 2023. I decided to rewrite the script to use Graph SDK cmdlets to explore how capable the SDK is in dealing with SharePoint Online content. Microsoft has a preview Graph API for SharePoint Online management that mimics some of the functionality available in the SharePoint Online management PowerShell module. Not much progress has been made made to develop this module and I don’t cover it here.
SharePoint Online includes the Export to Excel option in its ellipsis menu. This option generates a Microsoft Excel Web Query File (.iqy) to connect to the current location in the SharePoint site and export information about items and folders to a table in an Excel workbook. Usefully, the export includes all the properties shown in the default view. You could use this option instead of the script I’m about to explain, but then you wouldn’t learn how to interact with SharePoint Online using the Graph SDK cmdlets!

Sites, Drives, and DriveItems
People are familiar with the concept of SharePoint Online sites. The script begins by using the Get-MgSite cmdlet to search for sites with matching display names or descriptions. The first example searches using a string, the second using a variable:
Get-MgSite -Search 'Projects'
$SiteName = 'Office 365'
Get-MgSite -Search ($SiteName)
SharePoint Online trims the set of sites to exclude any site that the signed-in user cannot access. Even accounts holding the SharePoint administrator or Global administrator roles cannot access a site unless they are a site member. The set of sites returned by Get-MgSite includes the sites created for Teams private and shared channels. The script handles this by asking the user to select a site. The returned value includes a site identifier, which looks like:
Office365itpros.sharepoint.com,acfe74d8-edfb-436d-924b-e018666605ee,a2aba197-5f1d-4864-a2c7-4daf0ff6379b
SharePoint Online sites have a default document library called Documents (in English). However, a site can span multiple document libraries. In API terms, these are known as drives. The Get-MgSiteDrive cmdlet fetches the set of drives in a site:
[array]$Drives = Get-MgSiteDrive -SiteId $Site.Id
Each drive has an identifier (Id) that looks like this:
b!2HT-rPvtbUOSS-AYZmYF7pehq6IdX2RIosdNrw_2N5t7xp_DBXMQTalVjpKlwdxk
With a site identifier and a drive identifier, we can fetch the items (driveitems) in the drive. Drives include files and folders, so some work is required to process the two types of items. The script includes a function called Get-DriveItems to process files in a folder, including recursive processing of items in nested folders. To start, the script begins at the root (top-level) folder:
Get-DriveItems -Drive $Drive.Id -FolderId "root"
The information gathered for each file includes its display name, the folder it belongs to, the author and who last modified the file, created and last modified dates, file size, and if it is assigned retention and sensitivity labels. Figure 1 shows the script running.
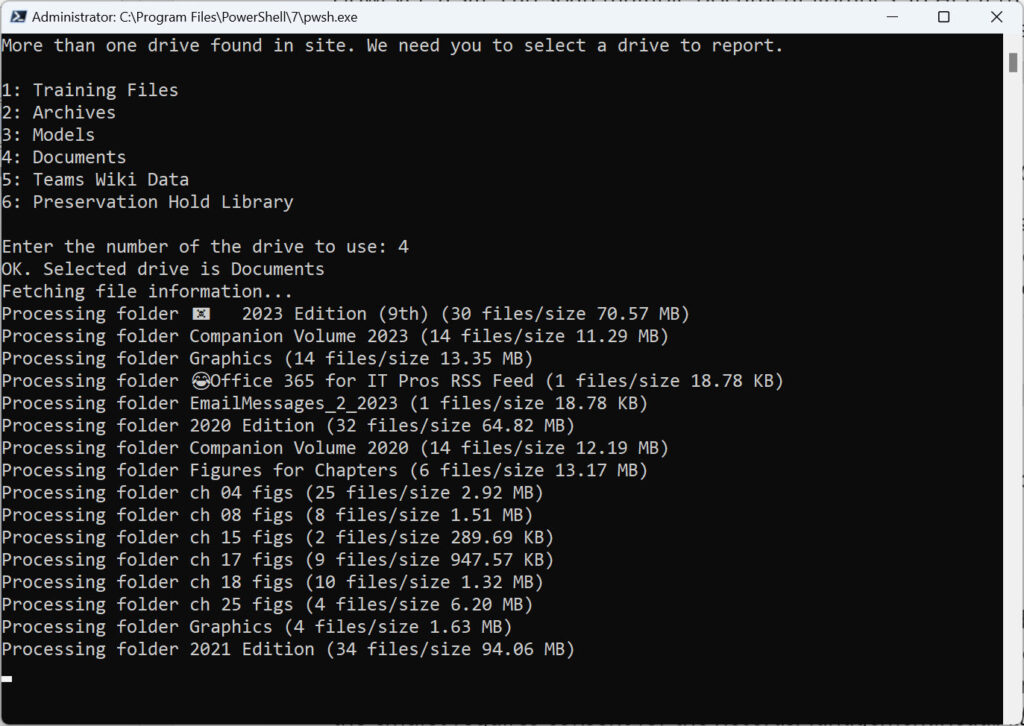
The largest folder I tested against held 6,523 files.
Getting the Retention Label for a File
Retention labels are supported by tenants with Office 365 E3 and above. Not every tenant uses retention labels, so the first thing is to check if retention labels are present. The script uses the Get-MgSecurityLabelRetentionLabel cmdlet to check for retention labels. Running the cmdlet requires consent for the RecordsManagement.Read.All permission.
# Discover if the tenant uses retention labels
[array]$RetentionLabels = Get-MgSecurityLabelRetentionLabel
If ($RetentionLabels) {
    $Global:RetentionLabelsAvailable = $true
} Else {
    $Global:RetentionLabelsAvailable = $false
}
The script then knows if it should attempt to retrieve the retention label for a file. The Graph SDK cmdlets cover the management of retention labels but not the retrieval of retention label information from a file. To get the retention label, the script uses a Graph request:
If ($RetentionLabelsAvailable -eq $true) {
  Try {
    $Uri = ("https://graph.microsoft.com/v1.0/drives/{0}/items/{1}/retentionLabel" -f $Drive, $File.Id)
   [array]$RetentionLabelInfo = Invoke-MgGraphRequest -Uri $Uri -Method Get
   RetentionLabelName = $RetentionLabelInfo.name
   } Catch {
   Write-Host ("Error reading retention label data from file {0}" -f $File.Name)
   }
}
Update: The Get-MgDriveItemRetentionLabel is now available to support retrieval of retention label data for a file. You can use the cmdlet or the API request shown above. Both fetch the same data.
$LabelInfo = Get-MgDriveItemRetentionLabel -DriveId $OneDrive.Id -DriveItemId $File.id
Getting the Sensitivity Label for a File
The Get-MgBetaUserSecurityInformationProtectionSensitivityLabel cmdlet retrieves sensitivity labels available (published) to the signed-in user account, which requires consent for the InformationProtectionPolicy.Read permission. This code runs the cmdlet to fetch the set of sensitivity labels and builds a hash table from the label identifier and name. An array holding the file types supported by sensitivity labels is also defined.
$Account = (Get-MgContext).Account
[array]$SensitivityLabels = Get-MgBetaUserSecurityInformationProtectionSensitivityLabel -UserId $Account
If ($SensitivityLabels) {
    $Global:SensitivityLabelsAvailable = $true
    [array]$Global:ValidFileTypes = "docx", "pptx", "xlsx", "pdf"
    $Global:SensitivityLabelsHash = @{}
    ForEach ($Label in $SensitivityLabels) {
        $SensitivityLabelsHash.Add($Label.Id, $Label.Name)
    }
} Else {
    $Global:SensitivityLabelsAvailable = $false
}
To retrieve the sensitivity label for a file, the script uses the extractSensitivityLabels API. A file can have multiple sensitivity labels, but only one label can apply protection through rights management-based encryption. As you can see, a POST request is used. This is because the API updates the SharePoint Online site with details of the sensitivity label. As I noted in a previous article, this action can cause incompatible label errors to be generated.
If ($SensitivityLabelsAvailable -eq $true) {
  # Only check for sensitivity labels if they are available
  $FileType = $File.Name.Split(".")[1]
  If ($FileType -in $ValidFileTypes) {
    $Uri = ("https://graph.microsoft.com/beta/sites/{0}/drive/items/{1}/extractSensitivityLabels" -f $Site.Id, $file.id)
    Try {
     [array]$SensitivityLabelInfo = Invoke-MgGraphRequest -Uri $Uri -Method POST
     If ($SensitivityLabelInfo.labels.sensitivityLabelId) {
       [array]$LabelName = $SensitivityLabelsHash[$SensitivityLabelInfo.labels.sensitivityLabelId]
     } Catch {
        Write-Host ("Error reading sensitivity label data from file {0}" -f $File.Name)
       }
     }
}
Sometimes errors happen when reading sensitivity labels from files and you’ll see a message like this:
Error reading sensitivity label data from file Chapter 1 – Office 365 Overview – Final.docx
One reason why this happens is when a file is protected by Office Information Rights Management (IRM) instead of a sensitivity label. The solution is to remove IRM from the file by opening the Protect Document section of file info and setting the protection to unrestricted access (Figure 2).
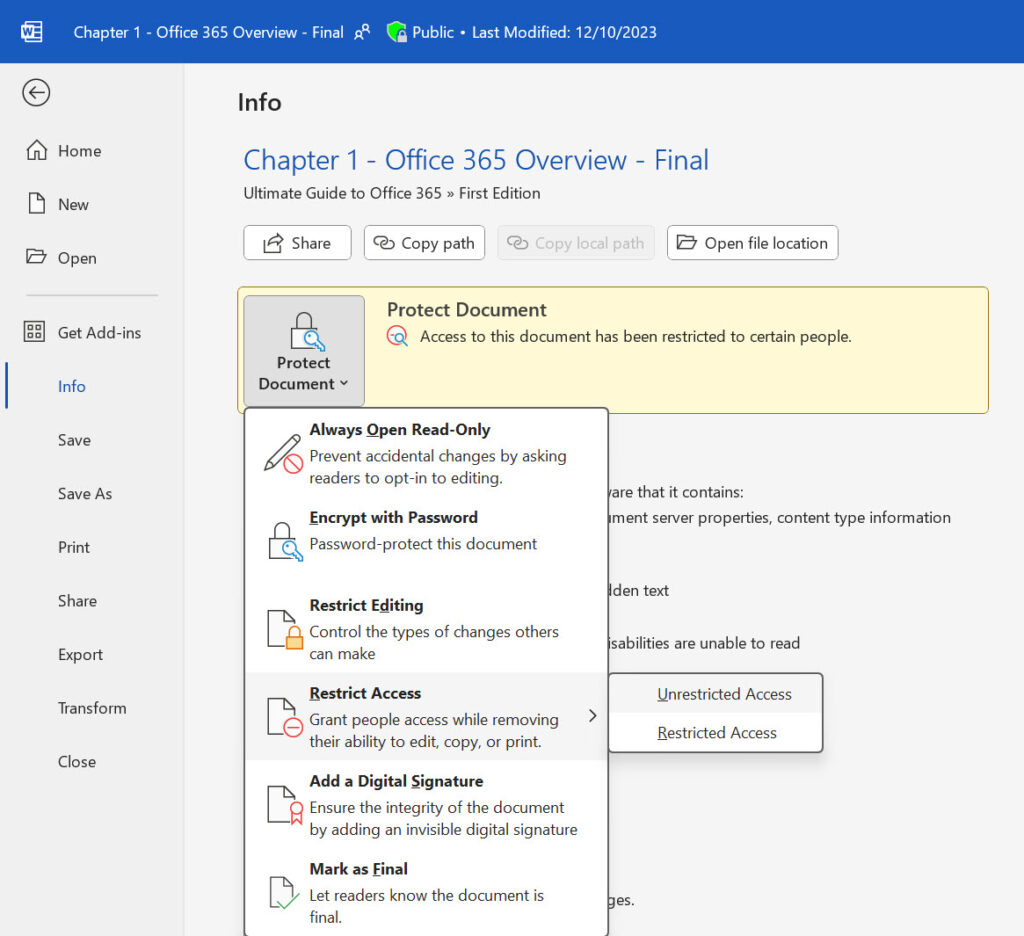
Another reason is that the file is assigned a sensitivity label that’s been removed from the tenant or was changed to or from a sublabel. The solution here is to ask the author (who always has rights to open a file) to open the file and assign a different sensitivity label. I am sure that other reasons exist why the API might fail. It’s just that I haven’t encountered those conditions.

The Report Output
The script processes files at between 225 and 300 files per minute. Generally, the fewer files with sensitivity labels found in a site, the faster the script runs. To run the script faster, edit the code to remove the lines that fetch information about the set of sensitivity labels defined in the tenant and the lines that call the extractSensitivityLabels API to retrieve the sensitivity label from a file.
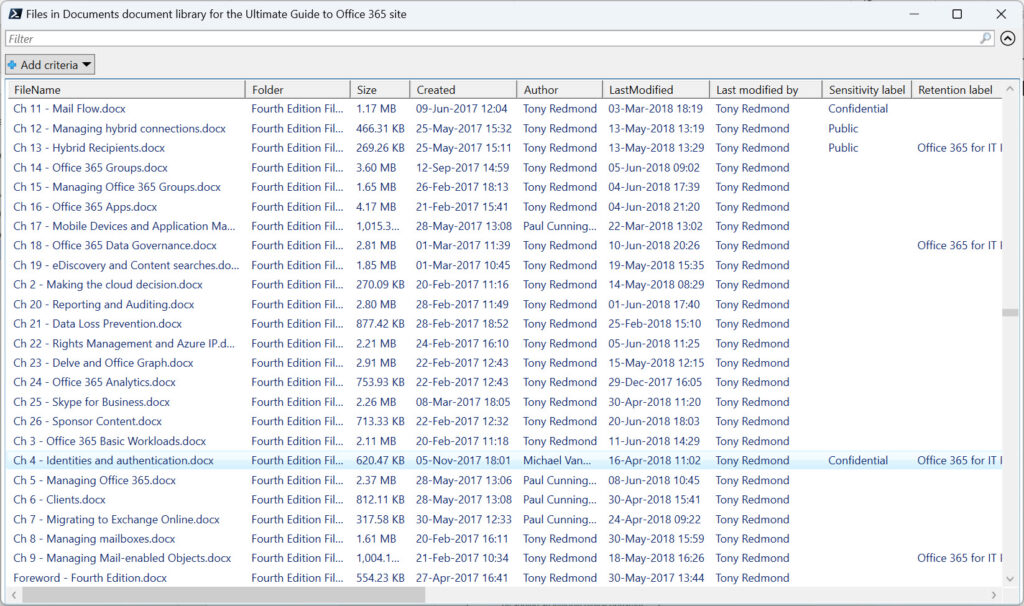
The output is a PowerShell list (shown in Figure 3). The script also exports the content of the list to a CSV file.
You can download the full script from GitHub.
Generative AI Makes Digital Debris Dangerous
The temptation exists to leave files alone in SharePoint sites. Retention policies help keep swelling file numbers under control but won’t remove any file that has a retention label with a longer retention period. As you can see from Figure 3, some of the sites I use contain files going back to 2017. Unless the tenant storage quota comes under pressure, administrators have no reason to dedicate time to finding and removing obsolete and potentially misleading files.
That is until the era of generative AI arrived. Tools like Copilot for Microsoft 365 can access any file in any site available to the signed-in user. Copilot has no sense of whether the content of a file is accurate or relevant. The content just provides more words for Copilot to work against as it generates output in response to user prompts (requests). Unless Copilot users scrutinize the generated output, the potential exists for inaccurate information to creep in. That’s one good reason to remove old and obsolete files from SharePoint Online instead of letting the digital debris accrue in place.
Hopefully, this script helps people understand how to use the Microsoft Graph PowerShell SDK to navigate SharePoint Online sites and gain an insight into quite how much old content lingers. The logical next step might be to edit the CSV file to remove items that should be kept and use the remainder as input for removal by the Delete Item API. That’s a topic worthy of another article!


Can we get the details of retention label applied on files in one drive or sharepoint sites by users. we need the detail of all one drive and sharePoint sites where user applied retention labels manually.
You won’t get that data from SharePoint or OneDrive. It’s logged in the audit log, so you’ll need to investigate there.
Here’s how to find who assigned retention labels to SharePoint files.
Hello Tony Redmond,
Nice Document,
Need one help can we generate the report for All Sites or by passing the sites from a csv file.
Also, this will capture details from All Document Libraries present on the site if I am not wrong.
Will wait for your response.
Thanks…
The issue you have would be access. You’ll need to run such a script in an app-only context so that you can use application permissions to access all the target scripts, but yes, what you want to do is possible.
Is there a script that would identify where IRM is enabled in SharePoint online?
You mean the old-style IRM where protection is applied to files when they are downloaded from SharePoint? I don’t have such a script and I think it would probably depend on access to a SharePoint site setting that isn’t revealed by the Graph. Maybe it’s possible with CSOM.
@ Tony
Is there any way I get a report for all files, files inside folder of a SharePoint online document library to capture last access time, last modified time and export as CSV?
Nope. SharePoint doesn’t make the last access time for documents available through the Graph. You can get information about file accesses from events in the audit log.
How can I get the Audit log for a specific site without setting up start and end dates?
Just run an audit search for FileModifiedEvents over a period and filter the desired events from the set that comes back.
I am looking for last access time not last modified time
Look for the FileAccessed event.
Is it not “Get-MgDriveItem” ?
https://learn.microsoft.com/en-us/powershell/module/microsoft.graph.files/get-mgdriveitem?view=graph-powershell-1.0
Are you referring to the function Get-DriveItems? If so, the Get-MgDriveItemChild is the cmdlet used there to retrieve items from a drive.
Is there any way to know how many guest users have accessed SharePoint files and how the sharing was done by whom etc. by graph??
No. That’s an audit function, so you need to search the audit log for that kind of information.