Creating content to share with your fellow IT professionals is a time-consuming endeavor. Getting the right setup and equipment is important, but it’s difficult to determine what the best kit for your budget is. The good news is we’ve spent a lot of time testing different kits to bring your videos, podcasts, and articles to life.
In this article you’ll find out exactly what you need to begin tech blogging, vlogging or podcasting – from Microsoft 365 environments, microphone, cameras, and green-screens – to software for recording or streaming your next tech discovery in the Microsoft Cloud.
Tech blogging about Microsoft 365? Here’s what you need
If you plan to start blogging or writing articles about Microsoft 365, then you’ll need a sandbox tenant. If you work with Microsoft 365 during the day and accomplish something interesting, solve an unusual problem or pilot a new feature, it is not appropriate to take screenshots in a client’s tenant and then post them on your own blog.
There are several options for obtaining a Microsoft 365 tenant to test with:
- The Microsoft 365 Developer Program provides a free, renewable Microsoft 365 E5 tenant that you can customize to your needs.
- For short term tests you can sign up for a fresh trial tenant. This is especially useful if you are testing features available in lower SKUs.
- Microsoft Partners can grab demo tenants – but I’d advise against these as a rule, as the above options allow you to keep an environment customized to your blogging needs.
You might need a lab environment for hybrid scenarios. You can buy or build a lab server quite cheaply or use Azure. Lower end basic VMs, such as A1, A2 and A3 can cost less than $10 a month for the <24 hours you’ll usually need to test scenarios with.

Recording tech videos & podcasts? Here’s the best kits & software for any budget
There are hundreds of options and many different views on what the best kit is to record a podcast or tech video with, and I’ve read and watched almost every review and bought a wide variety of kits.
They key reason for getting the right kit to record tech videos or podcasts with is so you can spend less time editing and making your video or podcast look professional and make better use of your spare time focusing on the actual content.
Microphones
If you’re a subscriber to our YouTube channel, you’ll see that I use several microphones depending on what type of video or podcast we’re making.
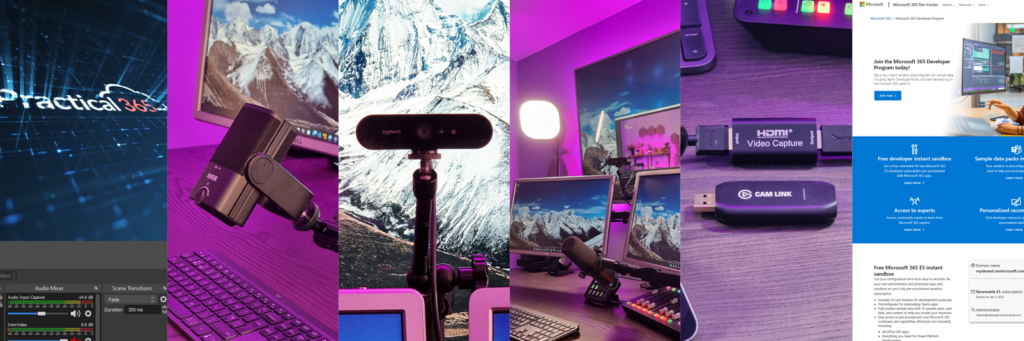
Rode NT-USB Mini – the best for any budget
If I had to choose one microphone for a reasonable price, I’d pick the Rode NT-USB Mini at around $100. USB microphones can be bought for less money, but you’ll soon outgrow them and become disappointed with their quality.
For podcasts and voiceovers for tech videos, dynamic microphones are usually the best go-to microphone type, as they capture your voice well but also are effective at ignoring background noise or room echo. The NT-USB Mini (Figure 1) is a condenser microphone, but has been designed with a cardioid pattern similar to most dynamic vocal microphones (i.e. it picks up sound directly in front of the microphone).
The Rode NT-USB Mini has one of the key features you need from a USB microphone; a headphone socket that provides zero-latency monitoring and the ability for you to hear the PC output – such as your co-host or guest. As you record your podcast or video, you’ll want to make sure you can be heard properly and hear your co-host through your headphones rather than the external speakers. If you use a microphone without this capability, you’ll have to listen to audio through the PC. Due to the added latency, you’ll hear your voice approximately half a second after you speak, which is extremely distracting.
The Rode NT-USB Mini also comes with software called Rode Connect. This is a software mixer that works with the advanced chipset inside the NT-USB Mini and allows you to record your podcast in the same way we record the Practical 365 podcast – introduction music, multi-track recording, and PC audio if needed. If you plan to meet up in person with a co-host, then you can connect both of your NT-USB Mini microphones to a single PC and mix/record both tracks much like a physical mixer.
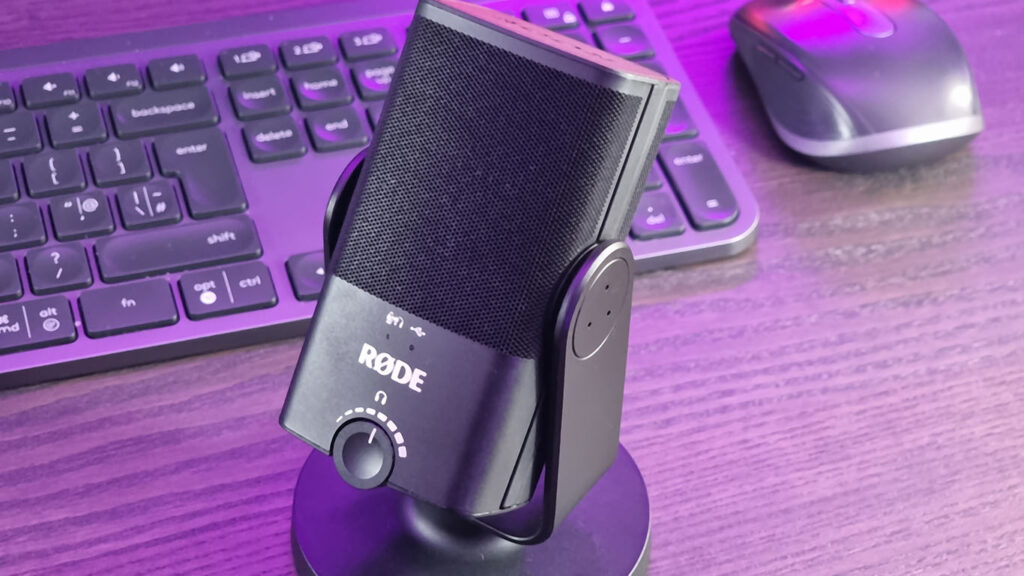
The Rode NT-USB comes with its own built-in stand, however if you’re recording a tech podcast or video you’ll probably need to type on your keyboard, in which case a microphone arm is a valuable addition. Rode’s PSA1 (or PSA1+) is professional quality, excellent value for the money, and should last a lifetime.
That being said, the PSA1+ isn’t great for recording tech videos as it’s hard to keep out of camera shot. The Elgato Wave Mic Arm LP (Low Profile) (Figure 2) is around the same price as the PSA1 (around $100). Whilst it’s not as well built as Rode’s PSA1, it is perfect for tech videos as you can keep your microphone out of shot and easily type on the PC when you’re recording demos.
The best of the rest for pro-quality recordings
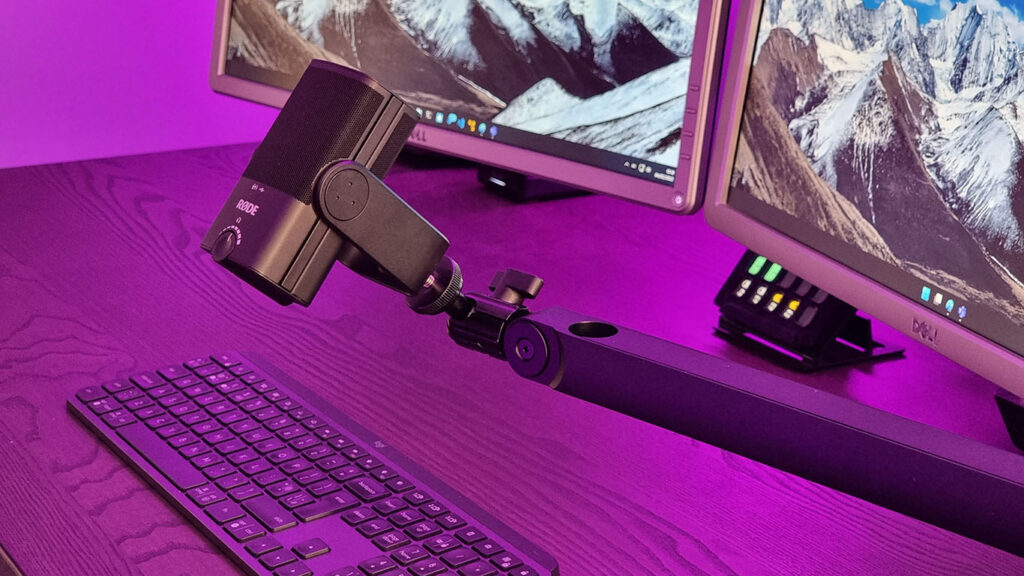
The standard for live gaming streamers, well known podcasts, and many radio stations is the Shure SM7B microphone (Figure 3). I’ve had one of these for around 8 years and use it for the Practical 365 Podcast and the tech videos on our YouTube channel.
As it’s a traditional microphone it needs to be paired up with an audio interface or mixer. I use the Rodecaster Pro, which like Rode Connect, allows for recording the individual audio tracks – such as Paul Robichaux joining me as co-host over Teams and our intro music. As the Rodecaster Pro is designed for recording podcasts, we can export the audio and upload the podcast without editing.
At the higher end of USB microphones, the Shure MV7 is designed to look and sound like the SM7B. It costs around three times the price of the Rode NT-USB Mini but includes an XLR interface that you can use with a mixer like the Rodecaster Pro in the future. Other Microsoft MVPs I know who’ve bought one seem to be pretty happy.
What about Teams-certified devices?
If you’re working in the Microsoft 365 arena, then you’ll undoubtably prefer to use Microsoft Teams-certified devices for meetings and calls. For recording podcasts and tech videos, a Teams-certified device isn’t always the best option.
Day-to-day, like most Microsoft 365 pros, I use a certified headset for my calls rather than the microphones we’ve recommended above. They are designed to work well with Teams, provide location flexibility during meetings, and focus on clarity rather than pure audio quality.
You’ll find that whilst you are crystal clear in a meeting with a Teams-certified headset, for the same reason (noise cancelling and processing in the headset itself) the audio quality isn’t ideal for recording a podcast or tech video.
Webcams and Video Recording
For a tech video or live streamed tech podcast, your built-in laptop webcam probably isn’t good enough. And for screen recordings where you show how to do something, you should record video too. Sometimes you’ll want to demonstrate concepts to someone watching, rather than just recording your screen and talking.
You also don’t want to over-complicate your workflow for recording tech videos to the point you’ll need to take a course in video editing, just to create a half-decent video showing how to accomplish something in Microsoft 365.
There are just three things you need to be able to record tech videos well:
- A decent camera positioned correctly
- Good lighting that illuminates you consistently well
- Screen recording and capture software that can be controlled as your record
Logitech Brio – the best webcam for tech videos
For our Practical 365 videos, we use a variety of different cameras, and to keep things simple and consistent it would be great to use one for everything – from our Teams Walkie Talkie to our tech discussion and demos and live streams. Those videos all used the same camera (a Sony ZV-1) which seemed like a great plan, but wasn’t as simple as hoped.
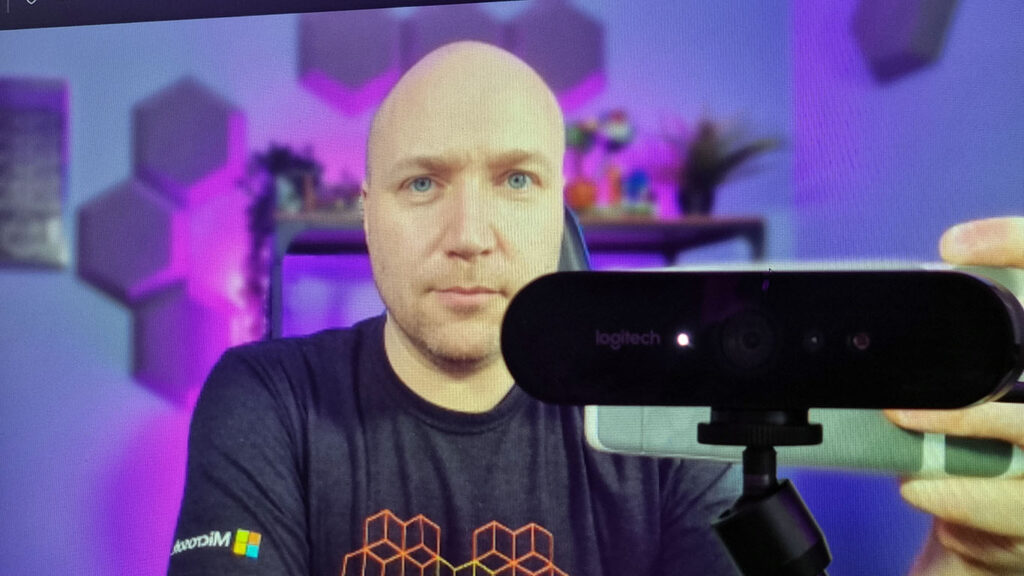
What I’ve learned from overheating cameras and unreliable capture cards is – for anything that’s recorded in one single place, the best option is the Logitech Brio (Figure 4):
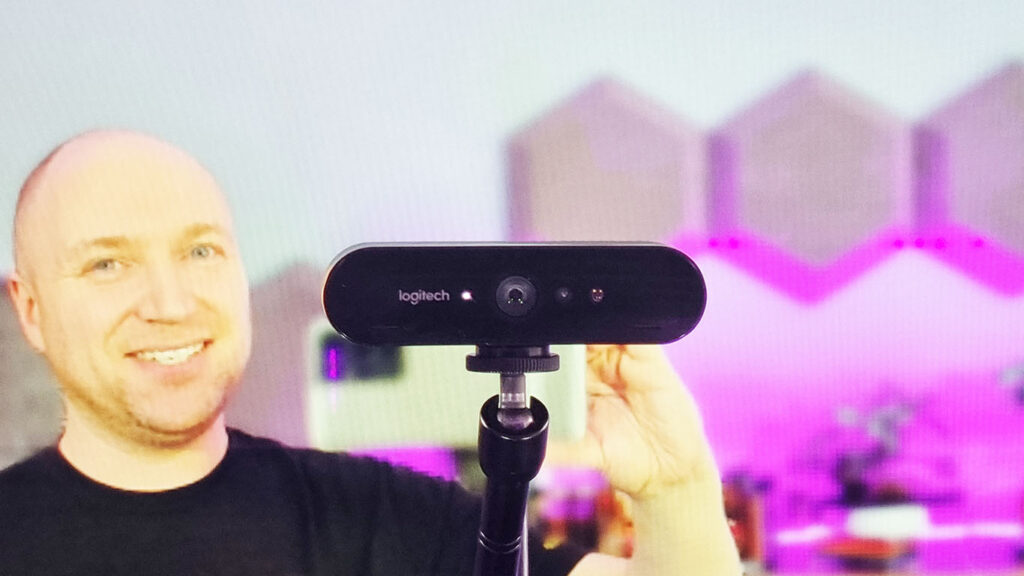
In terms of quality, if you compare the Logitech Brio to a vlogger-focused mirrorless digital camera like the ZV-1, there’s very little that’s noticeably different, at least for tech videos. In our most recent videos, like this guide on Task Publishing in Teams, the quality of the Logitech Brio is excellent.
Whilst there are other, newer webcams designed for live streaming such as the Elgato Facecam, the 4K recording capability of the Logitech Brio makes it much easier if you need to crop the video shot as you record, or afterwards. That means you can have several different shots, such as side-by-side with your demo or a wide-angle shot, from a single recording. Plus, the Logitech Brio is a Teams-certified webcam, which means you can confidently use the camera in Teams meetings.
The key reason I use the Logitech Brio for our Practical 365 tech videos is reliability. A long podcast or video series can take some time to produce, and the Brio is not going to overheat or suddenly stop working halfway through.
Lighting and Camera Positioning
Making sure you are well-lit is crucial. Even the best camera will produce a bad result if you aren’t lit properly, and the camera isn’t in a great position.
The Logitech Brio is at its best when positioned correctly. Whilst it comes with a monitor clamp, you’ll be better positioning it at the correct height and distance using a desk mount. You’ll find these around $30 on Amazon from a range of sellers, and they work well paired up with an articulating rosette arm / magic arm so you can flexibly position the camera and bring it closer to you. If you already have a monitor stand clamped to your desk, you can do as I do and just use the magic arm with a clamp attachment to avoid clutter.
I realized I needed to improve both my lighting and camera after we recorded this podcast interview with Microsoft’s Erica Toelle. Erica is using a Brio and is lit from both sides of the camera.
Naturally, after seeing how great her video looked, I asked her for advice, and bought better lights. I retrospect, I’d have saved a lot of time and money if I’d done as she did and brought a Brio rather than wasting a lot of time and money with more expensive and complex camera setups.
If you need to improve your lighting and have very little budget, for around $20 each, uou can buy small, rechargeable, portable video lights like this Ulanzi VL49. For our location-based Practical 365 videos, these are perfect when paired up with the Sony ZV-1 and work well enough for lighting tech videos in a pinch. They can be attached to cheap desktop light stands and positioned on either side of your desk. However, you’ll soon outgrow these and see their limitations.
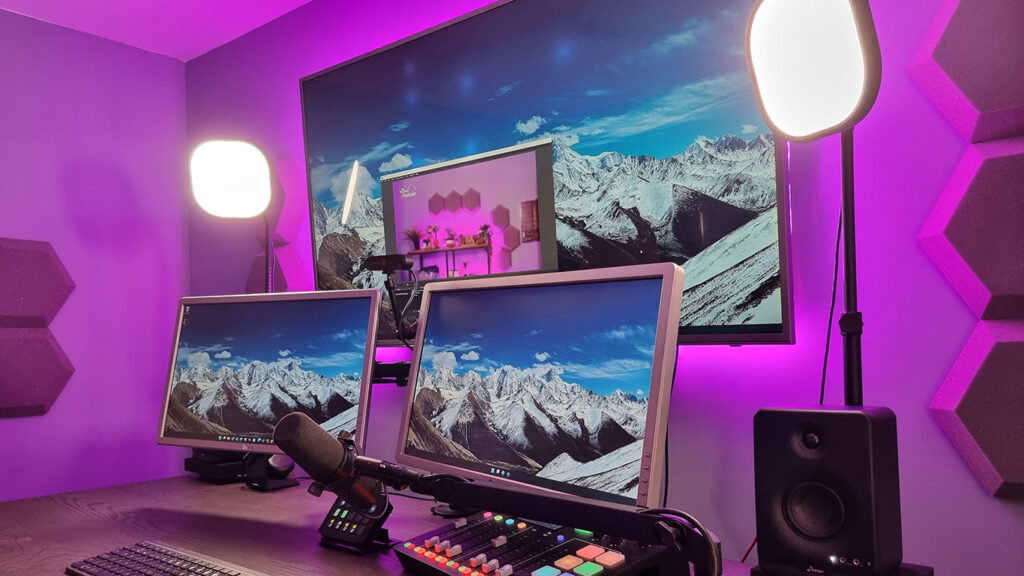
Mains-powered LED lights are a better option for recording tech videos, and the requirements are nearly identical to that of live streamers. Elgato’s Key Lights or Key Light Air (Figure 5) are the most straightforward options that will work well, consistently and without hassle. Two, positioned either side of your desk will work well.
The Key Light, Key Light Air and Ring Light are all Wi-Fi connected and integrate with common platforms like Home Assistant, meaning it’s easy to automate switching the light on and off. I use a simple app I’ve created so when I begin a recording or join a Teams meeting, both Key Light Air devices switch on, and switch off when the meeting or recording ends.
If you can’t justify buying lights, then the second-best option is to re-position your desk so that natural sunlight illuminates you face-on. Even with lighting, sunlight from the side will cause problems – and if the sun is behind you, you will struggle to get satisfactory results.
Teleprompters and green screens
It is possible to go too far with tech video recording, and using teleprompters and green screens are a good example of this.
Why you don’t need a teleprompter and how to get eye-contact
The most useful benefit of a teleprompter (with a field monitor connected to your PC) is so you can have eye contact with a guest on a podcast video recording. For most videos, such as those on Practical 365 or virtual conference presentations, reading a script from a teleprompter will do you no favors. Instead, I’d recommend rehearsing your content as many times as it takes before you know it well.
Using a teleprompter for tech videos will soon (and I know this from experience) add a lot more time to your preparation, as you still need to prepare your demo and know what you will say. Your time will be better spent using Presenter Coach in PowerPoint to refine your skills.
To establish eye-contact with remote guests, or for the ability to look at the camera whilst you present, there’s a simpler option that doesn’t require a bulky teleprompter, screen and mount for the camera.
A magic arm (Figure 6) provides that flexibility needed to reposition a camera (like the Brio) to wherever you need. I have two so that I can position the camera in front of the screen where needed.
I have seen other MVPs use a small tripod on their desk when they present, again, with the camera positioned in front of the screen which appears to work well. The benefit of both approaches is that when you are finished recording or presenting, you can move it back to a better position in seconds for normal day-to-day meetings.
Use software-based tools like Teams to avoid a bulky green screen
In day-to-day Teams meetings you don’t need a green screen, because technology can be used to remove your background. When recording a tech demo, you need to record at a higher quality than a Teams Meeting recording so you might desire a green screen.
If you do opt for a green screen, then Elgato (again) has a range of pop-up and roller-blind versions that avoid common problems such as creases or unwanted light reflections.
A straightforward option if you’d like something Teams-quality for background blur or removal when recording videos outside of Teams, is XSplit VCam. This can output the removed background as a transparent alpha channel to capture applications too, making it easy to insert yourself Teams Standout-Mode style in your tech videos.
If you’ve opted for a powerful PC or laptop, then check if you have an Nvidia RTX-based graphics card. Nvidia Broadcast (Figure 7) is a free AI-based utility for RTX graphics cards that uses the GPU to perform advanced background removal and effects, surpassing what Teams can do using the AVX-processor capabilities.
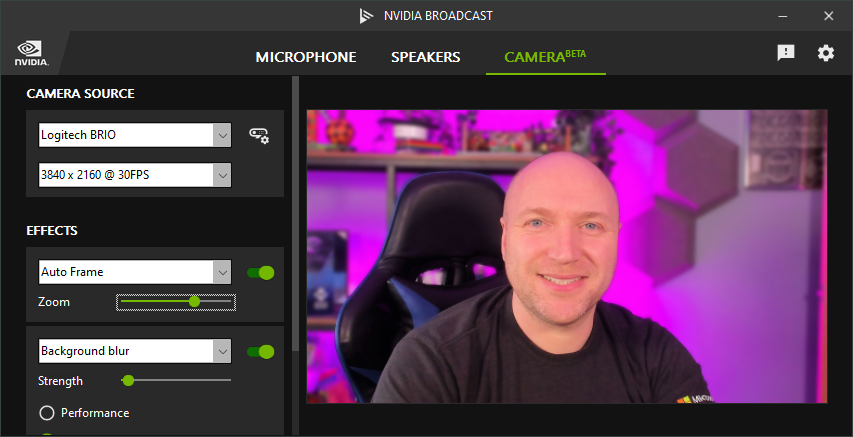
I use this to auto-frame, provide gentler background-blur, and remove backgrounds in Practical 365 videos filmed using the Logitech Brio.
Due to the scarcity of GPUs, I have to admit this was an expensive add-on for the PC I use to record videos – but it was worth it, as the graphics card also has built-in video encoding features that make Practical 365 live streams to our YouTube channel easy, even if Teams is running.
Best capture devices for camera input and HDMI screen capture
One area I’ve spent a lot of time on is getting input into the PC for recording and demos just right.
The flexibility to share captured HDMI input as a webcam is crucial because you can easily feed that input as your camera into a Teams meeting when needed. If you are creating tech videos about Microsoft 365, it’s likely you’ll also want to present at virtual user groups too.
This limits the capture cards you can choose from as some are designed primarily for live-streaming games from an attached console, and others are designed for broadcast use.
The good news is that the majority are designed for camera input, are compatible with Teams and Zoom – and can be used when recording demos as well.
What to avoid
Higher-end capture devices such as Elgato’s Cam Link 4K should be an option you can’t go wrong with. However, I’ve found that for longer live streams and tech videos, the Cam Link 4K device has a tendency to overheat. Originally suspected to be a faulty unit, a replacement didn’t fare any better. A little research found reports of similar issues on forums. Whilst the video quality is better than cheaper devices, it isn’t worth it if you’re in your flow recording the perfect Microsoft 365 tech video.. and the capture card linking the camera to the computer stops working.
Determined to overcome this while maintaining the quality, I tried the Cam Link Pro installed in a current-generation AMD Ryzen 7-based PC. This one didn’t overheat but could not reliably process 4K input from the ZV-1 and HDMI-attached PC screens or other video sources – it could do one, but not several. It was a waste of money.
As Microsoft Teams supports Blackmagic’s Decklink cards for video out, I also bought a Blackmagic ATEM Mini Pro as an external video mixer, recorder, and streaming device. Having seen Jeff Teper use one, and hearing they worked well at CommsVNext I thought it could be worth a try.
We used it for our Microsoft Ignite 2021 live stream, but frankly – trying to re-compose video output on the fly, whilst presenting a podcast, led to some issues.
With the Decklink Monitor output from Microsoft Teams it’s perfect for a hybrid conference session on-site at a venue. However, for tech videos – as it requires a mirrorless digital camera or camcorder, and your time to learn how to use it well – it provides limited value for the money and is hard to recommend. The ATEM Mini Pro and ZV-1 Camera cost over $1200, whereas a Logi Brio webcam – and a few of the capture dongles below – can be bought for less than $200.
$10 Video capture cards are reliable and good enough
After all that expense, you’ll be surprised to learn that a common $10 USB video capture dongle (Figure 8) proved most reliable in almost every scenario.
Whether that’s feeding in Paul’s Teams output into the podcast, capturing Teams on a mobile device in videos or feeding in dual-screen Microsoft Teams Rooms and a Sony ZV-1 camera for demos, it hasn’t let us down yet – even when recording using three devices at once.
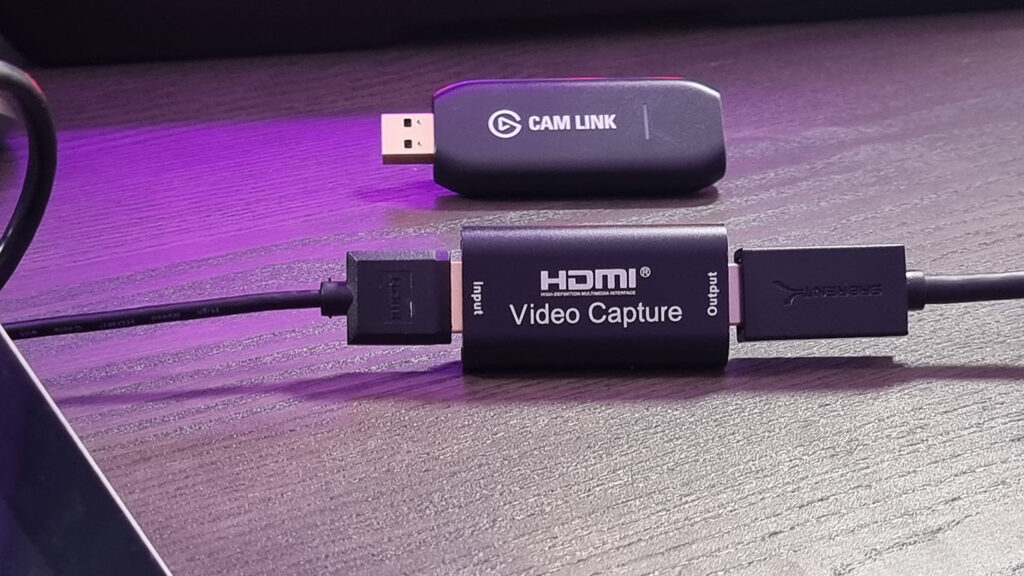
To validate that the common $10 video capture dongles that look the same (see above) actually are the same hardware, I purchased several from different vendors on Amazon, priced between $7 and $15. They appear to be the same device – “USB Video,” are USB 2.0, output MJPEG video with a little compression at 1080p/30 FPS, very little latency, and so far, have not failed when recording.
As another example of their versatility, I’ve even used them at in-person Microsoft 365 user groups so that a presenter can feed their HDMI cable into the user group laptop, which is then live-streamed to remote attendees and displayed on the in-room projector.
Use OBS to record tech videos and live stream
Regular readers of Practical 365 will remember my article on how to Live Stream from Teams, using NDI capabilities and OBS, like we do when recording the Practical 365 podcast over Teams.
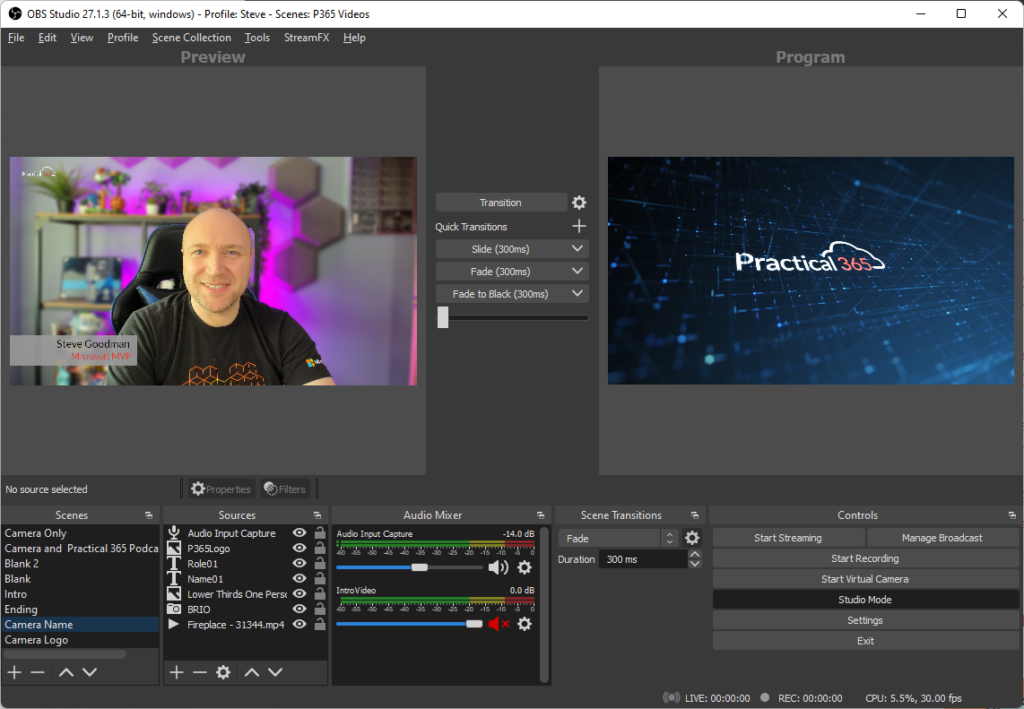
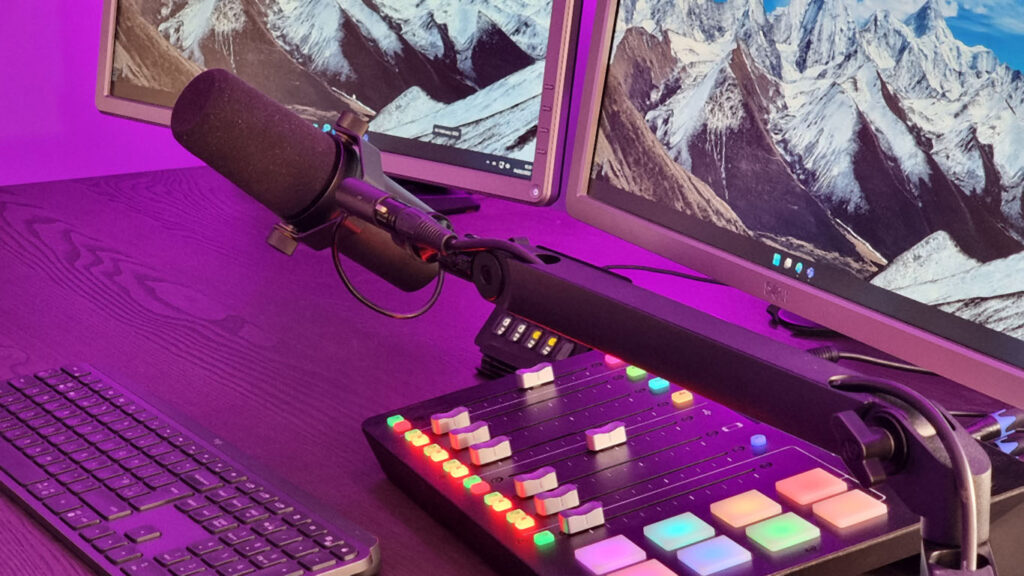
I also use Open Broadcast Software (OBS) (Figure 9) to record videos on our YouTube channel, using an Elgato Stream Deck (Figure 10) to switch between views, such as a screen share, mobile phone or PowerPoint deck.
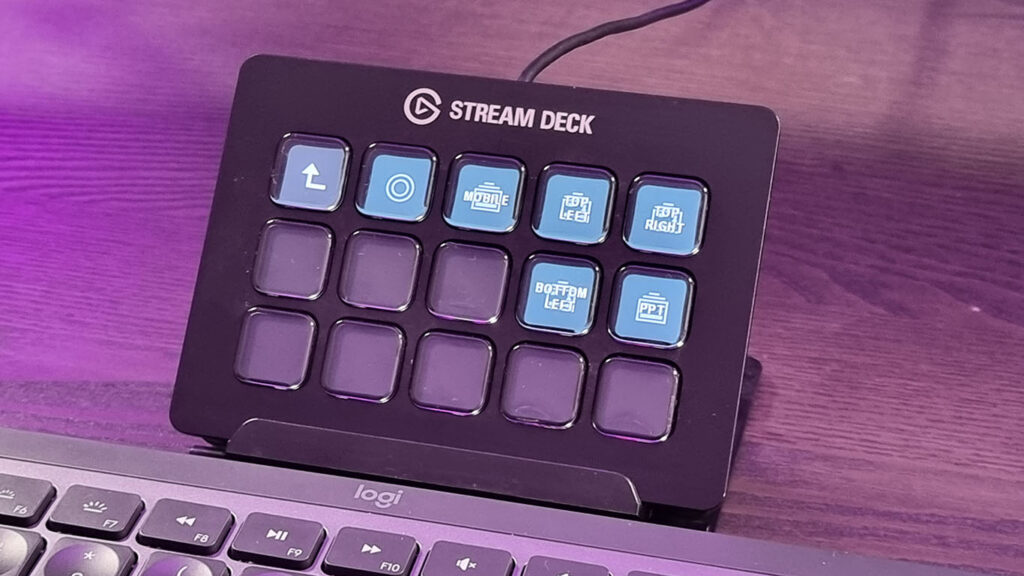
Before you invest in a Stream Deck though, you might want to try StreamControl, which (combined with the OBS websocket plugin) which allows you to use an Android phone to perform similar functions. I used StreamControl for several months before taking the plunge and buying the Stream Deck. I ended up buying the Stream Deck so I could control more than just OBS from one single panel.
As well as the Stream Deck, I also use the Advanced Scene Switcher plug-in to control OBS. It automatically performs regular tasks, like starting recording, playing the introduction and then automatically switching to the video feed after the intro finishes. You can use it so when you’re performing a demo in your video, the feed switches based on your mouse position. Move your mouse to the screen with the demo on and it will switch, then move your mouse back to the screen with OBS and it will change back to your video feed.
As you’ll soon find out, using plug-ins with OBS makes it easy to record a tech video without having to think about what scene or layout to switch to, or to add advanced features like bringing in Teams video feeds. Plug-ins help avoid the need to edit your videos later.
Alternatives like Camtasia are great if you want to get all your content recorded first and then edit it later. I used Camtasia to edit our Teams Walkie Talkie video and many of the earlier Practical 365 podcast interviews, prior to the Teams video and audio improvements that allowed us to switch to Teams for the podcast itself. For many MVPs, thanks to a complementary license, Camtasia and Snagit are part of every MVP’s tool kit and are much easier for most people to use than alternatives like Adobe Premier.


My camera have some problem according this blog I fix my camera completely . And i want to thnks to the owner of this post
Steve,
do you have any recommendations regarding devices with clean HDMI output?
-Thomas
Hey Thomas,
When I first went looking for a mirrorless/DSLR type camera, I first looked at Scott Hanselman’s guide “Good, Better, Best creating the ultimate remote worker webcam setup on a budget” (https://www.hanselman.com/blog/good-better-best-creating-the-ultimate-remote-worker-webcam-setup-on-a-budget) which pointed me to this Elgato Camera Check site: https://www.elgato.com/en/cam-link/camera-check
However – further research led me to the Sony ZV-1, which is purpose-designed for using as a vlogging camera and a webcam. Soon after that was launched (and I’d bought one) the Sony ZV-E10 was launched.
Both have a clean HDMI output (as do the cameras they are based on).
The ZV-1 can be used directly connected as a USB webcam. Although it can be charged over USB by a PC, strangely, using it as a webcam drains the battery and doesn’t charge it, so you end up needing a dummy battery if you want it connected all day. Additionally, every time you use it (or each time you start your PC for the day, assuming you use a dummy battery), you need to disconnect it from USB, switch on the webcam feature, then plug it in; otherwise it connects as a file device. The other downside is that the webcam output is 720p only.
The HDMI output needs switching so that it is clean HDMI out, but only one time. The clean HDMI out can be 1080p or 2160p. The frame rate depends upon the PAL/NTSC setting.
As I mentioned in the article, the challenge with this , the “best of the bunch” for pure quality when it comes to HDMI-in as a webcam is the Cam Link 4K. However for prolonged usage either the Cam Link 4K would overheat or randomly stop working as a USB device (mitigated slightly, but not entirely, by some forum suggestions about using a hidden setting in the Cam Link software).
Out of other devices I used, the cheap USB Video in devices that are 1080p provided reliable usage, with little lost in quality. Fundamentally though, those devices are “OK” and side-by-side the Cam Link 4K USB is better than a) those devices b) similar priced competitor devices I bought between £50-£100 and c) with identical settings, side-by-side, the Cam Link 4K had better colour reproduction than the Cam Link Pro. But for reliability – I felt I could only use the cheaper device that “always worked”.
However the camera overheating issue then became apparent, as recording say – several 20 minute videos, with a backup 2160p video to ensure I had a full-quality copy as well as the OBS capture resulted in the camera overheating and switching off.
Hence why I ended up, after a frustrating weekend of trying to get some complex video guides recorded… ordering a couple of Logitech Brios, as for half the price I have a two-camera setup that always works.
For roughly the same money as a Sony ZV-1 and Cam Link 4K, you can buy the Brio, but if you use a desktop PC, add on a RTX GPU. I bought an NVIDIA RTX 3060ti.
As I mentioned in the article, I use NVIDIA Broadcast with it as I am pretty happy with it’s AI-based background blur that leverages the GPU. It’s configurable, so a very light background blur effect gives a bokah output roughly equivalent to the Sony ZV-1; plus the 2160p Brio can be fed through NVIDIA Broadcast’s auto-framing feature. You’ll see both the light blur and the auto-framing in action in the latest interview I did earlier in the week: https://www.youtube.com/watch?v=NQAyKE61ulA
Hi Andi,
The purpose of the article isn’t to try and illustrate every single option – I’d rather help people avoid wasting time and take a shortcut to the finish line.
That is indeed one option I’ve looked at as well. I agree with you – it is a good option. When recording tech videos, with audio from a decent mic, I found it adds enough latency to make it difficult to sync audio with, even when wired to the PC USB appears to use the network (IIRC) – and obviously requires an decent camera phone rather than < $200 model. I.e. a Galaxy J6 would be worse than most webcams, but an iPhone SE (2020) would be OK and can be bought for a reasonable price. VCam, mentioned above for background blur & removal is probably the best option of the apps I have tried, as it provides similar features to Epoccam, has a wired option, plus remains useful with better cameras when you get one. There's also other similar apps on the market but sadly not one that a) can use an Android phone, even in developer mode, reliably to appear as a native webcam via a wired connection or b) easily allows you to switch between modern camera phones' different lenses, for example, if you want to get a decent bokah effect. I'll update the article to reflect this, as there's nothing worse than reading a post like this, then thinking "maybe the author didn't try *this* and then wasting a week of your spare time trying to get something working. Those apps are fine for, say, a better webcam for meetings, but... to be honest, even then, you would be better pairing your headset with the phone, mounting the phone in landscape mode, and joining the Teams meeting from the PC with no audio & video, and natively joining the meeting with video and audio from the phone itself. Steve
Great article, thank you!
As for cameras (and mic if you want) you could also opt for Elgato Epoccam which utilizes your iPhones camera. The pro version is like 6 euros and provides great video (and audio) from your phone either on a Mac or PC. You can try it with the “normal” version which is free and can only use the camera at a lower resolution (which is still better than many webcams).
Regards
Andi