
Automation is centric to our role as IT professionals in order to make manual tasks such as managing servers, endpoints or processes, more streamlined and efficient. However, since the proliferation of cloud technology, we’re now facing a new challenge, managing and automating the cloud environment.
To do this, we need tools to manage the cloud environment in the same way we managed our on-premises servers. In this post, I’ll demonstrate how to run PowerShell scripts for automating manual processes in the cloud environment without a third-party tool or resource.
As a case study for this article, I’m going to show you how to automate the new user onboarding process in Office 365. The process follows four main steps:
- New user request submission
- Approval by manager
- User account provisioning
- Office 365 license assignment
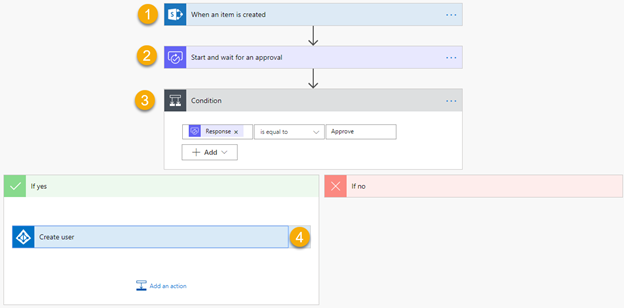
The first three steps are covered in my previous blog post Automating New User Account Onboarding Using SharePoint Online, Flow, and PowerApps. Check it out to follow the complete process, or if you don’t have time, here’s a summary of what was covered:
- A new user request is entered via SharePoint Online list by the recruiter
- The new record in the SharePoint Online list triggers the approval request via Microsoft Flow
- If a supervisor approves the request you can move to step 4
- Microsoft Flow creates the user account in Azure AD based on the data provided in the form (such as First name, Last Name, Department, etc.)

For the rest of the article, we’ll focus on automating the last major step in the onboarding process, which is assigning Office 365 licenses.
To achieve the goal of today’s blog, we’re going to use two very powerful automation tools:
- Azure Automation
- Microsoft Flow
Azure Automation
Azure Automation is a “serverless” environment you can use to run PowerShell or Python 2 scripts in the cloud. For example, when running scripts in the Azure Automation environment, you can scale up or down Azure VMs, you can manage your on-premises servers without exposing your servers to the internet, managing your Office 365 tenant and more.
We’re going to demonstrate the power of Azure Automation by integrating it into a Microsoft Flow workflow. This will give you a strong starting point for developing powerful solutions for your clients or organization, which will save time, money, and resources.
Microsoft Flow
Flow is a cloud-based automation engine with hundreds of connectors to automate tasks across multiple applications and services. We’ll be using Microsoft Flow to connect to the Azure Automation Account and run a PowerShell script to assign Office 365 licenses to a new user.
Before you begin
Before we get started, you need to make sure that you have access to the Azure portal or can request the creation of Azure Automation Account from the Azure Admin in your organization. For more information about Azure Automation requirements and permissions, please visit this link.
Provisioning of Azure Automation Account
The process of provisioning the Azure Automation Account and running a script in the cloud requires multiple steps:
- Create Azure Automation Account
- Import required modules if necessary
- Add Service Account (dedicated account to run PowerShell scripts with access to specific workloads)
- Create a Runbook
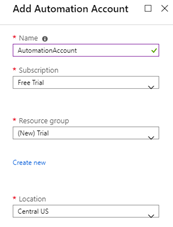
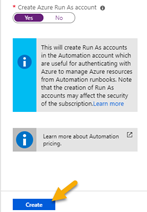
1. Create Azure Automation Account
Navigate to portal.azure.com, select All Resources and click Add.
Search for automation and click Create.
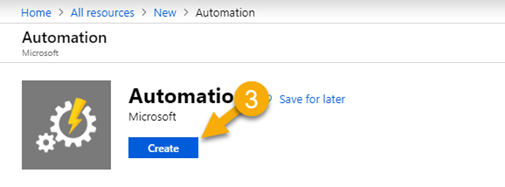
Complete the Automation creation form and click Create again.
2. Import required modules
As we know already, to work with different workloads such as Exchange, SharePoint, Azure or Office 365, you need to import the correct PowerShell modules to your scripts. Similarly, you can add the required modules to your Azure Automation Account based on the workload you’re trying to manage.
In this case, we’re working with Azure AD, so we need to import the module to our Automation Account. To do this, open the Automation Account that we’ve just created and in the properties pane open Modules gallery and search for AzureAD in the search box.
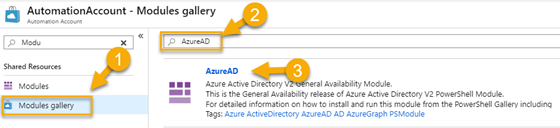
Select AzureAD module and click to import, then wait until the import process completes successfully.
3. Add Service Account
To streamline the script running environment, I prefer to add a special Account in my tenant, which has rights to run PowerShell Runbook in the environment. I can then use this service account to run all my Azure AD related scripts. To add the service account to your Azure Automation Account, open your Automation Account, and navigate to the credentials tab to complete the form.
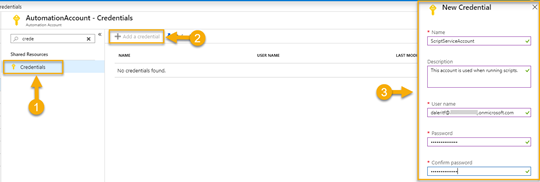
When credentials are added, you’ll be able to use that service account in your scripts.
Note: I would recommend using the same service account while creating your Flow, which I’ll explain why later in the blog post.
4. Create runbook
Runbooks are scripts that you run in the cloud. To Create a Runbook, navigate to your Automation Account, select Runbooks, and click Create a Runbook.
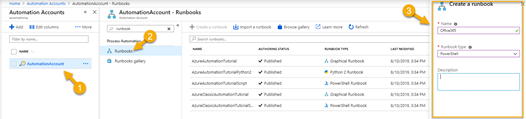
When Runbook is created, click Edit, and paste your script.

After entering your script to the script section, click Save and Publish.
If you want to find out more, here are the details from Microsoft’s documentation for creating Automation Accounts and manage Runbooks.
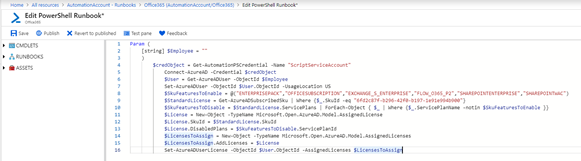
Script to assign Office 365 licenses to a user
Utilizing a full set of products from your Office 365 plan isn’t practical for most organizations. Usually, your policy will restrict certain products or request a review before deployment. With this in mind, this why we’re only assigning Microsoft Office, Exchange, Flow for Office 365, SharePoint, and Office Online from the existing Office 365 E3 plan.
The script below requires a parameter, this is the user’s UPN we need to pass. It’s important to note here that the script below will work without alteration if you have the Office 365 E3 plan. However, if you have a different plan, you’ll need to assign a different set of licenses. You can visit Microsoft Product Names and Service Plans document for more information on plan names and GUIDs for each license.
  Param (
 [string] $Employee = ""
 )
         $credObject = Get-AutomationPSCredential -Name "ScriptServiceAccount"
             Connect-AzureAD -Credential $credObject
             $User = Get-AzureADUser -ObjectId $Employee
             Set-AzureADUser -ObjectId $User.ObjectId -UsageLocation US
             $SkuFeaturesToEnable = @("ENTERPRISEPACK","OFFICESUBSCRIPTION","EXCHANGE_S_ENTERPRISE","FLOW_O365_P2","SHAREPOINTENTERPRISE","SHAREPOINTWAC")
             $StandardLicense = Get-AzureADSubscribedSku | Where {$_.SkuId -eq "6fd2c87f-b296-42f0-b197-1e91e994b900"}
             $SkuFeaturesToDisable = $StandardLicense.ServicePlans | ForEach-Object { $_ | Where {$_.ServicePlanName -notin $SkuFeaturesToEnable }}
             $License = New-Object -TypeName Microsoft.Open.AzureAD.Model.AssignedLicense
             $License.SkuId = $StandardLicense.SkuId
             $License.DisabledPlans = $SkuFeaturesToDisable.ServicePlanId
             $LicensesToAssign = New-Object -TypeName Microsoft.Open.AzureAD.Model.AssignedLicenses
             $LicensesToAssign.AddLicenses = $License
             Set-AzureADUserLicense -ObjectId $User.ObjectId -AssignedLicenses $LicensesToAssign
You can find a detailed explanation of how this script works in Tony Redmond’s book Office 365 for IT Pros.
Now we’ve completed the final step for configuring our PowerShell script in the Cloud environment, we can move to the next step which is calling the script when a new employee account is provisioned.
Call PowerShell Script from Microsoft Flow
We’ll be adding an additional step to our Flow to call the PowerShell Runbook right after we’ve created an account in step 4 of our workflow.
In your Flow, click on Add new action to add a new step and search for Azure Automation.
Note: Make sure that the user creating the Flow has access to an Azure Automation Account in AzureAD. Or, use the same Service Account (used in creating Azure Automation) to create Flow, but in this case, this service account must have access to Flow and SharePoint list.
In the Azure Automation action group, select Create a job.
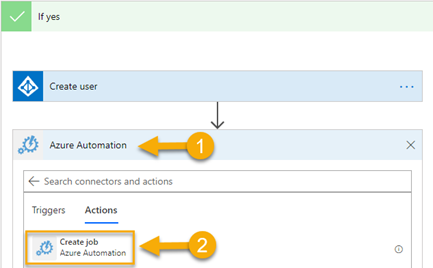
When you select Create job, Microsoft Flow will run an access check on the user account logged in Microsoft Flow, provided these checks pass, you’ll be prompted to enter PowerShell Runbook details.

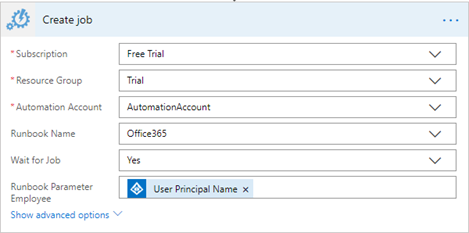
Note: Automation Account – is the one we created together earlier in this blog post
Runbook name – The Powershell script you created in the Azure Automation Account
Runbook parameter – If you remember, in our script, we were passing a required value to the Powershell script which was Employee’s UPN.
Param (
[string] $Employee=""
For our new Employee’s UPN, we’re going to use a value from the previous step in our Flow create User in AzureAD and pass the UPN of our newly created user.
Now we’ve completed configuring our Flow to provision Office 365 licenses for a new user, you’re now able to create more sophisticated processes based on your organization’s requirements.
Testing the workflow
Ok, let’s test the process. First, we’re going to enter a request in our SharePoint list.

The supervisor receives an email for approval.
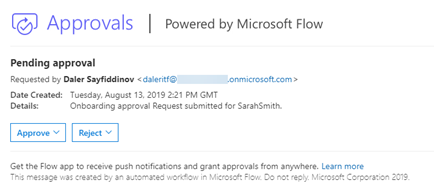
The Supervisor approves the request right from the email, this approval will trigger our workflow in Microsoft Flow.
Now, we can check the Office 365 Admin portal and see if the user has appropriate licenses.
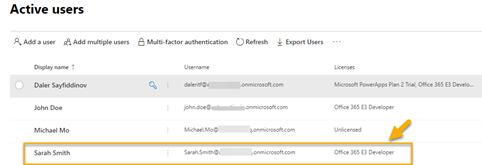
We can see that Sarah Smith is there and appropriate licenses have been assigned.

Conclusion
In a quick and relatively simple process, we’re able to create an automation to run the PowerShell script from Microsoft Flow, which really demonstrates the power of Microsoft’s platform. And why stop there? There is so much more to be done with Azure Automation, Flow and PowerApps. I see huge potential here to create custom applications for your first tier support members to run high privileged scripts in your environment with a structured approval process without having to elevate privileges. For example, they could create an eDiscovery in-place hold in Exchange Online environment without Discovery Management rights, simply by completing a mobile PowerApps form which triggers the PowerShell script to do the job. This is just one of the many various and sophisticated scenarios where we can use Flow and Azure Automation to make the daily operations of IT professionals more efficient.
Update (August 2022): Many things have changed in terms of Office 365 PowerShell and Automation since we published this article. Check out these articles to know about the latest techniques:
- Using Azure Automation with Exchange Online PowerShell.
- Using Azure Automation with the Microsoft Graph PowerShell SDK (send email).
- Using Azure Automation and PowerShell to create documents in SharePoint Online.
- Using Azure Automation and Managed Identities with the Microsoft Graph PowerShell SDK and Microsoft Teams modules.


Hi Daler,
I created my Azure Automation account and imported my modules and have no issues when I try to connect to Azure. However, I have a script that I’ve got that utilizes the “connect-graph” command to call “New-GraphTeam” and can’t get it to work – constantly telling me that it requires a work or school account.
Any ideas?
Hi Daler,
The steps described above only works for Azure or Cloud only account, not Hybrid where you have to create the account on OnPremise AD server.
Hi Daler,
The steps described above only works for Azure or Cloud only account, not Hybrid where you have to create the account on OnPremise AD server.
Address the issues/errors in your comments and stop just taking credit. Its weak!
Hi,
great article! But you lost me at the script 😀
I have modified it and can’t make it work. For fun, I tried to add employee as a member/owner of a O365 group, and give access to a shared mailbox. But nothing happens.
During testing, I run the runbook from the automation account (that is, I do not run the Flow, but just the Powershell commands). I have run into some issues:
* The runbook is “completed” but the actions are not performed – nothing simply happens.
* The runbook is completed no matter what credentials I enter, and even if I delete the credentials completely, and even if I use a fake user ID for the Employee parameter.
script 1:
Param (
[string] $Employee = “”
)
$credObject = Get-AutomationPSCredential -Name “ScriptServiceAccount”
Connect-AzureAD -Credential $credObject
$User = Get-AzureADUser -ObjectId $Employee
Set-AzureADUser -ObjectId
Add-MailboxPermission -User $Employee -AccessRights FullAccess -InheritanceType all
script 2:
Param (
[string] $Employee = “”
)
$credObject = Get-AutomationPSCredential -Name “ScriptServiceAccount”
Connect-AzureAD -Credential $credObject
$User = Get-AzureADUser -ObjectId $Employee
Set-AzureADUser -ObjectId
Add-UnifiedGroupLinks -Identity -LinkType Members -Links $Employee
Add-UnifiedGroupLinks -Identity -LinkType Owners -Links $Employee
I like how he has no problem taking credit and accolades for his article, but fails to address issues produced by his procedure. Very unprofessional. Kevin Holman does a much better job at this. You should follow by example.
I had the same issue with a Runbook. Add some error handling and verbose output to your script to try and catch the errors (if any, Ill bet there are) . this will help show where the script is failing. You could also convert it to a graphical runbook to take advantage of the output. If you havent fix this already
You should thank him for such a great article rather than complaining. People like you are burden for admins out there. Use your brain and get things working rather than waiting for spoon feed like school child. Grow up !!
– A frustrated admin with stupid questions from his end users.
EFD,
Thank you for feedback. The script outlined in the comment above is not part of the article and unfortunately I don’t have enough insights to be able to troubleshoot the reason why script is not working in the environment.
Thank you again for the feedback.
Hi Daler,
Would you please share script for automation. I am trying to add user to AZ distribution group and looking for automation from flow. Great article…
thanks
This was a great introduction for me to wiring up Azure Automation and Power Automate (previously Flow). Thanks for the clear writing and helpful screenshots!
Thank you, I strive to provide good content.
It is always very easy to read and follow your manuals! Great job!
I always enjoy reading your posts Mr Daler. Great Job
Thank you, many more to come!