From Runbooks to Email
In a previous article about using Azure Automation accounts and runbooks with the Exchange Online management PowerShell module, in that article, I also explained how to use Graph API queries in a PowerShell script executed in a runbook. The natural follow-on question is to ask if the Microsoft Graph PowerShell SDK supports runbooks. I can report that the SDK can be used with Azure Automation using certificate-based authentication or managed identities. Of course, a simple statement can hide a bunch of complexity, so let’s explore the details.
As a practical example of what’s possible, in this article I convert the script to send email to new mailboxes described here to execute in a runbook.
Azure Automation Setup
As discussed in the previous article, we’ll use an Azure Automation account (tied to an Azure subscription) to run the script on a sandbox server. Azure Automation supports managed identities, and I’ll dive into that topic in a future article. For now, the tried and tested technique does the job.
Update: Azure Automation no longer supports Runbook accounts. Use a managed identity instead. See this article for more information. The principals explained here of loading modules into an automation account and assigning Graph permissions to automation accounts are still valid.
Importing Graph Modules
The RunAs account has a service principal and a certificate managed by Azure. These are the key components used for authentication. However, authenticating is just the start. To make the Microsoft Graph PowerShell SDK available to a runbook, we must import its modules into the automation account as shared resources.
You might notice that I used modules and not module. When you download the Microsoft Graph PowerShell SDK from the PowerShell gallery and install it on a workstation, you don’t get a single module. Instead, the SDK splits into many different modules, each taking care of a small part of the overall Graph landscape. When you import the SDK into an automation account, you must import the modules needed by a script. The first task is to check the documentation for the cmdlets you plan to use to discover what module each cmdlet is in.
For example, let’s say that your script uses the Get-MgOrganization cmdlet to return details of your tenant. Microsoft’s documentation tells us that the cmdlet belongs to the Microsoft.Graph.Identity.DirectoryManagement module (Figure 1).

In passing, let me say that the documentation for the SDK cmdlets is a horrible example of why artificial intelligence sometimes doesn’t work so well when used to create documentation based on source code. Improving the documentation would help people understand the SDK cmdlets better and encourage their use. For now, substantial interpretation and a great deal of patience is needed.
Loading SDK Modules into the Azure Automation Account
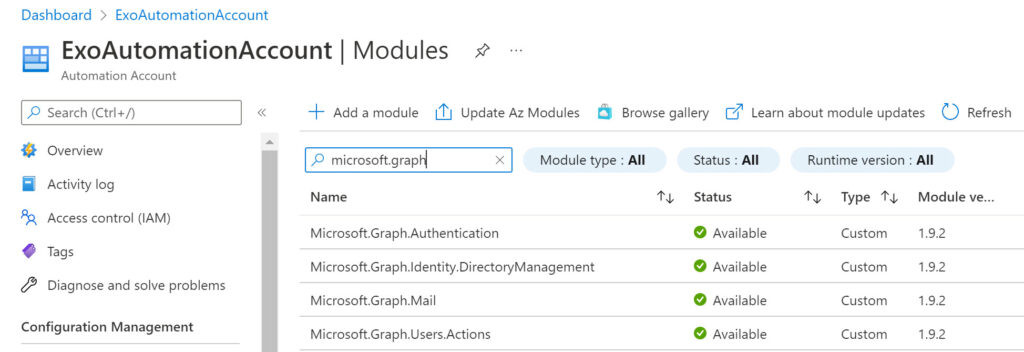
After checking the script to find all the SDK cmdlets, I ended up importing four modules (Figure 2):
- Microsoft.Graph.Authentication: to authenticate against the Graph.
- Microsoft.Graph.Users.Action: to send a message.
- Microsoft.Graph.Mail: to access mail messages.
- Microsoft.Graph.Identity.Management: to get organization details.

Assigning Graph Permissions
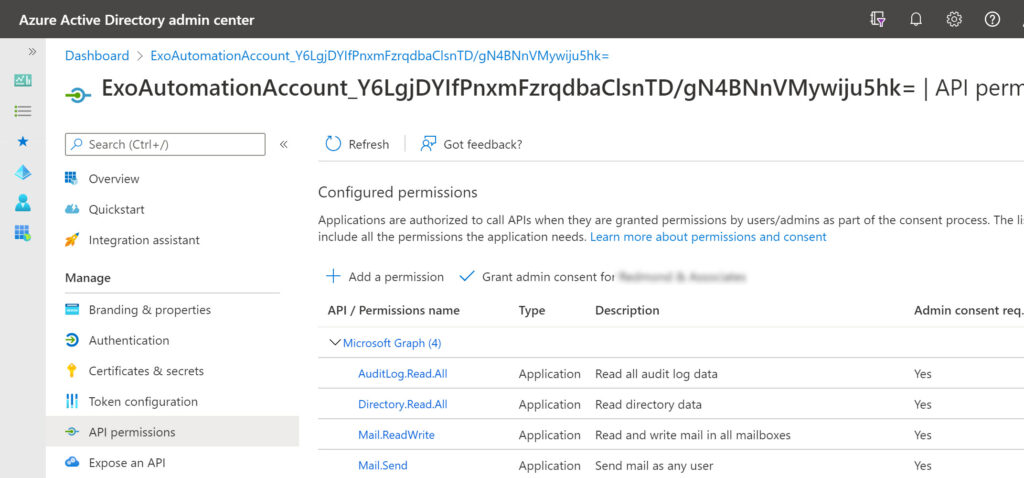
Loading the SDK modules to interact with the Graph starts us off: having the permissions to do so completes the circle. When you connect using the Connect-MgGraph cmdlet, the session you create can use certain Graph permissions. This is the session scope. In this case, the script needs to access a user’s mailbox to create a message before sending it to the message recipients, so the entity used for authentication must hold the Graph application permission necessary to perform these actions. The entity is the service principal for the RunAs account. Before the script can send email, an administrator must grant consent to allow the service principal to have the Mail.Send and Mail.ReadWrite permissions.
Assigning permissions to the service principal for the RunAs account is the same as assigning permissions to a registered app. Go to the Azure AD admin center, find the service principal in the set of registered apps, add the necessary permissions, and grant consent on behalf of the organization. You should end up with something like Figure 3. Two extra Graph permissions are present because I used this service principal in the previous article.

Be careful not to create service principals with too many Graph permissions. Like the service principal used for interactive sessions with the Microsoft Graph PowerShell SDK, it’s easy for a service principal to accumulate permissions over time if it’s used for multiple tasks. In production, consider using separate automation accounts for different jobs.
Amending PowerShell Code
We now have a RunAs account with the correct permissions and access to the required modules, so it’s time to write some code. A working script is available as a starting point, but it needs adjustment to work in a runbook. Here’s what I did:
First, I added a new authentication section to get the certificate thumbprint from the automation account. The certificate then authenticates the connection to the Microsoft Graph.
$Connection = Get-AutomationConnection -Name AzureRunAsConnection
# Get certificate from the automation account
$Certificate = Get-AutomationCertificate -Name AzureRunAsCertificate
# Connect to the Graph SDK endpoint using the automation account
Connect-MgGraph -ClientID $Connection.ApplicationId -TenantId $Connection.TenantId -CertificateThumbprint $Connection.CertificateThumbprint
Next, I retrieved the tenant service domain and use it together with and the same certificate thumbprint to connect to Exchange Online (to fetch the set of mailboxes added recently).
$Organization = Get-MgOrganization
$TenantName = $Organization.DisplayName
$TenantDomain = $Organization.Verifieddomains | ? {$_.IsInitial -eq $True} | Select -ExpandProperty Name
# Connect to Exchange Online
Connect-ExchangeOnline –CertificateThumbprint $Connection.CertificateThumbprint –AppId $Connection.ApplicationID –ShowBanner:$false –Organization $TenantDomain
Remember that the automation account needs some permissions to connect to Exchange Online. Those permissions are described in my previous article.
I then defined who the message is from (the mailbox I want to use). When I run the script interactively, I fetch this information from the account currently connected to PowerShell, but this doesn’t work for a RunAs account, so we need to define the SMTP address of the account to use in a variable.
$MsgFrom = "WelcomeNewUsers@Office365itpros.com"
My script attaches a welcome letter stored on a local drive. Obviously, a script running in a sandbox doesn’t have access to my local drive, so instead I download the welcome letter from a web site and store it in a local folder. The script then encodes the content to allow the attachment of the file to a message.
$WebAttachmentFile = "https://office365itpros.com/wp-content/uploads/2022/02/WelcomeToOffice365ITPros.docx"
New-Item -Path c:\TempForScriptxxx -ItemType directory -ErrorAction SilentlyContinue
$AttachmentFile = "c:\TempForScriptxxx\WelcomeNewEmployeeToOffice365itpros.docx"
Invoke-WebRequest -uri $WebAttachmentFile -OutFile $AttachmentFile
$Attachment = (Get-Item -Path $AttachmentFile).Name
$EncodedAttachmentFile = [Convert]::ToBase64String([IO.File]::ReadAllBytes($AttachmentFile))
Finally. I removed any messages sent to the screen using Write-Host. There’s no point in issuing these messages because there’s no screen for them to display on when code executes in a runbook.
The Messages Arrive
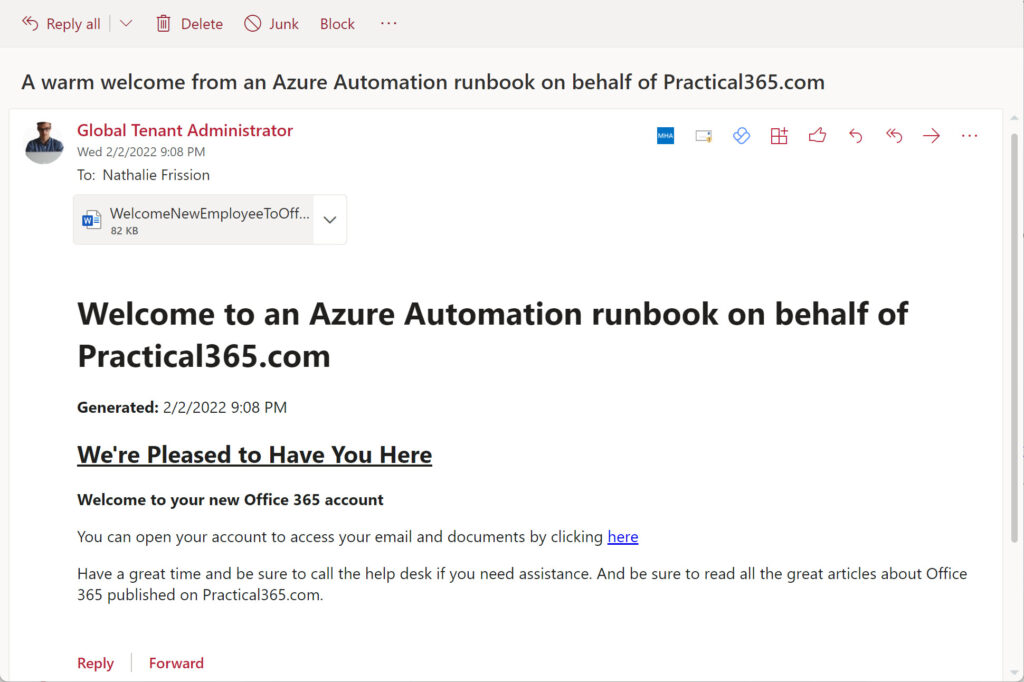
And that’s it. The process is not difficult once the preparatory work is done. The code runs because all the necessary modules are available in the account and the account has the correct Graph permissions, so mail flows into the mailboxes of new users (Figure 4).

You can download a copy of the complete script I used from GitHub.
Automation is Nice
The nice thing about using Azure Automation is that you can publish the script and then schedule it to run weekly to send welcome messages to users who joined during the preceding week. With a couple of clicks, new joiners receive waves of happiness. And the same technique of creating and sending email can be used to distribute information generated by many other jobs. Isn’t that a nice thing?


Hi Tony, I have used PowerShell for Office 365 core services either to run scripts only once or scheduled them through task scheduler. I have always wondered if there was a better way to automate, for example, daily reporting. Then someone advised me to use Azure Automation Runbooks, for tasks like automatically enabling archive mailbox for every new user mailbox created. Next, I learnt about infrastructure as a code and Microsoft365DSC. But my current organization uses Azure DevOps with Bicep for IaC. As someone primarily responsible for Exchange Online, I wonder what the best tools and platforms are for automating tasks and managing configuration.
I have no idea. I have spent zero time looking into Bicep. My brief experience of it indicated that Bicep wasn’t well aligned with the PowerShell modules for Microsoft 365, so I would stay with Azure Automation.
How can I configure my automation account to connect to MS graph using below PS script?
Connect-MgGraph -Scopes “User.Read.All”, “GroupMember.Read.All”, “Group.Read.All”, “Directory.Read.All”
I keep getting error below:
Authentication needed. Please call Connect-MgGraph.
Authentication needed. Please call Connect-MgGraph.
Authentication needed. Please call Connect-MgGraph.
Authentication needed. Please call Connect-MgGraph.
Authentication needed. Please call Connect-MgGraph.
Authentication needed. Please call Connect-MgGraph.
Could not find a part of the path ‘C:\ocio\AzureADMembers.csv’.
Use a managed identity, certificate, or credentials to identify which account the Graph SDK should use. Here’s how to use a managed identity: https://practical365.com/managed-identity-powershell/
Hi Tony,
Excellent article!
We look forward to your article covering the use of managed identities + Graph Powershell + Azure Automation.
No resources in the Web covering that.
This is an excellent and well-written article. Thanks for the tremendous help this provided to get my runbook script which used the command Get-MgSubscribedSku to work.
Hi Tony
Very interesting article – I’ve been looking at Azure Automation and system assigned Managed Identities to update a SharePoint Online List. Just wondering if you have tried anything like this as the Managed Identity Roles available such as Contributor I think refer to resources in Azure and not eg SharePoint in Office365?
I have played with managed identities and it’s one of the topics I want to cover, once I get some time to focus on it.
Hi Redmond,
thanks for the great article. Have you found the time to explore the use of managed identities?
I have tried myself but get stuck with connection issues:
I receive the following error msg when solely running “connect-mggraph -Identity” inside of an Azure Runbook:
ManagedIdentityCredential authentication failed: Could not load file or assembly ‘System.Memory.Data, Version=1.0.2.0, Culture=neutral, PublicKeyToken=************’. The system cannot find the file specified.
See the troubleshooting guide for more information. https://aka.ms/azsdk/net/identity/managedidentitycredential/troubleshoot
Haven’t found a way to work around this yet. Any suggestions?
Do you normally address people by their surname?
In any case, have you read the other articles published here about using managed identities with different modules?
But the first thing I would do is update the resource modules in the Azure Automation account to make sure that you’re using the latest versions. https://practical365.com/update-graph-sdk-azure-automation/
Hi Tony! 🙂 I have the same problem here. A runbook with Graph Auth module 2.7.0 works as it should in dev tenant. When I moved it to prod tenant the module installed became 2.9.0. The exact same code will not auth with 2.9.0 that auths with 2.7.0. Was there a bug introduced in 2.9.0 that causes it to fail with Managed Identity auth? Gaahhh!
AHA! Three days ago Microsoft released 2.9.1 where they apparently fixed the bug with login for Managed Identity! When I update to that version the script works again! 🙂
I just noticed the update!
I am here looking for the same thing! Been breaking it down step by step. Haven’t been able to pull it off yet though.