Exploring the Graph PowerShell SDK
Recently, I’ve been exploring how to use the Microsoft Graph with PowerShell to automate some common Microsoft 365 administrative tasks like how to send Exchange Online mail to report the outcome of scripts. Among the recent factors causing me to consider using Graph APIs with PowerShell are:
- Microsoft’s decision to move to a new licensing platform in 2022, which means that some Azure AD cmdlets won’t work after June 30, 2022. (Microsoft subsequently extended the deadline for some tenants to March 2023).
- The well-founded campaign to remove support for basic authentication from Exchange Online connectivity protocols from January 1, 2023). Although Microsoft has exempted the SMTP AUTH protocol for now, it’s wise to prepare to consider alternatives to PowerShell’s Send-Message cmdlet like the Graph SendMail API.
I used the Microsoft Graph SDK for PowerShell to solve the first problem and native Graph API calls for the second. In this article, I explain a second alternative to the Send-MailMessage cmdlet by using the New-MgUserMessage and Send-MgUserMessage cmdlets from the SDK to create and send a welcome message to new employees.

Welcome Email
Organizations commonly send welcome email to new employees as part of their onboarding process. The email usually contains helpful tips about working in the organization and things which new employees need to know, like how to find the cafeteria. To automate the process, the script does the following:
- Connects to Exchange Online to find the mailboxes for employees added in the last 7 days.
- Connects to the Microsoft Graph to create and send the email. Like all connections to the Graph, you need permissions to access data. In this instance, we need the Mail.Send and Mail.ReadWrite permissions. The script runs interactively, so we need to be aware of permission creep on the service principal used to connect to the Graph.
- For each mailbox in the set found, use the New-MgUserMessage cmdlet to create a HTML message in the mailbox of the signed-in user.
- Send the message using the Send-MgUserMessage cmdlet.
The script is basic (you can download it from GitHub) but does enough to prove the principal. You can embellish it by adding an attachment (perhaps a new employee guide) or changing the set of recipients. We’ll get to those points later.
Code to Connect
The code to connect to the Graph is straightforward:
Connect-MgGraph -TenantId a562313f-14fc-43a2-9a7a-d2e27f4f3478 -Scopes "Mail.Send", "Mail.ReadWrite"
$TenantName = (Get-MgOrganization).DisplayName
The Connect-MgGraph cmdlet connects to a tenant using the tenant identifier (make sure you use the right value for your tenant) and requests the two permissions that we need. If the service principal used by the Graph SDK does not already hold consent for these permissions, the Graph prompts for consent. The other commands fetch details of the logged-in context and the organization name.
Finding Target Mailboxes
The code to find target mailboxes looks for any mailboxes created in the last 7 days. Again, it’s pretty simple:
[string]$CheckDate = (Get-Date).AddDays(-7)
# Find all mailboxes created in the target period
[array]$Users = (Get-ExoMailbox -Filter "WhenMailboxCreated -gt '$CheckDate'" -RecipientTypeDetails UserMailbox -ResultSize Unlimited -Properties WhenMailboxCreated | Select WhenMailboxCreated, DisplayName, UserPrincipalName, PrimarySmtpAddress)
If ($Users -eq $Null) { Write-Host ("No mailboxes found that were created before {0}. Exiting!" -f $CheckDate) }

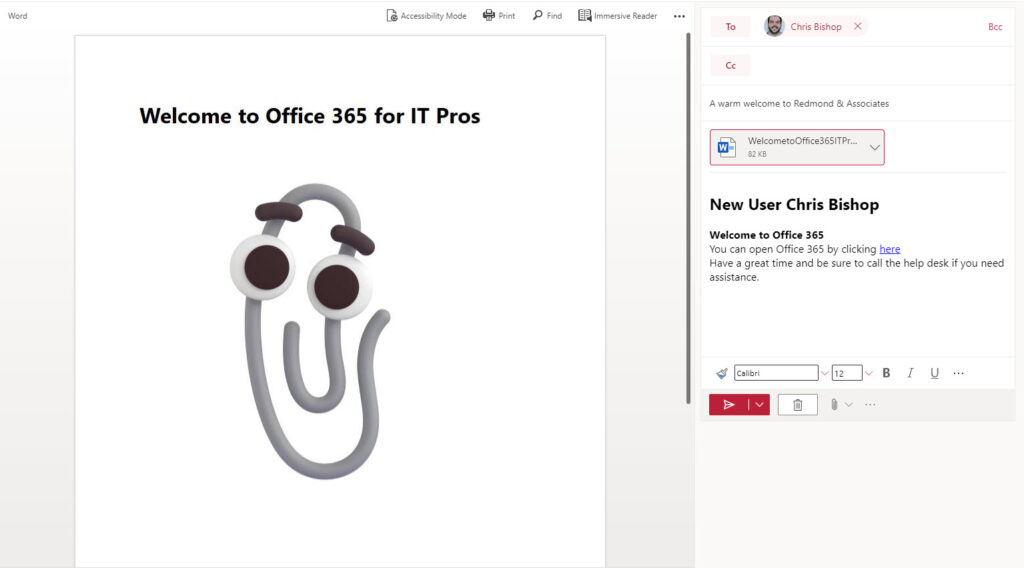
Creating and Sending a Message
After finding the set of target mailboxes, we can loop through each mailbox to create a customized HTML message (Figure 1) and populate the set of message properties needed by the Send-MgUserMessage cmdlet to send the new message to the recipient.

# Create and send welcome email message to each of the new mailboxes
ForEach ($User in $Users) {
      # Add the recipient using the mailbox's primary SMTP address
      $EmailAddress  = @{address = $User.PrimarySmtpAddress}
      $EmailRecipient = @{EmailAddress = $EmailAddress}
      Write-Host "Sending welcome email to" $User.DisplayName
      # Customize the message
      $htmlHeaderUser = "<h2>New User " + $User.DisplayName + "</h2>"
      $htmlbody = $htmlheaderUser + $htmlline1 + $htmlline2 + $htmlline3 + "<p>"
      $HtmlMsg = "</body></html>" + $HtmlHead + $HtmlBody
      # Construct the message body
      $MessageBody = @{
           content = "$($HtmlBody)"
           ContentType = 'html'
           }
     # Create a draft message in the signed-in user's mailbox
     $NewMessage = New-MgUserMessage -UserId $MsgFrom -Body $MessageBody -ToRecipients $EmailRecipient -Subject $MsgSubject
     # Send the message
     Send-MgUserMessage -UserId $MsgFrom -MessageId $NewMessage.Id
} # End ForEach User
Unlike many other PowerShell cmdlets, especially those for Exchange Online, when you interact with Graph APIs, you must be very careful to use whatever input format the API requires. For example, you would imagine that it should be possible to fetch the primary SMTP address for a target mailbox and use that string to add a recipient to a message. Unhappily, that’s not the case and you need to build an array with the elements in the right format before the Graph is happy.
Handling Recipients
The code above shows the steps to add a single TO: recipient. If you wanted to add other recipients, you go through the same kind of thing to build the input array. For instance, let’s assume you want to add a couple of BCC recipients to the message. We declare the recipients in an array (or fetch them from some source using PowerShell):
$BCCRecipients = @("Brian.Weakliam@Office365itpros.com", "Kim.Akers@Office365itpros.com")
And then build the input array:
$BCC = $BCCRecipients | % {@{emailAddress = @{ address = $_ }}}
The array looks like:
$BCC

Name                           Value
----                           -----
emailAddress                   {address}
emailAddress                   {address}
We can see the values of the array using:
$BCC.Values

Name                           Value
----                           -----
address                        Brian.Weakliam@Office365itpros.com
address                        Kim.Akers@Office365itpros.com
The SDK developers could do us all a favor by making it easier to add recipients to messages. I’m sure there’s a logic into why the message structure demands nested values, but it doesn’t make it easy to convince people to update their code to use the SDK.
Adding Attachments
Adding attachments to messages is another place where the SDK developers could hide some complexity from PowerShell developers. For now, adding an attachment requires you to create a Base64 encoded version of the file and include it in an input array. For example:
$AttachmentFile = "c:\temp\WelcometoOffice365ITPros.docx"
$EncodedAttachmentFile = [convert]::ToBase64String((Get-Content $AttachmentFile -Encoding byte))
$MsgAttachment = @{
    "@odata.type"= "#microsoft.graph.fileAttachment"
    name = ($AttachmentFile -split '\\')[-1]
    contentBytes = $EncodedAttachmentFile
}
The input array we’ve just built looks like this:
$MsgAttachment

Name                           Value
----                           -----
contentBytes                   UEsDBBQABgAIAAAAIQD7xliMzwEAAEoKAAATAAgCW0NvbnRlbnRfVHlwZXNd…
name                           WelcometoOffice365ITPros.docx
@odata.type                    #microsoft.graph.fileAttachment
To include the attachment in the message, specify the array as an input to the Attachments parameter for New-MgUserMessage. The attachment shows up as you’d expect (Figure 2).
$NewMessage = New-MgUserMessage -UserId $MsgFrom -Body $MessageBody -ToRecipients $EmailRecipient -Subject $MsgSubject -Attachments $MsgAttachment
Good Functionality; Could be Easier
Pleading to be re-elected, sometimes politicians claim that they’ve done a lot but still have lots more to do. I get the same feeling about using the Microsoft Graph SDK for PowerShell to create and send messages via Exchange Online. There’s a lot of functionality available but it’s hard for the unanimated to access, especially when coming from the relative simplicity of the Send-MailMessage cmdlet. The lack of good documentation is a further barrier.
Today, the Microsoft Graph SDK for PowerShell mimics the way the underlying Graph APIs work. That’s appropriate and necessary given the early stage of development. But to convince people to embrace and use the SDK, I think its developers need to make it much simpler for administrators to access the power of the Graph though the SDK cmdlets.


Is there a way to generate an email reply from a message
You can certainly use the Graph to read text from a message (see https://practical365.com/mailbox-contents-report/ for an example of reading message content) and use that in a message.
Hi Tony, Thanks for your post!
Now I need to get it working for large attachments too. I know I have to do something with ‘New-MgUserMessageAttachmentUploadSession’. Do you have experience with this?
Sorry, I haven’t looked into how this cmdlet works.
Hey Tony! Great post!
I was wondering how can I use multiple recipients on the “to” field directly, without having to create it before like you did.
This website use splatting to pass the mail parameters:
https://www.powershell.co.at/send-an-e-mail-using-the-ms-graph-powershell-commandlets-in-3-steps/
So I was trying to use it but I couldn’t manage to do it.
This is the code:
$MailParams = @{
Subject = “Mail test”
UserId = “user@domain.com”
Body = @{
content = “This is a test mail!”
contentType = “HTML”
}
ToRecipients = @{
emailAddress = @{
address = “user1@domain.com”
}
}
}
I need to add more addresses to it, but I hav no idea how…
Look at the code to add BCC addresses in the Handling Recipients section. The same approach works for TO and CC recipients.
Yes, but using your way I need to create a hash table first with all email addresses and then create another variable using a foreach-object loop.
There’s no way to write the hash table directly?
Something like:
ToRecipients = @{
emailAddress = @{
address = “user1@domain.com”, “user2@domain.com”, “user3@domain.com”
}
or
ToRecipients = @{
emailAddress = @{
address = “user1@domain.com”
},
@{
address = “user2@domain.com”
}
}
I wish the code was easier to write, but that’s the way we have to do it until the developers refine the cmdlet.
Thanks a lot! At least you found a way!
Tony,
I’ve managed to do it using this code:
$MailParams = @{
Subject = “Mail test”
UserId = “admin@domain.com”
Body = @{
content = “This is a test mail!”
contentType = “HTML”
}
ToRecipients = @(
@{
emailAddress = @{
address = “user1@domain.com”
}
},
@{
emailAddress = @{
address = “user2@domain.com”
}
}
)
}
Got the code from this other post from you:
https://practical365.com/upgrade-powershell-scripts-sendmailmessage/
Thanks once again!
Super!
im pretty new to graph, but im wondering if there is a way you can get the teams transcripts through graph and what that would look like?
I don’t believe that the transcript information (for Teams meetings) is currently exposed via a public Graph API.
Is there a way to adapt this script to send to external recipients (gmail, etc.) I’ve tried messing around with the script but the new-mgusermessage command always comes up blank for the ToRecipients attribute
The email address is added (in the script) by fetching the user’s primary SMTP address. You need to change the script to input the external recipient SMTP address in this line:
$emailaddress = @{address = “Someaddress@gmail.com”}
Everything should work then.