Supporting Structured Teams Creation
When I speak to customers about Microsoft 365 governance and administration, a common challenge for them is how to manage Microsoft Teams effectively. By default, any user can create a new Team in Microsoft 365. Without proper lifecycle management in place, the sheer number of Teams in a Microsoft 365 tenant often becomes hard to manage for tenant administrators.
To combat this “Teams spawl” issue, many larger tenants tend to prevent users from creating Teams (and SharePoint sites). Instead, these organizations provision Teams through their IT team. While creating Teams can be done manually by a member of the IT team, there are better ways busy tenant administrators can spend their time. I explored automating the creation of Teams in my article on Keeping Teams tidy through automation.
In this article, I show how PnP PowerShell helps improve automated Teams provisioning using templates and preset structures.
Note: The code used in this article is available on GitHub here.

Preparing
I’ve detailed the process of installing the PnP PowerShell Module and connecting to your tenant in the article, Manage Your SharePoint Online Environment with PnP PowerShell, so I won’t repeat that here, but if you need a refresher, go check out the previous article before continuing.
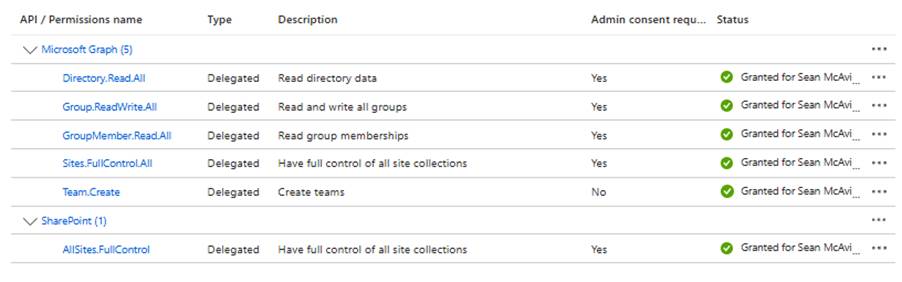
For the provisioning tasks in this article, the permissions required on the app registration are shown in Figure 1.
The next preparation step is to start the PowerShell script. To get started, we declare the variables that are to be modified by the user when running the script (DisplayName, Description and MailNickname, Client ID and Tenant Name). At the top of the script, add the following variables (and update with your chosen details). Note that the MailNickname of the Team is also used for the URL path of the backend SharePoint site.
$DisplayName = "Project - Project Spring"
$Description = "Project Spring is a project team for the Spring project"
$MailNickName = "Project-ProjectSpring"
$ClientID = "<ClientID>"
$tenantName = "<TenantName>"
Get the Sensitivity Label GUID
Sensitivity Labels for SharePoint Sites, Teams and Microsoft 365 Groups (Container labels) enforce preconfigured settings to Sites, Teams, and Groups. Container labels control guest access, visibility, privacy, external sharing, and shared channel functionality that is available to the container.
At a basic level, I recommend creating at least two container labels for your tenant, one for externally available Teams and one for internal-only Teams. Separating external and internal Teams is a great way to protect sensitive areas such as your finance or HR Teams from accidental external sharing.
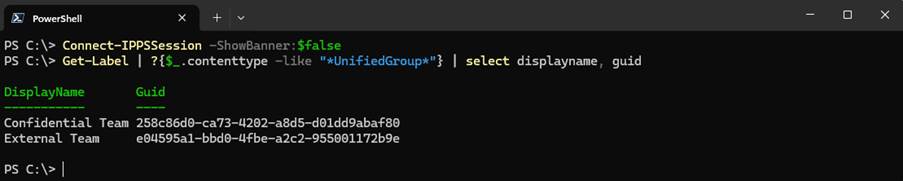
To use a container label during Team provisioning, we first need the GUID of the labels. This can be retrieved using Security & Compliance PowerShell (available in the Exchange Online PowerShell Module) as shown in Figure 2.
Define Team Settings
Teams have a number of settings that control what functionality is available for end users, for example, if Team members can delete or modify their channel messages. These settings are managed by the Team owner(s) after creation but can also be configured during the creation of the Team. The below hashtable defines the configuration options available during Team creation:
$ProjectTeamSettings = @{
    AllowDeleteChannels = $false
    AllowAddRemoveApps = $true
    AllowChannelMentions = $true
    AllowCreateUpdateConnectors = $true
    AllowCustomMemes = $true
    AllowGiphy = $true
    AllowStickersAndMemes = $true
    AllowTeamMentions = $true
    GiphyContentRating = "Moderate"
    AllowUserEditMessages = $true
    AllowOwnerDeleteMessages = $false
    AllowCreateUpdateChannels = $true
    AllowCreateUpdateRemoveTabs = $true
    AllowUserdeleteMessages = $false
    AllowGuestCreateUpdateChannels = $false
    AllowGuestDeleteChannels = $false
    Visibility = "Private"
    SensitivityLabel = "258c86d0-ca73-4202-a8d5-d01dd9abaf80"
}
The sensitivity label GUID we returned earlier is also added to the settings here to apply the label during Team creation.

Provision the Team
With the settings defined, the next step is to create the initial Team object. The New-PnPTeamsTeam cmdlet takes the parameters defined above to create the Team with the settings defined:
$TeamObject = New-PnPTeamsTeam -DisplayName $DisplayName -Description $Description -MailNickName $MailNickName -AllowDeleteChannels $ProjectTeamSettings.AllowDeleteChannels -AllowAddRemoveApps $ProjectTeamSettings.AllowAddRemoveApps -AllowCreateUpdateChannels $ProjectTeamSettings.AllowCreateUpdateChannels -AllowCreateUpdateRemoveTabs $ProjectTeamSettings.AllowCreateUpdateRemoveTabs -AllowUserdeleteMessages $ProjectTeamSettings.AllowUserdeleteMessages -AllowUsereditMessages $ProjectTeamSettings.AllowUsereditMessages -AllowGuestCreateUpdateChannels $ProjectTeamSettings.AllowGuestCreateUpdateChannels -AllowGuestDeleteChannels $ProjectTeamSettings.AllowGuestDeleteChannels -Visibility $ProjectTeamSettings.visibility -SensitivityLabel $ProjectTeamSettings.SensitivityLabel
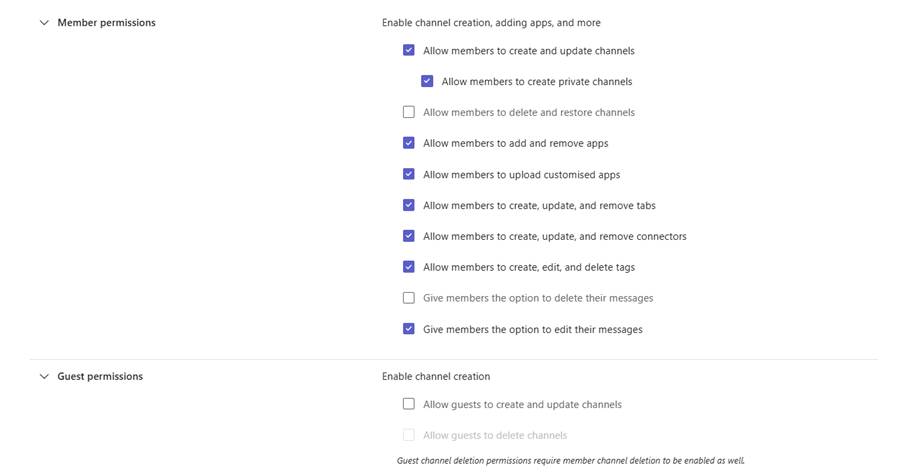
The user running the script will be added as the owner of the Team object and a quick check shows the settings defined have been applied (Figure 3).
Building the Channel Structure
Teams templates (as described in this article on using Teams template policies) are useful for building Teams structures and making them available to users. Teams Templates come with some limitations though, such as a lack of support for Private or Shared channels. As PnP PowerShell allows granular control of Team structures, we don’t need Team templates here. Instead, we build out our Teams structure in PowerShell.
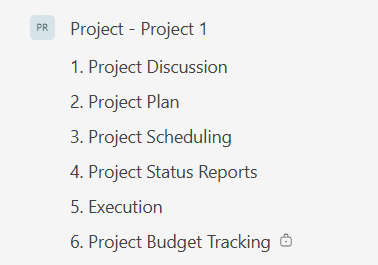
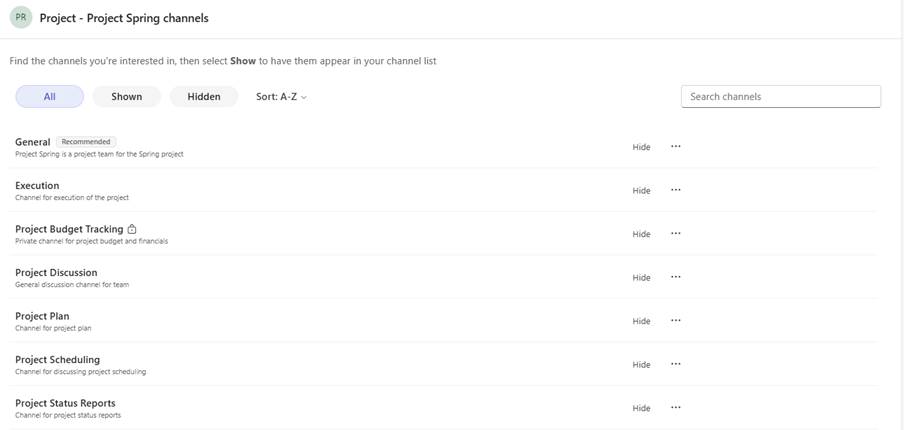
Figure 4 shows a typical structure for a project-focused Team, where the important aspects of a project have a channel each and we then have a private channel for project budget and financials.
Translating this structure into PowerShell, we create an array to store the channel information.
$ProjectTeamChannels = @(
    @{
        DisplayName = "Project Discussion"
        Description = "General discussion channel for team"
        ChannelType = "Standard"
    },
    @{
        DisplayName = "Project Plan"
        Description = "Channel for project plan"
        ChannelType = "Standard"
    },
    @{
        DisplayName = "Project Scheduling"
        Description = "Channel for discussing project scheduling"
        ChannelType = "Standard"
    },
    @{
        DisplayName = "Execution"
        Description = "Channel for execution of the project"
        ChannelType = "Standard"
    },
    @{
        DisplayName = "Project Status Reports"
        Description = "Channel for project status reports"
        ChannelType = "Standard"
    },
    @{
        DisplayName = "Project Budget Tracking"
        Description = "Private channel for project budget and financials"
        ChannelType = "Private"
    }
)
Provisioning the channels is done by looping through the array created and running the Add-PnPTeamsChannel for each new channel. Where there is a private channel, we also need to specify an owner which we retrieve from the Team object itself.
$Owner = [array](Get-PnPTeamsUser -Team $TeamObject.GroupId)[0].userprincipalname
foreach($Channel in $ProjectTeamChannels)
{
    if($Channel.ChannelType -eq "Private")
    {
        Add-PnPTeamsChannel -Team $TeamObject.GroupId -DisplayName $Channel.DisplayName -Description $Channel.Description -ChannelType $Channel.ChannelType -OwnerUPN $Owner
    }
    else
    {
        Add-PnPTeamsChannel -Team $TeamObject.GroupId -DisplayName $Channel.DisplayName -Description $Channel.Description -ChannelType $Channel.ChannelType
    }
}
Once the above script runs, each channel is added to the Team as shown in Figure 5.
Add SharePoint Site Templates
Finally, as I outlined in this article on using PnP PowerShell to manage SharePoint Online, we use site templates to customize the SharePoint site for our end users. To apply a site template to the Teams we create, we get the URL of the site from the Team and then apply the template using the Invoke-PnPSiteTemplate cmdlet:
$SiteURL = Get-PnPMicrosoft365Group -Identity $TeamObject.GroupId -IncludeSiteUrl | Select-Object -ExpandProperty SiteUrl
Connect-PnPOnline -Interactive -ClientId $ClientID -Url $SiteURL
Invoke-PnPSiteTemplate -Path C:\SiteTemplates\TeamSiteTemplate.pnp
Flexibility is Key
One of the things I like about PnP PowerShell is the level of flexibility provided by the module. There are multiple areas within the process where we interact with different components of the Microsoft 365 platform which would usually require us to use different modules to achieve. This flexibility means that tenant administrators can get to a high-quality solution in a relatively short space of time.
In this article, I’ve shown how to build the basics of a Teams provisioning script in very little time. There is no doubt that many more additions and enhancements can be made to your provisioning scripts to make the creation of new Teams an easy, well-polished process. The script shown here gives a starting point to build a robust and polished solution.


I had use AI write it by myself, but not very stable, I will try your version and give some feedback. 😊