The Problem with Group Sprawl
Microsoft 365 Groups have been around for a long time now, and while there are undoubtedly some good uses, such as an alternative to Shared Mailboxes and a potential replacement for the dreaded Public Folders, they really hit their stride with Microsoft Teams. Every Team is backed by a Microsoft 365 Group, and every Group contains a variety of components from different areas of the platform, making up a single object (sort of) with multiple use cases.
The problem of Group sprawl isn’t unique to Teams, but rapid adoption and easy creation of Teams for end users by default definitely haven’t helped busy tenant admins to keep their environment tidy. Providing education to end users on how to manage Teams responsibly can help, but like most things in Microsoft 365, it can be a bit of a moving target.
There are various controls available to admins which make managing Groups / Teams a bit easier, but there’s no unified end-to-end solution available natively. That being said, with some ingenuity and some automation, there are ways to control Teams creation without too much overhead.
Note: The code samples outlined in this article are all available on GitHub to help you get started with your own solution.

Key Areas to Control
There are some key areas of Teams that are useful to control at a more granular level to keep everything in order in your tenant. When planning your Teams automation scripts, the following areas are important to consider as they can really help define the rules for different types of Teams.
Group Naming: Group naming policies in the Microsoft Entra admin center allow some basic naming convention functionality for Microsoft 365 Groups (and Teams), but in reality, they severely lack flexibility. Basing Group names on static user attributes is a good idea in theory but misses out on several key use cases, such as cross-departmental Teams or differentiating between internal and externally available Teams. Another aspect of naming that can be useful in large organizations is controlling the SharePoint site URL that is used. By default, Microsoft 365 uses the Group mail nickname to devise the URL for the associated site. Depending on the SharePoint structure within a tenant, this might not be granular enough.
Group Expiration: Group expiration is a useful way to trim legacy Groups from your tenant. The Azure AD Group Lifecycle policy is an easy way to configure this, but there is only one policy available and unless you include all groups in it, it needs to be updated for every group you want to either include or exclude.
Access and Sharing Controls: With different types of Groups or Teams across an organization, there are different levels of access and sharing that should be considered. For example, a customer-facing project Team should have a vastly different external access configuration to an HR departmental team. The configuration for different Group types is easily configured using Sensitivity labels, as explained in this three-part series on using Sensitivity Labels with SharePoint sites, Microsoft Teams, and M365 Groups. Unfortunately, assigning sensitivity labels programmatically requires the use of delegated permissions with the Graph API, which is difficult to achieve when running non-interactively. For the purpose of this example, I configure the group and site settings directly rather than using labels.
Ownership: Orphaned Groups (Groups that no longer have owners) are a fact of life in Microsoft 365. There are some methods for managing this through policies or scripts which are discussed in this article on Group Ownership Governance Policies. By default, Groups require at least one owner at creation time, but it’s a good idea to have at least two.
Entitlement Management: For sensitive Groups, the initial setup is only half the battle. It’s important to ensure that access granted to specific Groups or sites is continually reviewed and confirmed. This is a wider issue many admins face that isn’t unique to Microsoft 365. Managing the lifecycle of access to resources is key to keeping your environment secure. A good way to keep control of this is through Entitlement Management, as discussed in this series: A guide to entitlement management.
Where to start?
The areas I’ve mentioned are just a few of the different solutions and settings available in Microsoft 365 that, on their own, represent part of a solution. Bringing each piece together and automating it is where we really add value (and save time).
Jumping straight into building a solution, Azure Automation is easily a good fit to automate something like this as it runs reliably and securely. There’s also a wealth of good examples online showing how Azure Automation is used with Microsoft 365 and the Microsoft Graph SDK.
There are some limitations when using the Graph API though, particularly for configuring SharePoint Online. Microsoft has recently added (very) limited Microsoft Graph support for SharePoint Online Tenant Settings in the Graph beta endpoint but that doesn’t allow the granularity needed to configure each site yet. To get around this issue, the PNP PowerShell module fills in the gaps.
Prepare the environment
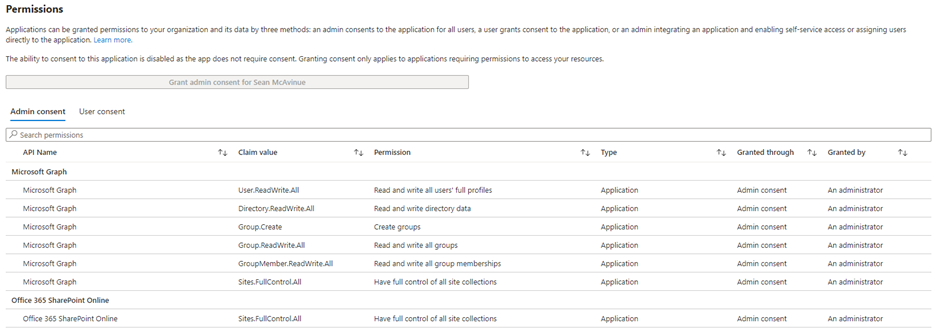
There are many tutorials for creating a registered app in Azure AD and generating the required authentication and consent parameters, so I won’t dwell too much on that configuration here. In short, we provision a new Automation Account with a system-assigned managed identity similar to this article on using managed identities with the Microsoft Graph SDK. With the Automation Account created, the following application permissions are required for the managed identity:
- GroupMember.ReadWrite.All (To manage group membership)
- Group.Create (To create groups)
- User.ReadWrite.All (To manage group membership)
- Group.ReadWrite.All (To manage groups)
- Directory.ReadWrite.All (To manage Directory Settings and lifecycle policies)
- Sites.FullControl.All (To manage Site settings)
Note: There is some overlap in the above permissions, particularly with “Directory.ReadWrite.All” but I’ve included the minimum permission for each task so they can easily be modified for your script. Directory.ReadWrite.All permissions is a highly privileged permission level which is currently a requirement for adding Groups to a group lifecycle policy. This isn’t ideal, but until a more granular level of permission is made available, it is the only way to achieve this through the Microsoft Graph.
We also need the following “Office 365 SharePoint Online” permissions:
- Sites.FullControl.All (To allow PNP access)
The following script assigns the permissions listed above to a service principal using the Microsoft.Graph PowerShell module:
##List Required Permissions
$Permissions = @(
    "“GroupMember.ReadWrite.All"”
    "“User.ReadWrite.All"”
    "“Group.ReadWrite.All"”
    "“Directory.ReadWrite.All"”
    "“Sites.FullControl.All"”
    "“Group.Create"”
)
##Add Managed Identity ID
$MIID = "“<Replace with Managed Identity Service Principal ID>"”
##Get Roles for Permissions
$GraphApp = Get-MgServicePrincipal -Filter "“AppId eq '‘00000003-0000-0000-c000-000000000000'’"” # Microsoft Graph
[array]$Roles = $GraphApp.AppRoles | Where-Object {$Permissions -contains $_.Value}
##Loop through and add each role
foreach($role in $roles){
    $AppRoleAssignment = @{
        "“PrincipalId"” = $MIID
        "“ResourceId"” = $GraphApp.Id
        "“AppRoleId"” = $Role.Id
    }
    # Assign the Graph permission
    New-MgServicePrincipalAppRoleAssignment -ServicePrincipalId $MIID -BodyParameter $AppRoleAssignment
}
##List Required Permissions
$Permissions = @(
    "“Sites.FullControl.All"”
)
##Get Roles for Permissions
$GraphApp = Get-MgServicePrincipal -Filter "“AppId eq '‘00000003-0000-0ff1-ce00-000000000000'’"” # SharePoint Online
[array]$Roles = $GraphApp.AppRoles | Where-Object {$Permissions -contains $_.Value}
##Loop through and add each role
foreach($role in $roles){
    $AppRoleAssignment = @{
        "“PrincipalId"” = $MIID
        "“ResourceId"” = $GraphApp.Id
        "“AppRoleId"” = $Role.Id
    }
    # Assign the SharePoint permission
    New-MgServicePrincipalAppRoleAssignment -ServicePrincipalId $MIID -BodyParameter $AppRoleAssignment
}
The permissions added (shown in Figure 1) are required for the example I give here, but it’s important to figure out what Microsoft Graph permissions you need and adjust for your own script.
Next, the automation account needs the required modules to be installed. The following modules are used in this example, but depending on your needs, make sure you have the correct modules installed:
- Microsoft.Graph.Authentication
- Microsoft.Graph.Groups
- Microsoft.Graph.Identity.DirectoryManagement
- Microsoft.Graph.Teams
- PnP.PowerShell
- Az.Accounts (This one should already be installed in the automation account)

Creating the script
For any reusable automation task, as much as possible, you want to avoid putting static references in the code. This isn’t just good practice to make scripts reusable, but it also helps others to reuse and build upon your script. This is done by building out parameters in the code that are passed through at run time. In this script, I define the following input parameters:
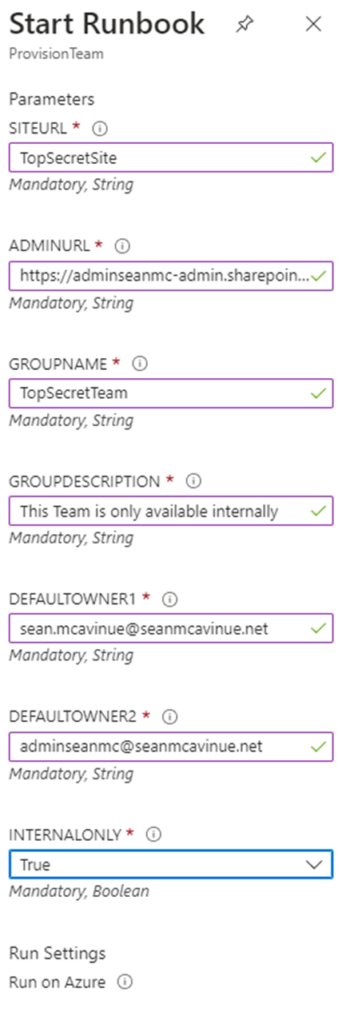
- SiteURL – This is the relative URL of the associated SharePoint site. It is used to populate the mailnickname of the Group, which is then used to generate the site URL.
- AdminURL – This is the admin URL of your SharePoint Online instance.
- GroupName – This is the name of the Group to be created for the Team.
- GroupDescription – This is the description value of the Group.
- DefaultOwner1 – This is the owner of the site.
- DefaultOwner2 – As we want two owners minimum, this is the second owner.
- InternalOnly – This is a Boolean value to define if the site should be made internal only – setting this to false will allow external access to the site. More on this later.
Param
(
  [Parameter (Mandatory= $true)]
  [String] $SiteURL,

  [Parameter (Mandatory= $true)]
  [String] $adminURL,

  [Parameter (Mandatory= $true)]
  [String] $GroupName,

  [Parameter (Mandatory= $true)]
  [String] $GroupDescription,

  [Parameter (Mandatory= $true)]
  [String] $DefaultOwner1,

  [Parameter (Mandatory= $true)]
  [String] $DefaultOwner2,

  [Parameter (Mandatory= $true)]
  [bool] $InternalOnly
)
The next key area is to connect to the Microsoft Graph using the managed identity of the automation account. Currently, this needs to use the Get-AzAccessToken cmdlet to acquire a token which is then passed to the Connect-MgGraph cmdlet. Once connected, we switch to the beta endpoint to allow for the directory setting configuration, which is not available in v1.0. To test this code locally, you need to have the Microsoft.Graph, AZ, and PNP.PowerShell modules installed on your machine.
##Connect to Azure to retrieve an access token
Connect-AzAccount -Identity
$Token = (Get-AzAccessToken -ResourceURL "https://graph.microsoft.com").token

##Connect to Microsoft Graph
Connect-MgGraph -AccessToken $Token
select-mgprofile beta
When creating the Group, we use the parameter variables declared above to build out the body of the request and pass this to the New-MgGroup cmdlet. Then pause the script for 60 seconds to allow time for the group to be created fully before continuing. This is a rudimentary way to avoid errors, mainly included here to get you started. Before putting your own solution into production, it’s worth adding some more robust error handling. The body of the Group contains the base Group settings and is customizable for any use cases you may have.
##Build Parameters for new M365 Group
$GroupParam = @{
    DisplayName = $GroupName
    description = $GroupDescription
    GroupTypes = @(
        "Unified"
    )
    SecurityEnabled     = $false
    IsAssignableToRole  = $false
    MailEnabled         = $false
    MailNickname        = $SiteURL
    "Owners@odata.bind" = @(
        "https://graph.microsoft.com/v1.0/users/$DefaultOwner1",
        "https://graph.microsoft.com/v1.0/users/$DefaultOwner2"
    )
}

#Provision M365 Group
$Group = New-MgGroup -BodyParameter $GroupParam

##Wait for Group to finish provisioning
start-sleep -seconds 60
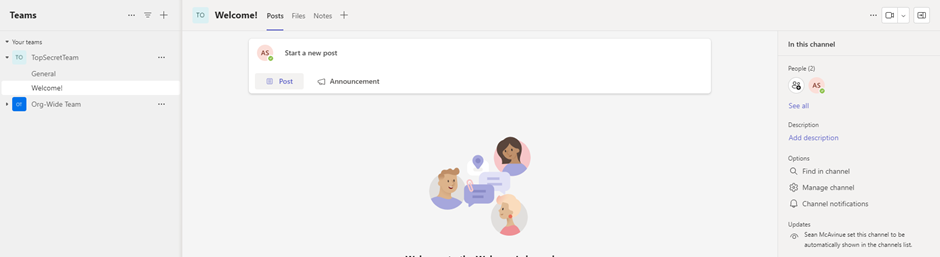
Next, we follow the same process to enable a Team for the Group that was created. This is again customizable based on your needs. For example, I have chosen to create a channel named “Welcome!” for each Team. This is quite a simplistic example but can be expanded upon with custom channels/channel messages etc., to build out specific Team layouts and customizations.
##Build Parameters for new Team

$TeamParam = @{
       "Template@odata.bind" = "https://graph.microsoft.com/v1.0/teamsTemplates('standard')"
       "Group@odata.bind" = "https://graph.microsoft.com/v1.0/groups('$($Group.id)')"
       Channels = @(
             @{
                    DisplayName = "Welcome!"
                    IsFavoriteByDefault = $true
             }
       )
       MemberSettings = @{
             AllowCreateUpdateChannels = $false
             AllowDeleteChannels = $false
             AllowAddRemoveApps = $false
             AllowCreateUpdateRemoveTabs = $false
             AllowCreateUpdateRemoveConnectors = $false
       }
}

##Add Team to group
New-MgTeam -BodyParameter $TeamParam
I have also chosen to add the Team to the tenants’ Group Lifecycle Policy. If your policy is configured for all groups, then this won’t be required, but many organizations will want to exclude key Groups from lifecycle policies. As there is no exclude parameter available in the policy, this needs to be added when the Group is created.
##Add Group to tenant group lifecycle policy
Add-MgGroupToLifecyclePolicy -GroupLifecyclePolicyId (Get-MgGroupLifecyclePolicy).id -GroupId $Group.id
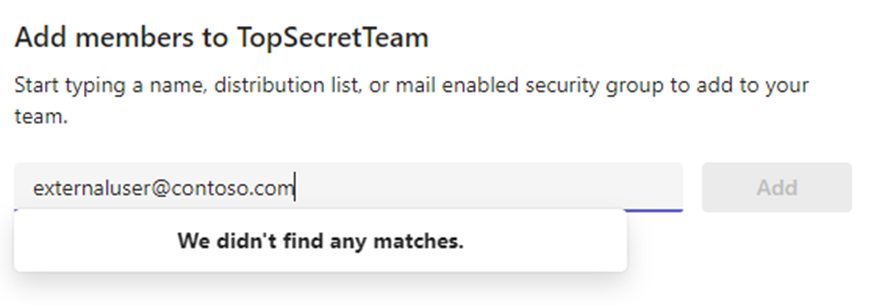
Finally, if the Team should be internally available only (based on the IsInternal parameter), we apply the Azure AD Directory setting to block the addition of guest users and use PNP to configure the site sharing settings to block external sharing of data.
##If the Team is internal only, block guest access and external sharing
if($InternalOnly){

##Block Guest Access to Group if required
$Template = Get-MgDirectorySettingTemplate | ?{$_.displayname -eq "Group.Unified.Guest"}

$TemplateParams = @{
       TemplateId = "$($template.id)"
       Values = @(
             @{
                    Name = "AllowToAddGuests"
                    Value = "false"
             }
       )
}
New-MgGroupSetting -BodyParameter $TemplateParams -GroupId $Group.id

##Connect to PNP
Connect-PnPOnline -ManagedIdentity -Url $adminURL

##Set Sharing policy to internal only
$site = Set-pnptenantsite -SharingCapability Disabled -Url $url

}
Using different input parameters, the exact configuration of each Team is fully customizable. This is a simple internal/external Team example, but it should give you an idea of how to structure the script to allow for different Team options.
Running the Script
Running the script through Azure Automation is straightforward and prompts for the parameters at run time (Figure 2).
Validating the Team
After the script has completed, there will be a new Team provisioned with the settings defined and ready for use. Checking in SharePoint Online (shown in Figure 3), we see that the site has been restricted to only allow internal sharing of files.

Checking in Teams, the Team is provisioned with the settings provided, and the “Welcome!” channel is present (as shown in Figure 4)
Finally, external guests can’t be added to the Team, showing the directory setting has been applied successfully (as seen in Figure 5)
Automating Teams Creation
With a relatively small amount of effort, the provisioning of Teams in an organization can be automated to cater to the requirements of the business, as well as IT. Running the script directly from Azure Automation is fine, but taking this a step forward and looking at different methods to trigger the runbook allows organizations to get creative with how they structure this process. Once the core script is in place, why not trigger the runbook from your ITSM tooling? Or from a PowerApp? This can be done quite easily using a Webhook and calling it from your chosen application while passing in the required parameters. A Webhook can be created in Azure Automation, as shown in Figure 6. This is discussed in more detail in this series on how to use Azure automation to work with SharePoint Online.

The very simplistic example I give here is available on GitHub and contains very little in the way of error handling and optimization. It is a good place to start when developing your own process, though, and pushing Teams providing to an automated process grants much more control that is available out of the box.
Microsoft Platform Migration Planning and Consolidation
Simplify migration planning, overcome migration challenges, and finish projects faster while minimizing the costs, risks and disruptions to users.


Hi Jacob,
Removing the user from the group will remove their permissions UNLESS, they have been granted permissions through sharing links or broken inheritance to individual files and folders. Keep in mind you need to remove the user from both Group Owners AND Group Memebers.
Hi Sean
Is it possible to revoke rights of a creator of a teams group ? Right now I have a situation that the creator is no longer responsible for the teams group but still is presented as owner of then group eventhough was removed from owners of that group. How to restrict him access to the group and its assets ( sharepoint ext..)?