What is Microsoft Sentinel?
Microsoft Sentinel helps organizations protect their Microsoft 365 tenants by providing insight into activity that might require investigation. Administrators can get started with the tool quickly because its UI is clear and easy to understand. Deciding if Microsoft Sentinel is suitable for your organization depends on how information flows and is maintained within the organization. You can learn more about Microsoft Sentinel and how it compares to Microsoft 365 Defender in my earlier article.
Microsoft Sentinel can seem daunting for some administrators due to the learning curve associated with mastering a new product, however, in this blog post, I’ll show how easy it is to set up Microsoft Sentinel with a basic configuration that delivers a great deal of value.
Specifically, in just four simple steps, we’ll connect Microsoft Sentinel to other Microsoft Cloud Security products to get a single pane of glass for incidents and automate security response through playbooks.
Step 1 – Set up Microsoft Sentinel
Microsoft Sentinel runs on top of and extends the capabilities of Azure Log Analytics – an Azure resource part of the ‘Azure Monitor’ stack that collects logs and allows support for queries and visualizations against the log data. Azure Log Analytics supports solutions that enable additional features on top of it, and Microsoft Sentinel is a solution that extends the capabilities of Log Analytics. Log Analytics is responsible for retention and query capabilities, and Microsoft Sentinel adds security information and event management (SIEM) and security orchestration, automation, and response (SOAR) functionality.
Accordingly, before you can use Microsoft Sentinel, you must have a Log Analytics workspace for it to run against. To create one and connect it to Microsoft Sentinel, follow these steps:
- Navigate to the Azure Portal, search for ‘Microsoft Sentinel,’ and then select Create.
- In the window that opens at the top, you can select an existing Log Analytics Workspace or create a new one. To use a new workspace, select Create a new workspace, and select the Azure subscription and resource group to use for the new workspace (see Figure 1):
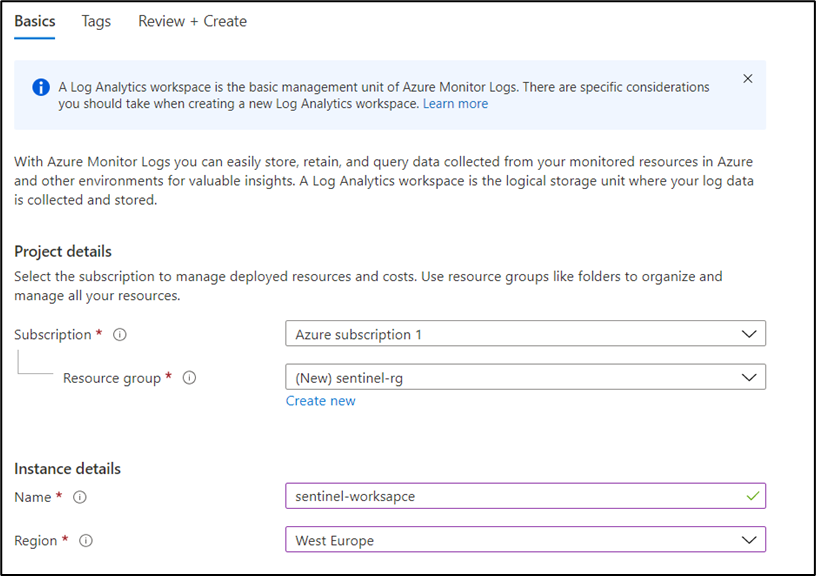
After creating the Log Analytics workspace, you can select it and activate Microsoft Sentinel using the workspace. Once the connection between Sentinel and the workspace exists, you will see the Microsoft Sentinel UI.
Step 2 – Connect the workspace to data sources
The next step is to connect the workspace to other sources of log data. By default, no data is available in a workspace. To start data flowing, you must configure data connectors, which is Microsoft Sentinel’s way to ingest data into the workspace. Many built-in connectors are available, including connectors for both Microsoft and third-party products, and you can also create custom connectors to ingest data from products that are not officially supported.
Sentinel has excellent support and integration for Microsoft Cloud Security products and provides easy integration, however, we need to take a look at the following connectors:
- Microsoft Defender for Cloud (previously Azure Defender) — Protects your Azure components
- Microsoft 365 Defender (includes Defender for Endpoint, Defender for Identity, and more) — Protects your Microsoft 365 environment
- Azure Active Directory Identity Protection — Protects your cloud identities
Note that while the latter two products are included in the Microsoft 365 E5 license, Microsoft Defender for Cloud must be enabled on each subscription that you want to protect.
To connect these products, follow these steps:
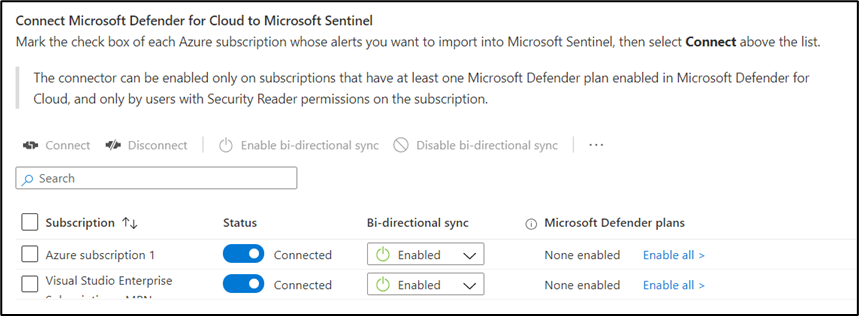
- Navigate to the Microsoft Sentinel portal and select Data connectors.
- From the list of data connectors, search for Microsoft Defender for Cloud (see Figure 2). This connector supports bidirectional synchronization of alerts — This means alerts closed within Microsoft Defender for Cloud show as closed in Microsoft Sentinel and vice versa. Because Defender for Cloud is enabled on a subscription level, you need to enable the bidirectional synchronization for each subscription that has Microsoft Defender for Cloud running.
- Search for the Microsoft 365 Defender connector. This connector also supports bidirectional synchronization of incidents, so whenever Microsoft 365 Defender generates an incident, it is also created in Microsoft Sentinel; when an incident is closed in Sentinel, the connector will close it in Microsoft 365 Defender. Select Connect to start synchronizing incidents.
- The last connector to enable is Azure Active Directory Identity Protection. This is the only connector that doesn’t support bidirectional synchronization of alerts or incidents. Once you enable the data connector, alerts generated by Identity Protection are added to Microsoft Sentinel as alerts. By default, alerts do not appear in the Sentinel UI, so they are meant for low-fidelity signals. The next section explains how to generate incidents for Identity Protection alerts.
Step 3 – Create rules to generate incidents for Identity Protection alerts
Alerts from Identity Protection do not appear as incidents within Microsoft Sentinel. To make them show up as incidents, we need to create an Analytics Rule, which Sentinel uses and is responsible for generating incidents. Two types of rules exist:
- Scheduled Analytic Rule — Uses a search query to search your logs for specific events
- Microsoft Incident Creation Rule — Creates incidents from alerts created by Microsoft security products
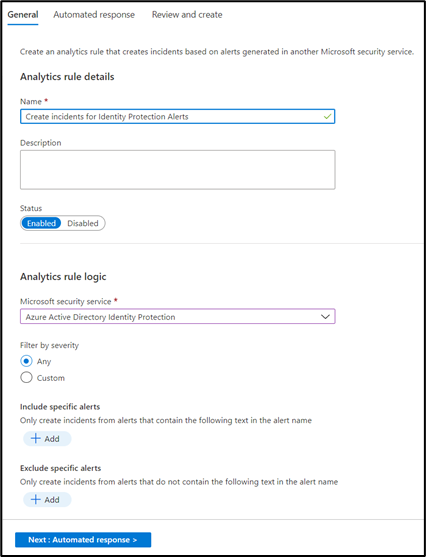
To generate incidents for Identity Protection alerts, we will use a Microsoft Incident Creation Rule:
- Navigate to Analytics and choose Create > Microsoft Incident Creation Rule.
- Select Azure Active Directory Identity Protection as the security service (see Figure 3).
- Click Next and then Create to save the new rule. Every Identity Protection alert generated afterward will have a corresponding incident in Microsoft Sentinel.
Note that this example is a basic Analytic Rule. More advanced options enable you to search the raw data to find anomalies within your organization.
Step 4 – Automate response to incidents
After ingesting data with data connectors and generating incidents through Analytic Rules, it is time to automate some of the responses to the incidents.
Automation within Microsoft Sentinel provides two options for automating response to incidents:
- Automation Rules help you triage incidents in Microsoft Sentinel. For example, they can automate tasks by assigning an incident to the right person or update the status and severity. Automation Rules can also trigger playbooks.
- Playbooks are procedures that can be run from Microsoft Sentinel in response to an alert or incident, and the crux of automation within the tool – they are Azure Logic Apps that can integrate with Sentinel. I consider Logic Apps to be ‘the enterprise version’ of Power Automate, since it is essentially the same ‘low code’ solution, just built on top of the Azure platform. By using playbooks, we can integrate with different solutions, including both Microsoft cloud products and third-party solutions like Fortinet and ZScaler.
Playbooks might appear daunting at first, but Microsoft provides sample playbook templates to help you get started with the automation capabilities of Microsoft Sentinel. To see the available playbook templates, navigate to the playbooks gallery by selecting Automation in the Microsoft Sentinel portal, click Automation and select the Playbooks template tab. Here, you can see many templates that can enable the following functionality (see Figure 4):
- Isolate a device in Microsoft Defender for Endpoint when creating an incident
- Send a Teams or email message with incident details
- Confirm the Identity Protection risk of an Azure AD user through Identity Protection
- Create a snapshot of an Azure Virtual Machine


The sky’s the limit!
In just four quick steps, we’ve set up Microsoft Sentinel with a basic configuration that delivers a lot of value — you now have a bird’s eye view of security information across your tenant as well as the ability to automate response to incidents. I encourage you to explore Microsoft Sentinel further and use it to enhance your security posture.


