This is the second article in a series of articles on Source Control for Microsoft 365 Tenant Admins.
The first article introduced source control and how to get started with Git. In this article, you will learn how to collaborate with others using Git. This could mean working with a teammate or people around the world to collaborate or co-develop code.
More Developers Means More Complexity in Source Control
The complexity of managing code goes up an order of magnitude when multiple people access the same code base. Git helps you manage that complexity. When you combine the technical capabilities of Git with well-understood processes and practices, you can collaborate with as many other developers as you want. Remember, Git was invented to manage the source code of the Linux kernel with over 1000 developers. However, we focus here on techniques that are useful for a team of two to five people contributing to a code base.

Source Code Layout
The directory and file structure of a source code repository are important to think about before adding more contributors to a project. When multiple contributors update a code base, there are typically more changes to keep track of. Some of those changes happen at the same time. Contributor 1 fixes a bug, while Contributor 2 adds a new feature. When these two changes need to be merged back into the main branch, it is ideal if Git can do it automatically.
Below are two strategies to think about.
Multiple Repositories
All source code for a team does not need to be in the same repository. Use different repositories for different projects. Don’t create a Git repository called “Automation Scripts.” This will grow over time into a huge mess. On the other hand, it is also impractical to create a repository for every individual script that you and your team manage. Create repositories based on a logical grouping of functionality. For example, you may have one repository used by your team to manage Intune. Another repository may contain scripts to automate user management tasks in Azure Active Directory.
Multiple Files in a Repository
The second consideration is how to divide code across files within a single repository. If two contributors work on two different files, Git can merge both changes automatically because they do not conflict with each other. If two people edit the same file, a merge conflict may need to be resolved by a developer. Resolving merge conflicts is an advanced topic that I’ll cover in a future article.
If the project is a PowerShell module, consider having each function in a separate file. You can use the module’s PSM1 file to load all the functions from separate files. While PowerShell module design is not covered in this article, a really quick and easy way to do this is to dot source all the files in your PSM1 file. You can see a directory structure here in the VS Code snapshot (Figure 1).
There is a directory called ModuleDemo. In that directory is the ModuleDemo.psm1 file. All the other files containing code for the functions are in the functions directory.

This practice not only makes it easier to manage changes with Git, but also forces scripters to build small, single-task functions when writing code. As a code base expands, it will help to minimize duplicate code and should simplify the overall project.

Pushing Code to a Remote Git Server
My first article demonstrated how to set up a local git repository, how to make changes, and commit them to the repository. Collaborating with team members requires the use of some sort of Git server. Dozens of options exist. Microsoft offers two solutions that are can be used by Microsoft 365 Admins and .Net Developers.
The first is Azure DevOps. Azure Dev Ops is the latest cloud version of what used to be the Team Foundation Server. Azure Dev Ops is great for projects where all contributors to the code base are in the same Azure Active Directory tenant. It is possible to add external users from outside of the organization, but that capability will depend on the B2B settings in the Azure AD tenant
The second option is GitHub. Individuals and enterprises use GitHub to manage their Git Repositories. GitHub is home to many popular Open-Source projects, including PowerShell itself.
Both services provide a wide array of features in addition to Git, such as project management tools, issue tracking tools, build automation, and pipelines for deploying code.
The examples that follow use GitHub as a remote Git server. However, the same process can be used to push code to Azure Dev Ops as well.
Adding a Remote Git Server
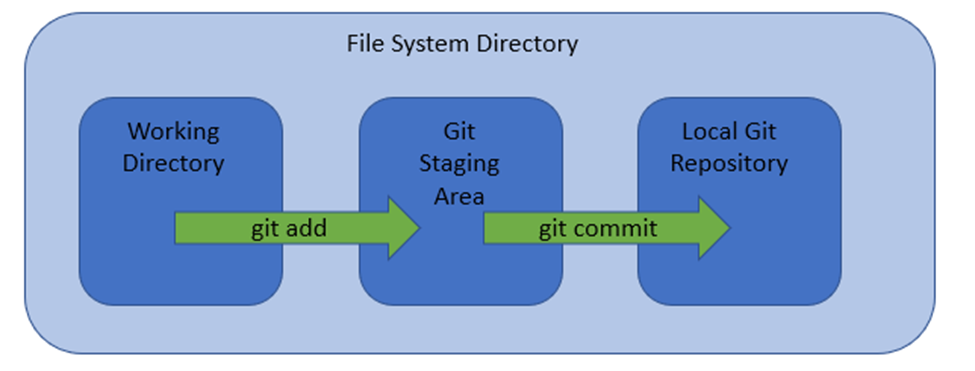
You may recall this diagram from the previous blog article (Figure 2).
One more step is required to start sharing code with others so that collaboration can take place (Figure 3).
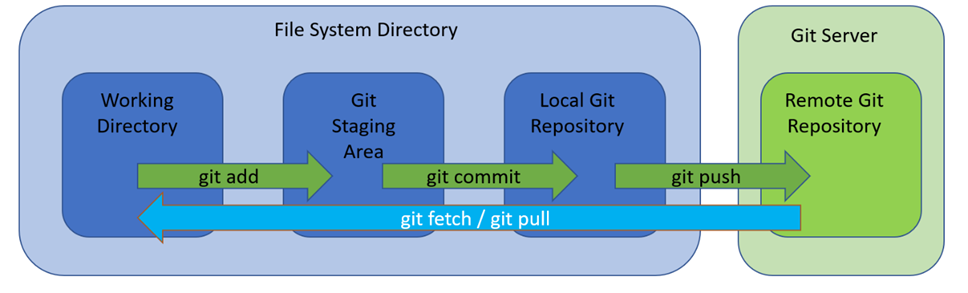
Adding the Git Server adds two more steps to the process of committing code, pushing and pulling or fetching. Pulling and fetching are similar but with one key difference. A pull merges the changes from the remote server into your local repository. A fetch tells the local repository that there are changes available in the remote repository without merging the changes into the local repository.
It is important to understand when to push versus pull. When reading a map to figure out how to go somewhere, you must have a reference point. To know where you are going, you need to know where you are.
The same is true when it comes to pushing and pulling code to or from a remote Git repository. Most of the time, everything is relative to the main branch on the remote git repository. If you want to send changes in a local repository up to a remote repository, use the git push command. If another user pushes changes to the remote repository and you want to make sure you have the latest version of what is in the remote repository, use git pull or git fetch.
Git Going
To setup GitHub as a remote Git repository, perform the following steps:
- Create a Github.com account if you don’t already have one.
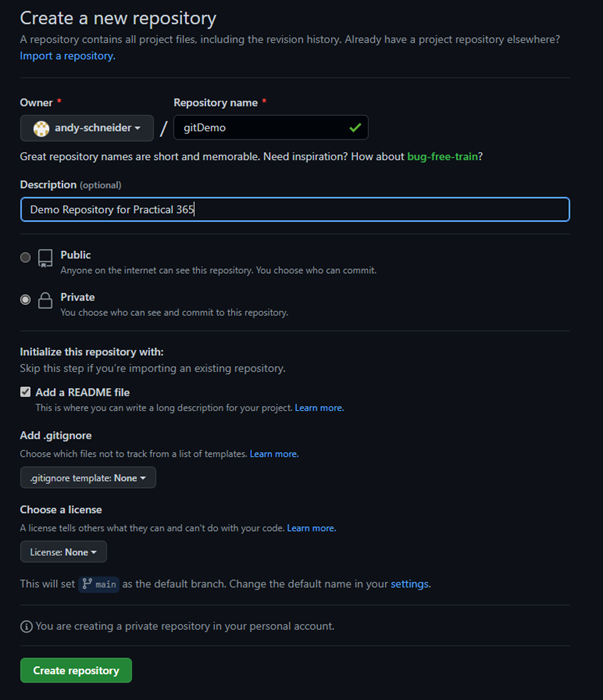
- Create a new repository. There are several options to configure when creating the repository, as seen in Figure 4. Any of these options can be changed later, but the most important ones are the name of the repository and whether it is public or private. Public repositories can be seen by anyone. You maintain control over who can contribute, but your code will be accessible to the world.
3. If you want to connect the repository you created in the first article, click on the “Import Repository” at the very top.
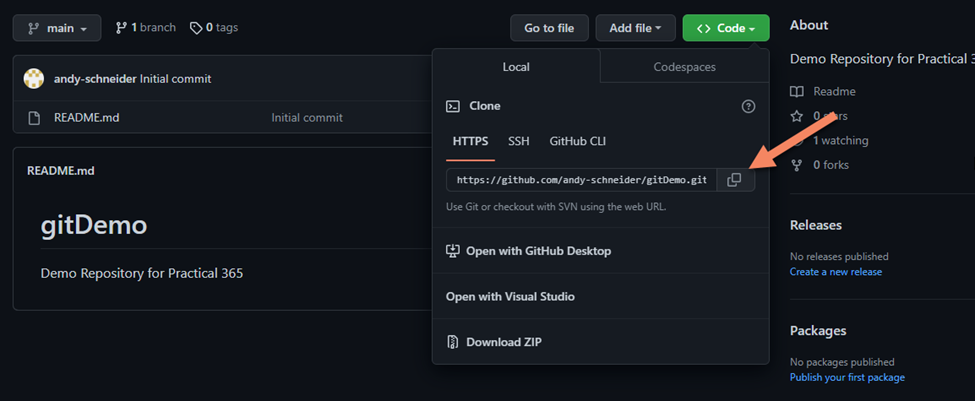
4. Once you create the repository, find the HTTPS Clone URL by clicking on the “Code” button. Click on the copy button to copy the URL (figure 5).
5. On your workstation, you can now clone the new repository. In my case, it would be
git clone https://github.com/andy-schneider/gitDemo.git
6. You may be prompted for Github credentials when you clone the repository. This will only happen the first time. Once the credentials are cached, you can use git pull and git push with no prompts.
7. Congratulations, you now have a git repository on GitHub!
Working with Others
To collaborate with other people on a code base, it is important to avoid conflicting changes. Augmenting the process we used earlier, along with the file structure of the repository itself, can help avoid conflicting changes. It won’t eliminate them, but it can help dramatically. There are two new concepts that need to be understood in order to collaborate with others successfully: a branch, and a pull request.
Branches
Branches are a way to name a set of changes in a git repository. Up until now, we have been making changes on the “main” branch, committing them, and pushing them. To successfully work with others, that workflow must be updated.
Before starting to edit code, create a branch. This allows you to easily keep track of the change you are working on.
1. Create a branch using the branch command.
git branch MyFirstFeature
2. To switch to that branch, you need to check it out.
git checkout MyFirstFeature
3. Using git status, you can see what branch you are on.
git status
> On branch MyFirstFeature
> nothing to commit, working tree clean
4. Create a file with new content.
Add-Content "File1.txt" -value "This is the first feature"
5. Stage the changes and commit them to the local repository.
git add .
git commit -m “My first feature”
The goal from here is to get our changes into the main branch on the Git server (GitHub) so that other contributors have access to this great new feature.
The first thing to do is to push this branch and all your updates to the repository in GitHub. If you try to do a git push, you will get an error message.
git push
fatal: The current branch MyFirstFeature has no upstream branch.
To push the current branch and set the remote as upstream, use
git push --set-upstream origin MyFirstFeature
To have this happen automatically for branches without a tracking upstream, see ‘push.autoSetupRemote’ in ‘git help config’.
What this is saying is that the remote repository doesn’t know about the MyFirstFeature branch. However, it tells you how to fix it! Run
git push –set-upstream origin MyFirstFeature
That command told Git what branch to sync to on GitHub when changes occur in your local MyFirstFeature branch. Now your code is up on GitHub! However, the job is not quite done. The next step is to get your code merged into the main branch so it can be deployed, and other developers can pull the code down easily.
To merge this branch into the main, a pull request must be submitted. A pull request seems like a strange name for such an operation. Remember the difference between pull and push? These operations are relative to the main branch in the remote repository. When you submit a pull request, you are requesting that your branch be pulled into the main branch.
When you’ve pushed your changes, you should have seen a message on how to create a pull request. The URL it gave me was https://github.com/andy-schneider/gitDemo/pull/new/MyFirstFeature.
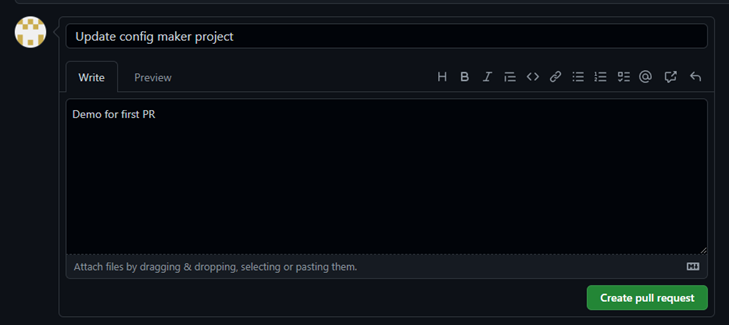
If you browse to the URL GitHub gave you when you pushed your branch, you should be able to submit and complete the pull request. First, create the pull request, as seen in Figure 6.
Once you create the pull request, you will be able to merge it. Note that it shows that you want to merge the MyFirstFeature branch into the main branch, (Figure 7). It also shows me that there are no conflicts, so this merge can happen automatically.
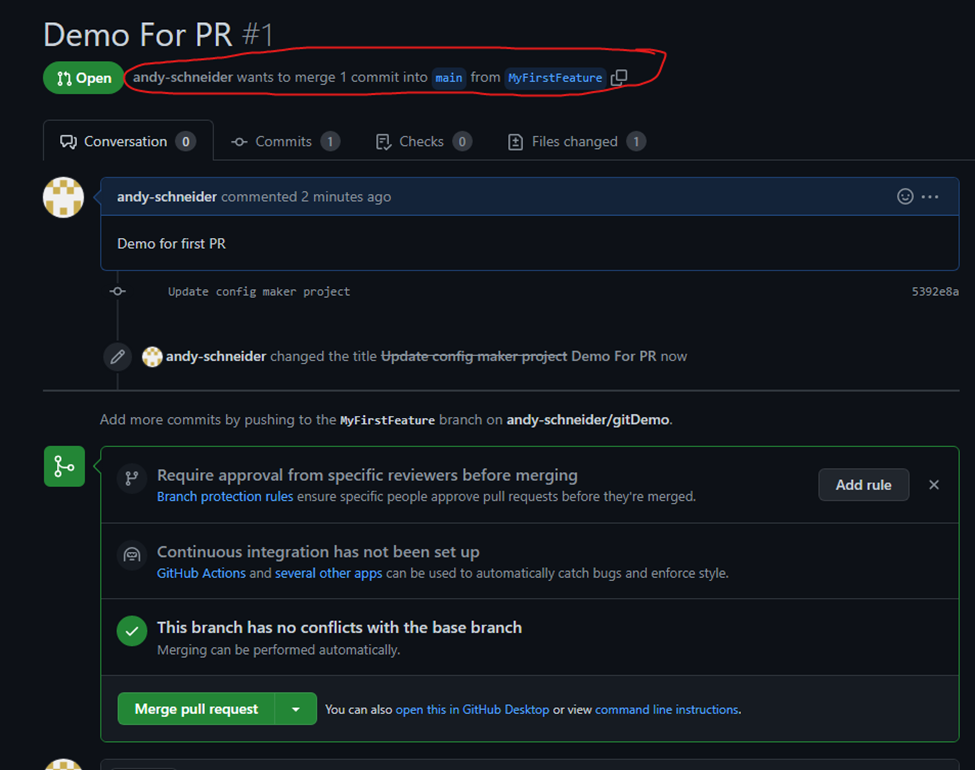
You can complete the merge.
Using a pull request (or PR) in your workflow with other teammates can provide other benefits as well. There is an opportunity for code reviews. You can set up rules so that the person who submitted a PR cannot complete it. Someone else would have to review the change and approve the merge to the main.
If the person reviewing the PR has suggestions for the contributor, developers can continue to make changes on the MyFirstFeture branch and push it up to GitHub. When the reviewer is satisfied, then the merge can be accepted.
Git at It
In this article, we looked at Git capabilities and processes to easily collaborate with teammates on a code base. The next article in the series will focus on how to integrate Git workflows directly in VS Code and some advanced techniques in Git. If you haven’t started using source control, now is the perfect time to git started!
The Microsoft 365 Kill Chain and Attack Path Management
An effective cybersecurity strategy requires a clear and comprehensive understanding of how attacks unfold. Read this whitepaper to get the expert insight you need to defend your organization!


