Detecting and Reporting Important Audit Events
It’s been a busy time for those who worry about the security of Exchange. On the on-premises front, two new day-zero vulnerabilities appeared as another unpleasant reminder of the dangers lurking on the internet when attackers figure out new ways to penetrate even well-managed servers. On-premises servers that aren’t so well managed are easy targets for the bad guys, and there are just too many of those kinds of servers still around.
Because of the barriers erected to protect Microsoft 365, Exchange Online is usually safe from these kinds of exploits. However, as we covered before, a compromised Azure AD administrator account can lead to attackers hijacking Exchange Online in a tenant. Microsoft VP for Security Alex Weinert’s words about the importance of protecting all Azure AD accounts with MFA must have had special meaning to the folks who owned the compromised tenant.
All of which brings me to an article by the Microsoft cybersecurity team (DART) where they review important sources of forensic information for investigations. DART likes to look in the Azure AD audit log, Azure AD sign-ins, and the Office 365 audit log (aka the unified audit log) to find traces of bad guy activity. This sparked the idea of writing about how to use the new support for managed identities in the Exchange Online management module (V3) to check for audit events that might disclose problems. So here we go.

Exchange Online, Azure Automation, and Managed Identities
Previously, I covered how to use Exchange Online PowerShell with Azure Automation. Before V3, credentials like a username and password (safely stored in Azure Key Vault) could be used to sign into an administrator account and run Exchange cmdlets. With V3, you can use a managed identity, just like you can with the Microsoft Graph PowerShell SDK and Teams modules.
The big advantage of using a managed identity is that Azure takes care of security and there’s no need to mess with passwords or certificates. Instead, Azure uses the permissions assigned to the automation account used with the managed identity to allow or deny access to resources. It’s possible that attackers might attempt to compromise a managed identity, but the likelihood is low compared to the possibility of compromising a username/password combination.
Cybersecurity Risk Management for Active Directory
Discover how to prevent and recover from AD attacks through these Cybersecurity Risk Management Solutions.
Assigning the Right Permissions
My idea is to write a PowerShell script that will execute as a runbook using a schedule owned by an Azure-managed identity. The script does the following:
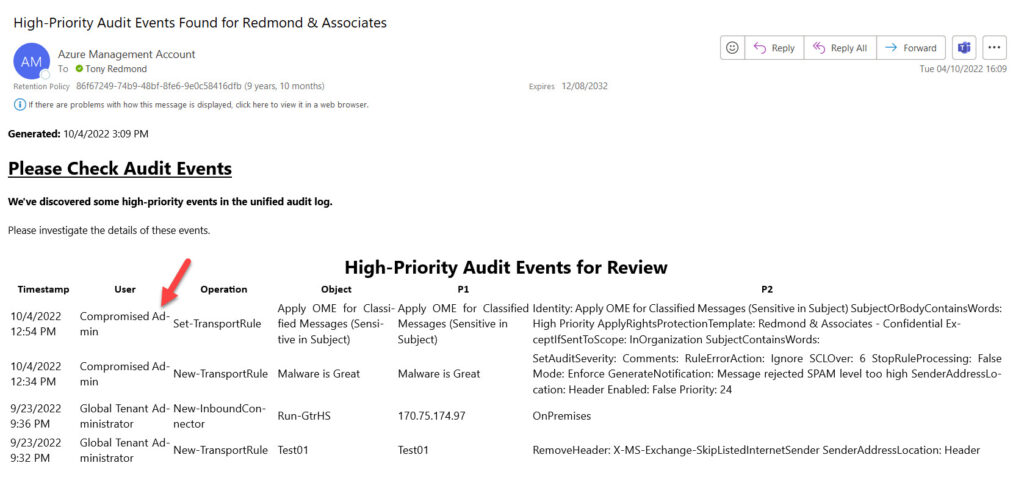
- Defines the high-priority audit events to monitor. The recent compromise of a Microsoft 365 tenant allowed the attackers to create a new inbound connector and 12 new transport rules. The attackers could then use the tenant to send lots of spam. My script checks for these events.
- Signs into Exchange Online using a managed identity. The service principal for the managed identity must be assigned the Manage Exchange As Application permission. To learn how to assign the permission (only possible using PowerShell), read this article.
- Searches the Office 365 audit log using the Search-UnifiedAuditLog cmdlet. The search covers the last 30 days. For Office 365 E3 tenants, it could go back 90 days; for E5 tenants, 365 days. I think 30 is reasonable on the basis that you should be checking for recent events on a regular basis.
- If the search finds some audit records, parse the audit data payload in each record to extract important information like the name of a transport rule or connector, parameters used, and so on. The payload varies from event to event, so if you add other events to the search, you must update the script to extract information from those events.
- Run the Get-ExoMailbox cmdlet to fetch the display name of the account which performed the action that caused the audit event to fire.
- Create an HTML report of the audit data.
- Email the report to a designed SMTP address. This could be for a distribution list, Microsoft 365 group, mail-enabled Team channel, or individual. The idea is that the message is a call to action to prompt administrators to check if the actions associated with the high-profile audit events are valid. The script uses Microsoft Graph PowerShell SDK cmdlets to create and send the message, so the managed identity’s service principal must hold the Graph Mail.ReadWrite and Mail.Send application permissions. These permissions are very powerful (among the type beloved by attackers), so it’s important to deploy them in conjunction with an application access policy (explained below).
Most of this is straightforward and Azure Automation duly sends the email to prompt administrators to review high-priority audit events (Figure 1). Attaching the runbook to an Azure Automation schedule will ensure that tenant administrators will receive notifications on a regular basis.
Assigning Graph Permissions to a Managed Identity
Two issues deserve some additional attention. First, assigning a Graph permission like Mail.ReadWrite to the automation account used with the managed identity is another operation that’s only possible in PowerShell. Here’s the code I used:
$ManagedIdentity = Get-MgServicePrincipal -ServicePrincipalId d5469aa1-070f-4008-863b-e69b6646203a
$GraphApp = Get-MgServicePrincipal -Filter "AppId eq '00000003-0000-0000-c000-000000000000'" # Microsoft Graph
$Role = $GraphApp.AppRoles | Where-Object {$_.Value -eq 'Mail.ReadWrite'}

$AppRoleAssignment = @{
     "PrincipalId" = $ManagedIdentity.Id
     "ResourceId" = $GraphApp.Id
     "AppRoleId" = $Role.Id }
# Assign the Graph permission
New-MgServicePrincipalAppRoleAssignment -ServicePrincipalId $ManagedIdentity.Id -BodyParameter $AppRoleAssignment
The steps in the code are:
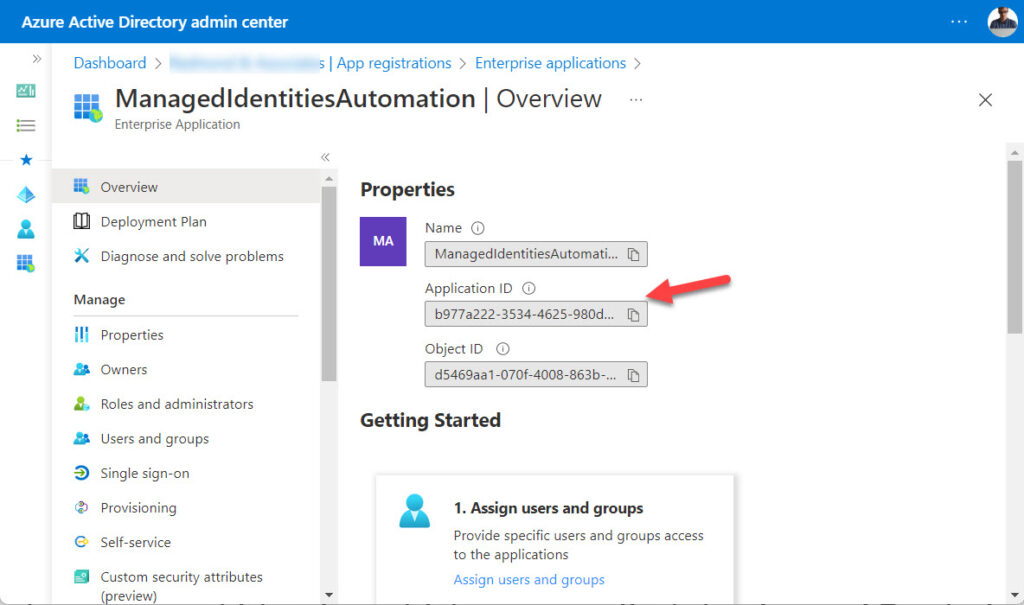
- Get the service principal for the automation account for managed identity using the service principal identifier. You can get this by selecting the managed identity in the enterprise applications section of the Azure AD admin center and viewing its properties.
- Define the identifier for the Microsoft Graph enterprise application. This value is always ‘00000003-0000-0000-c000-000000000000.
- Retrieve the App role for the permission I want to grant. The filter extracts the role for the Mail.ReadWrite role.
- Use the information fetched to build the parameters for the new assignment.
- Run the New-MgServicePrincipalAppRoleAssignment cmdlet to assign the role to the automation account’s service principal. Assigning the role consents to the use of the requested permission.

Securing Mailboxes Against Applications
Second, the automation account now has the Mail.ReadWrite and Mail.Send application permissions. The Microsoft Graph will allow code run by the automation account to access any mailbox in the tenant and send email on behalf of any mailbox. Establishing an omni-powerful facility to send email makes it easy for developers, but it can be a security nightmare. And that’s where Application Access Policies come in.
An application access policy controls access to mailboxes by an application. In our scenario, we probably only want code run by the automation account to be able to access a limited number of mailboxes, perhaps even just one. To make the set of mailboxes easy to maintain, you can create a distribution list to define the set of accessible mailboxes.
For example, this code creates a security-enabled distribution list (a normal distribution list cannot be used) and adds a single mailbox to the list.
New-DistributionGroup -Alias ManagedMailbox.Restrict -PrimarySmtpAddress ManagedMailbox.Restrict@office365itpros.com -Description "Restrict Access for Managed Mailboxes - used with Application Policy" -DisplayName "Restrict Access to Managed Mailbox" -IgnoreNamingPolicy -Name ManagedMailbox.Restrict -Type Security

Set-DistributionGroup -Identity ManagedMailbox.Restrict -ManagedBy Tony.Redmond -HiddenFromAddressListsEnabled $True

Add-DistributionGroupMember -Identity ManagedMailbox.Restrict -Member "Azure.Management.Account@office365itpros.com"
Now I can create an application access policy to limit the automation account to the set of mailboxes defined in the distribution list. Immediately after the policy is active, Exchange Online limits the automation account, including runbooks using the managed identity, to the assigned mailboxes.
New-ApplicationAccessPolicy -AccessRight RestrictAccess -AppId "b977a222-3534-4625-980d-e2f864d3a2d5" -Description "Restrict Mailbox Access to Managed Identity" -PolicyScopeGroupId ManagedMailbox.Restrict

ScopeName        : Restrict Access to Managaed Mailbox
ScopeIdentity    : ManagedMailbox.Restrict
Identity         : a662313f-14fc-43a2-9a7a-d2e27f4f3478\b977a222-3534-4625-980d-e2f864d3a2d5:S-1-5-21-458367025-2064581115-2950179075-49778371;e33e4a0e-149d-4949-8c51-0c849df7b9ea
AppId            : b977a222-3534-4625-980d-e2f864d3a2d5
ScopeIdentityRaw : S-1-5-21-458367025-2064581115-2950179075-49778371;e33e4a0e-149d-4949-8c51-0c849df7b9ea
Description      : Restrict Mailbox Access to Managed Identity
AccessRight      : RestrictAccess
ShardType        : All
IsValid          : True
ObjectState      : Unchanged
The scope of the policy is set by the distribution list created above. The AppId value used in the code is the application identifier for the automation account, which you can find in the Azure AD admin center by examining the properties of the account (Figure 2).
You can download the runbook code from GitHub.
Scheduled Automation is Good Automation
Protecting a tenant takes hard work and ongoing persistent effort. Using Azure Automation to run scheduled runbooks to pick up anomalies is an excellent way to make sure that no one forgets to check things out. Now that the Exchange Online management module supports managed identities, a new set of possibilities is available. Go for it!


