Understanding the Different Components in Defender for Office 365
Recently, I wrote an article around how you can get started with Configuring Microsoft Defender for Office 365 using Microsoft’s Preset Security Policies and Configuration Analyzer. For many organizations, the Microsoft guidance is more than enough to get started on the right track. There is, however, a lot of room for tailoring the suite of tools to meet the needs of your organization more effectively.
In this article, I will examine the different components of Defender for Office 365 and how you can customize the configuration beyond the baselines to enhance the relevance and impact the policies have on your tenant. I won’t go through every possible setting here, but I will highlight the most important aspects to review when modifying the configuration from baselines and the reasons to consider each configuration option.
*If you haven’t already, make sure to check out the Feature Availability documentation to see what is available under your current subscription.
With so many configurable options within Defender for Office 365, it can be hard to know where to start. So, to help keep things clear, I’ll break them down into the following major sections:
- Anti-Phishing
- Anti-Spam
- Anti-Malware
- Safe Links and Safe Attachments
For context, I’ll start with the assumption that the standard Microsoft recommendations have been applied – or reviewed – across the board through Configuration Analyzer.

Anti-Phishing
When configuring Anti-Phishing Policies with the Microsoft baselines in place, information relevant to your organization such as specific users and domains to protect is not being used by default. Let’s look at some settings that can be used to improve this.
Anti-Phishing Policy: Enable Users and Domains to Protect with Impersonation Protection
Out of the box, Defender for Office 365 isn’t aware of the domains or users that are sensitive to your organization. When defining anti-phishing policies, it’s important to look beyond standard phishing attempts and protect against more advanced attacks such as whaling.
Whaling is a practice where the attacker will perform a highly targeted phishing attack by assuming the identity of a high-level individual such as a CEO or CFO in an organization. This gives the phishing attempt the benefit of seeming important or urgent, making the recipient more likely to accept it at face value. For example, a mail purporting to be from the CFO of an organization, requesting an update of payment details urgently can often pressure recipients into acting quickly, before considering the validity.
Using the Users and Domains to Protect setting, you can specify both internal and external users and email domains that will be protected from impersonation. This means that if you protect the user Bruce.Wayne@contoso.com (Figure 1), then an email from the address Bruce.Wayne@fabrikam.com will have an increased likelihood to be flagged as potential impersonation based on the similarity to the protected user.
It’s important to note that this doesn’t specify who gets the policy assigned, that is done in the regular policy assignments.
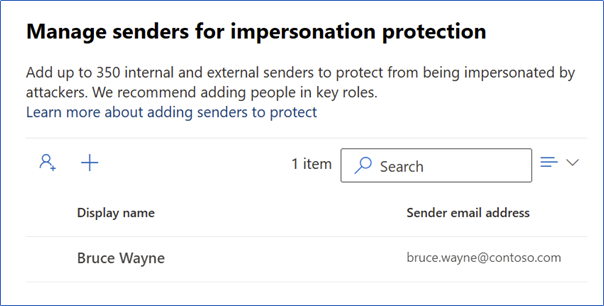
Similarly, when protecting the domain “contoso.com”, mails coming from a domain such as “contosoo.com” will have an increased likelihood of being flagged as potential impersonation. While this can obviously cause issues if used for every contact – internal and external – it can be a very powerful way to protect important users such as the CEO of a partner organization. The baselines via Configuration Analyzer will protect the accepted domains in your organization but any critical partner or supplier domains should be added.
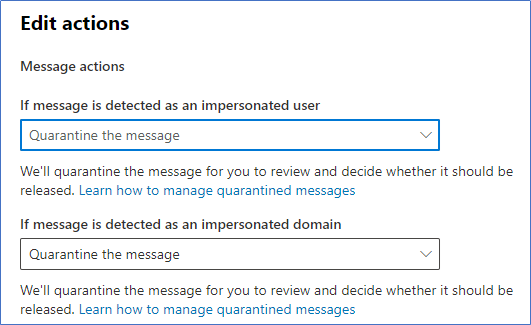
Once Impersonation Protection is enabled for these users and domains, you can set the action to take in the actions section as shown in Figure 2:
Anti-Phishing Policy: Enable Mailbox Intelligence Impersonation Protection
Mailbox Intelligence in Defender for Office 365 uses machine learning to gather information about each users sending and receiving patterns to create a “sender map” for the user. Defender then uses this information to inform decisions made on potential spoofing attempts by using the data gathered as a strong signal that the mail is legitimate. Mailbox Intelligence is enabled as part of the baseline; however, the option to leverage Mailbox Intelligence for Impersonation Protection is not enabled.
This setting extends the Mailbox Intelligence functionality to mails that are protected via Impersonation Protection to help improve the reliability of results. For example, if Bruce.Wayne@contoso.com is a protected user and a user in our organization frequently communicates with Bruce.Wayne@fabrikam.com, the information gathered from mailbox intelligence will influence the phishing confidence of this scenario to lower the likelihood that the legitimate sender is seen as a phishing attempt.
Note: For Mailbox Intelligence to work, recipient mailboxes must be hosted in Exchange Online
Anti-Phishing Policy: Enable First Contact Safety Tips
First Contact Safety Tips are a relatively new addition to Defender for Office 365, and at the moment seemingly not captured by Configuration Analyzer. When enabled, this setting will inform the user when they receive a mail from an unfamiliar address with the tip shown in Figure 3. This is particularly useful to help users stay vigilant and remind them when they receive a mail from an address they are not familiar with:

I suspect this setting will become standard as part of the baselines in time, but it’s worth enabling manually until then to help users to detect potential spam or phishing attempts from unknown mailboxes. The setting is available under the ‘Actions’ section of the Anti-Phishing Policy.
Anti-Phishing Policy: Phishing Threshold
Suspected Phishing attempts are assigned a rating based on the confidence that Defender has that the message is truly Phishing. This rating can be ‘low’, ‘medium’, ‘high’ or ‘very high’ confidence. Messages are then treated differently based on the level of confidence assigned.
For the standard baseline, the Phishing Threshold is set to 2 (Aggressive). This means that any attempts marked as ‘high’ or ‘very high’ are treated as very high confidence and will take the action assigned in the spam filter for that, while ‘low’ and ‘medium’ can take a different action.
As with most of the thresholds in the Defender suite, the value set here depends highly on the organization, industry, and associated risk. While I don’t recommend changing this value on day one, this is something that should be monitored and adjusted as required.
If it seems like you are still receiving phishing attempts despite having active preventions in place, this threshold can be used to harden the protections. Likewise, if you are getting too many false positives, it may be worth considering a lower threshold for your organization. This setting should also consider the actions assigned in the Anti-spam Phishing and High Confidence Phishing settings detailed in the Anti-Spam policy section.
Anti-Spam
Within the Anti-Spam policy, the “Spam Properties” section contains the Advanced Spam Filter (ASF) configuration. You’ll notice that this isn’t configured by the Configuration Analyzer. This is by design, the ASF settings as part of Anti-Spam policies are being deprecated and these protections are being integrated into other parts of the platform. The current recommendation is not to use them in new configurations going forward.
Anti-Malware
Anti-Malware Policies deal with malicious content from files and emails. There are not a huge number of configurable options within the Anti-malware settings but there are a few settings that you will want to review which aren’t covered in the baselines.
Anti-Malware Policy: Common Attachments Filter
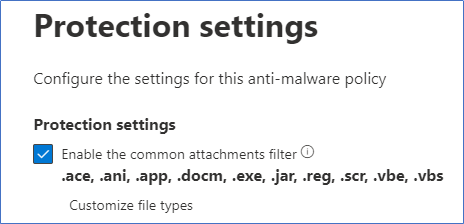
Using the baselines, there are a handful of attachment types blocked by the common attachment filter (Figure 4), covering the most commonly blocked file types. To put it simply, unless there is a legitimate need to allow specific file types, most of the extensions listed in the common attachments filter can be blocked.
This covers a large amount of undesirable file types, so I highly recommend reviewing the list Microsoft has provided and using a ‘whitelist’ approach to choose which ones you don’t want to block.
Anti-Malware Policy: Configure Notifications
There are several notifications that can be configured for the Anti-malware policy to notify the different parties. I don’t recommend ever notifying an external sender when anything is blocked, because you are potentially exposing information about your configuration that you don’t need to.
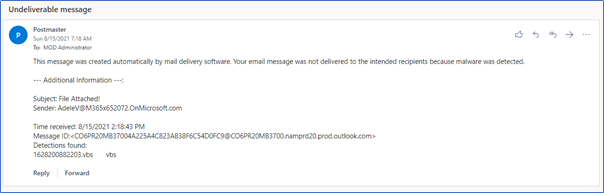
However, notifying internal senders when items are quarantined is good practice, but the most important configuration, in my opinion, is to notify admins when Malware is blocked in mail. Configuring the options “Notify an admin about undelivered messages from internal senders” and “Notify an admin about undelivered messages from external senders” to forward reports to a monitored security mailbox will allow admins to track when malware is blocked with a notification similar to the one shown in Figure 5:

Safe Links and Safe Attachments
When configuring Defender for Office 365 using Configuration Analyzer, if you don’t have a Safe Links or Safe Attachments policy created in your tenancy, Safe-attachments will not be shown in Configuration Analyzer. This can lead to a false sense that everything is set up perfectly when it may not be in place at all. Creating the initial policies will bring them into scope of the analyzer. Once again, after the baselines are in place and showing in Configuration Analyzer, there are a few further settings to watch out for.
Safe Attachments Global Setting: Turn on Safe Attachments for SharePoint, OneDrive and Teams
In the global settings for Safe Attachments, you have the option to enable Safe Attachments for SharePoint Online, OneDrive for Business, and Teams. This setting should be considered to extend the protections applied to Exchange out to the other areas of the platform, particularly where there may be external users interacting with Teams or SharePoint.
With this setting in place, files that are uploaded to SharePoint but detected as malicious by Safe Attachments will be locked and users will be unable to interact with the file. By default, downloading the file is still allowed, however, this can be disabled by running the following command in the SharePoint Online Management Shell:
Set-SPOTenant -DisallowInfectedFileDownload $true
Safe Attachments Global Setting: Turn on Safe Documents for Office Clients
The Safe Documents feature for Office Clients allows Office Clients to enforce a Microsoft Defender for Endpoint scan before opening a file. Unfortunately, Safe Documents requires a full Microsoft 365 E5 or Microsoft 365 E5 Security license (most likely due to the integration with the Defender for Endpoint service).
When the feature is enabled, files that open in ‘Protected View’ will be scanned before the user can click through to enable editing. If the file is detected as malicious, users will not see the ‘Enable Editing’ option and will see a message similar to the one in Figure 6:

There is the option to “Allow people to click through Protected View even if Safe Documents identified the file as malicious” but I would recommend against ever enabling this outside of testing.
Safe Attachments Policy: Enable Dynamic Delivery for non-Hybrid Environments
In environments where not all mailboxes are present in Exchange Online, Safe Attachments can be configured to block mails with detected malware or to replace the malicious attachment and allow the base email to flow. Both options can delay mail flow to allow for Defender to investigate the attachments.
In an environment where all mailboxes are hosted in Exchange Online, Dynamic Delivery can be enabled. This setting allows mail to be delivered immediately – without the attachments. The attachments are then scanned and readded to the mail, post-delivery by Defender. This allows for the scanning process to have a minimal impact on end users’ productivity.
Safe Attachments Policy: Apply the Safe Attachments detection Response if scanning can’t complete
There are times when scanning can’t be performed on a particular file due to encryption, back-end errors, or timeouts. I recommend enabling the option to ‘Apply the Safe Attachments detection Response if scanning can’t complete’ to ensure that these errors do not allow any unscanned attachments to reach end users.
Summary
The baselines provided are a fantastic way to get Defender for Office 365 set up quickly in your environment, but they don’t take you all the way. There are still items that should be reviewed and tweaked to suit your organization. The items I’ve listed here are a subset of what’s available but when combined with the baselines will help you to bring your Defender implementation to the next level.
To learn more about Defender for Office 365 and other Office 365 Security topics, check out these articles:
How to train your users against threats with Attack Simulation Training (practical365.com)Office 365 Security Resources (practical365.com)


Additional I am missing a bit more information about SafeLinks and your take on those settings. Potentially the article could get a little refresh ;), I believe most information is still accurate.
Hi Rob,
For a full breakdown on each setting I recommend checking out Microsofts recommended settings at the below link.
For Safe-Links in particular, there isn’t much in the Microsoft recommendations that I would disagree with or recommend to change. The article describes key settings to pay attention to – the most key decision for Safe Links is to make sure it’s turned on! One to pay attention to is “Do not rewrite the following URLs in email”, I don’t recommend this as a general solution to bad links but it proves useful for internal applications and reports that Safe Links can’t scan.
https://learn.microsoft.com/en-us/microsoft-365/security/office-365-security/recommended-settings-for-eop-and-office365?view=o365-worldwide
Nice article!
There is a small hickup in the text under “Safe Attachments Global Setting: Turn on Safe Attachments for SharePoint, OneDrive and Teams” 😉
I fixed that formatting bug. Sean will have to respond about the settings. I will note that any article written in October 2021 is likely to be a tad behind the times. Things change very quickly in the cloud…