For many organizations, Exchange Online (EXO) will be their first access point into Microsoft 365. While there are many similarities in how the cloud service is managed compared to an on-premises Exchange deployment, there are also many new concepts and risks introduced. The responsibilities of a traditional Exchange Administrator after moving to EXO are vastly different from what they were previously used to.
In this article, I will outline the most important steps an Exchange Online Administrator needs to take to make EXO secure by default. While there are a lot of nifty security tools we can leverage with the appropriate licensing, all the steps outlined in this article can be achieved with basic licenses.
Disable Legacy Authentication
This one should be no surprise to anyone. The first step that should be taken to make your Exchange Online environment secure by default is to disable Legacy Authentication. In the context of Microsoft 365, Legacy Authentication is not a single protocol, more an umbrella term used to describe any protocol that uses Basic Authentication. Steve Goodman wrote a great article on how to do this which I strongly recommend you review.
For tenants with Azure Active Directory Premium, Conditional Access can be used to block Legacy Authentication at a tenant, app, or user level. But as Conditional Access only applies after the initial authentication occurs, Legacy Authentication should still be turned off at a service level in Exchange.
Microsoft is pushing to disable Legacy Authentication and has recently announced that they will be retiring it from any tenant that is not currently using it. Owners of these tenants will be notified by a Message Center Notification.

Implement Multi-Factor Authentication
Multi-Factor Authentication (MFA) is an extremely effective method to provide additional verification for user sign-ins. With the abundance of Phishing attempts that occur daily for large organizations, it can often be the last line of defense against an attacker gaining access to confidential data. It is also extremely easy to implement.
For tenants with Azure Active Directory Premium, Conditional Access can be implemented to allow for some cool scenarios such as bypassing MFA on trusted devices, from trusted networks and even reassess the requirement based on user state changes with the continuous evaluation feature.
If you don’t have Azure AD Premium though, you can still protect your tenancy with Azure AD Security Defaults. This will allow you to enforce MFA for all users very easily, although the flexibility of Conditional Access is lost here.
Understand and Secure Exchange Online Mail Connectors
Out of the box, Exchange Online has default send and receive connectors and unlike Exchange On-Prem, you can’t see or modify them. Exchange Online has some top-class mail protection available through Microsoft Defender for Office 365 but that requires additional licensing to leverage. Some organizations will opt to maintain a third-party service instead of fully moving inbound and outbound mail protection to Microsoft, and that’s fully supported in Exchange Online however there are some considerations to this configuration.
The most important consideration is the default connectors I mentioned above. When you set your MX records to route inbound mail via a third-party gateway, it’s important to remember that MX records are not an enforced mail route, they are simply letting other mail systems know the advertised/preferred public mail route. By default, nothing is stopping external systems from sending mail directly to Exchange Online, bypassing your third-party protections.
To protect against this, a new connector is required in Exchange Online to ensure that mail from external domains is only accepted from your designated sources. This connector needs to specify “*” as the domain to catch all inbound mail and can be set up like the example shown in Figure 1:
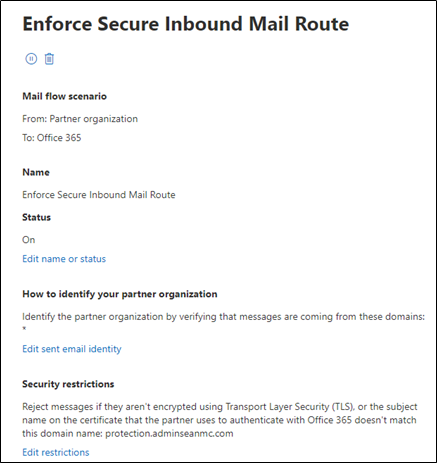
My recommendation is that for any mail connectors you set up, to use certificate validation wherever possible and to enforce TLS. IP-based restrictions are available but not as secure as using a public certificate and enforcing TLS.
With this connector set up, when a mail is sent directly to Exchange Online for your organization, it will be denied with a delivery status notification 5.7.1:

Implement SPF, DKIM, and DMARC
Sender Policy Framework (SPF), DomainKeys Identified Mail Standard (DKIM), and Domain-Based Message Authentication, Reporting & Conformance (DMARC) are email security controls that protect public mail domain reputation. They are used to ensure that your outbound mails can be verified while helping to ensure spoofed mails from your domains are blocked by recipients.
While you can’t control the protection standards of other organizations’ mail systems, you can help them to determine if mails received from your domains are legitimate and be informed when your domain is being spoofed.
Let’s look at a brief description of each control:
- SPF uses a public DNS TXT record to inform organizations about the authorized source mail systems for your domain. It does this by publishing source IP addresses/ranges for your domain. It also has a lookup functionality to allow you to specify A records or MX records as authorized sources.
- DKIM does a similar job to SPF by allowing you to verify the source of your emails but can be more effective in complex scenarios as it uses certificate signing for outbound mails. An encrypted header is added to outbound mail using a DKIM signing certificate, which can be validated against a public key that is advertised via a public DNS CNAME record.
For a detailed breakdown of SPF and DKIM setup, check out Alan Byrne’s article here.
- DMARC is a little different in that it’s not a specific control, rather a set of instructions that external mail servers should honor when validating SPF and DKIM from your domain. DMARC works by publishing these “instructions” in public DNS for receiving servers to follow when they get an email from your domains. This record is a TXT record that can specify the following values:
- v – What version of DMARC is being used? (Currently, the only version is version 1)
- aspf – Should SPF be verified?
- adkim – Should DKIM be verified?
- p / fo – What should happen if SPF and/or DKIM fail? (Nothing, Quarantine, Reject)
- rua – Should aggregate reports be sent back you your mail system and to what address?
- ruf – Should individual failure / forensic reports be sent back to your mail system and to what address?
- sp – Should there be a separate policy for subdomains?
- pct – *What percentage of mails should DMARC apply to?
*When rolling out DMARC, you can specify a percentage of mail to apply it to, gradually working towards 100%
A fully implemented DMARC TXT record will look like this:
v=DMARC1; p=reject; rua=mailto:DMARCValidation@adminseanmc.com; ruf=mailto:DMARCIndividualReports@adminseanmc.com; fo=1; adkim=s; aspf=s;With each of these controls in place, you aren’t just helping to protect your domain against spoofing, but also minimizing the likelihood that your legitimate mails will be seen as spam on the recipient side. This doesn’t replace having appropriate outbound mail filtering in place but goes a long way to protecting your public domain and gaining insights into potential issues.

Enable Admin Consent for Azure AD Apps
Securing user authentication is an effective step in preventing unauthorized access to data within your organization but there are other means that attackers can use to get control of a user’s account. One of these methods is by creating an application which requests users to grant permissions to aspects (scopes) of their data / profile. This can be very useful for application developers who need to access services on behalf of the user, say for example, allowing a scheduling app access to a user’s mailbox / calendar.
The risk with this type of access is that we don’t (by default) predefine which applications can access our tenancy and a user may end up consenting to access from a malicious app. Once the application is granted permissions on the defined scopes, it doesn’t need the users password or MFA to access data on behalf of the user. The user will be prompted to consent when they sign up for the app, similar to Figure 3:
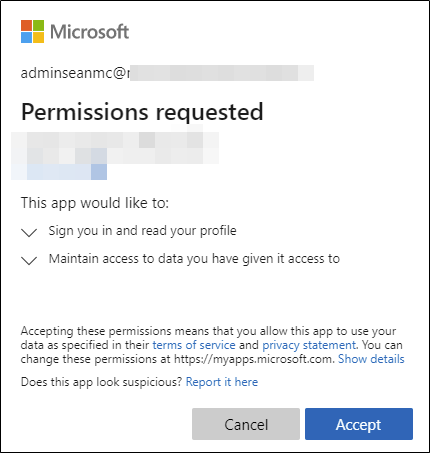
To combat this risk, you can configure Admin Consent in Azure AD. This prevents users from directly granting consent to applications and instead will allow an administrator to approve it after ensuring it’s safe. I recommend checking out this article for a detailed breakdown of how to implement admin consent in Azure AD.
Implement External Email Tagging
Helping users to easily identify external mail can go a long way towards protecting against phishing/spoofing attempts. Adding a tag to mail as it comes in makes it clear to end-users that they should be extra vigilant if the mail contains sensitive content. There are a few ways to implement tagging for external mail, each delivering a similar result, so whichever one you use is up to you.
The first way to accomplish this is to implement a transport rule to prepend a disclaimer to emails that originate externally such as the one shown in Figure 5:
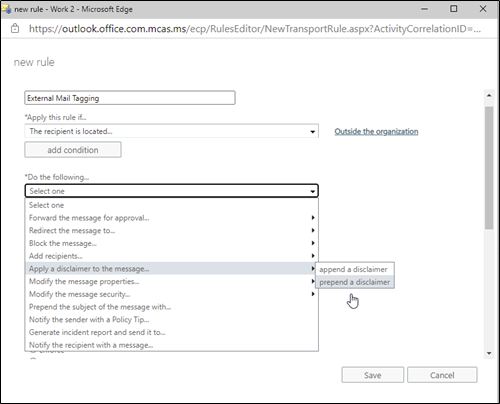
This rule can even add HTML content to draw the user’s attention, an example of this is shown in Figure 5:

The drawback to this method is it tends to break any message preview function in mail clients as the first few lines of text will always be the disclaimer.
Another way this can be implemented is simply prepending some text to the subject. This can also be done with a transport rule. To stop this rule triggering every time there is a reply to a message trail, make sure to add an exception to the rule as shown in Figure 6:

For organizations who solely use Outlook to access Exchange Online from different platforms, there is also the built in external email tag functionality which can be enabled organization wide. This tag (Shown in Figure 7) will only show up in Outlook / Outlook Web so the mail apps in your organization will need to be considered.
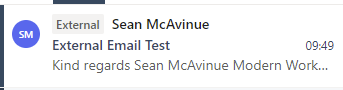
Turning on this feature is as simple as running a single command in Exchange Online PowerShell as shown in Figure 8:
Set-ExternalInOutlook -Enabled:$true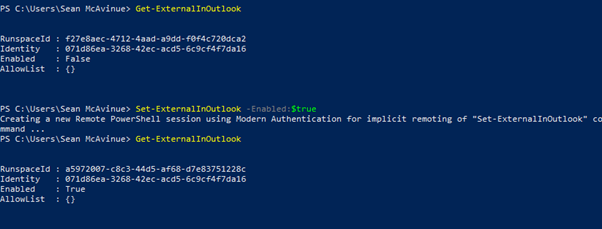
Mobile Application Management
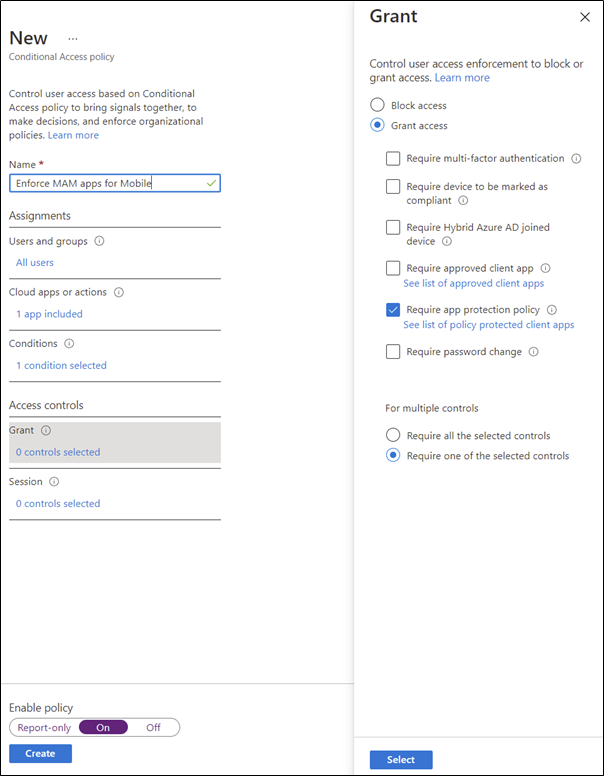
Microsoft Endpoint Manager (MEM) / Intune – if you are licensed for it – can provide some powerful features to ensure that when users connect to data in your organization, that the data can be protected from export to an untrusted device or location. By implementing Mobile Application Management Policies, export of data from corporate applications (such as Outlook Mobile) can be restricted. This unlocks a lot of BYOD scenarios without putting corporate data at risk. It’s important to note that Mobile Application Management will only work with supported applications so if enabling MAM, make sure to also restrict mobile access to these applications using Conditional Access as shown in Figure 9:
Configure Microsoft Defender for Office 365
Microsoft Defender for Office 365 (formerly Office 365 ATP) is a powerful tool for protecting Exchange Online from all types of malicious email traffic such as Phishing, Malware and regular Spam. While it does require some premium licensing, the feature-set and protection available provides a lot of value for money by making available a lengthy list of features.
Getting started with Defender for Office 365 doesn’t need to be a pain either, and you can read more on that here.
Define Data Loss Prevention Policies
Data Loss Prevention (DLP) policies can allow organizations to secure and control data as it leaves the organization. By defining DLP policies particular patterns (or Sensitive Information Types) can be detected within content as it is shared externally, and a set of rules are applied to determine if the data is allowed to exit the tenancy.
For example, an email with a list of credit card numbers can be blocked due to the contents, while a single credit card number can be sent but with Office Message Encryption applied. It’s important to note that DLP should be used alongside user vigilance and training, it isn’t designed to replace good practice when it comes to protecting data.
Once defined, DLP can then be extended to SharePoint Online, OneDrive and even Microsoft Teams. To make sure you can extend the policies, they need to be configured as Unified Policies within the Microsoft 365 Compliance Center. Having a single set of rules in the tenant for what can (or can’t) be shared externally via any method, will avoid “Loopholes” in the controls.
For an in-depth look at DLP Policies in Office 365 I highly recommend checking out this article by Paul Cunningham.
Note: DLP for Exchange requires a minimum of Exchange Online Plan 2 licensing
Summary
There are a lot of methods you can implement to improve the security of your Exchange Online environment, and even more tools out there made by Microsoft and third-party companies that can assist with security initiatives.
And while there are many advanced features and settings to consider down the road, in this article I’ve detailed some of the most important steps that can immediately be implemented out-of-the-box to align your Exchange Online tenant with a good security baseline and posture.


Great article Sean!