Why Separate Users in the First Place?
Microsoft 365 has many controls built-in to manage how users communicate externally, however, these controls do not generally extend to internal communication. While this is fine in most environments, situations exist where a degree of separation is required.
For example, a university wants to stop students communicating with facility members, or an organization with multiple subsidiaries wants to restrict employees from communicating with other subsidiaries. One option is to run multiple tenants, however, that introduces extra complexity and administrative effort. Often, a better solution is to create and use Exchange Online Address Book policies.

Address Book Policies
Address Book Policies (ABPs) aren’t new to Exchange Online. They exist to provide separation by grouping users into “Virtual Organizations,” each with their own Address Lists, Global Address List (GAL), Room Lists, and Offline Address Book (OAB). This is different from a Hierarchical Address Book which imposes a structure on address lists but does not enforce segregation. ABPs can also be extended to Microsoft Teams to scope directory search – with some caveats.
In this article, I detail the configuration of Address Book Policies, and how they can be extended to include Teams.
Configure Address Lists
Before creating any ABPs, you must define the objects that the policies will manage. Each ABP needs a minimum of one GAL, one OAB, one address list, and one room list. To create two ABPs, at least two of each component will be needed, scoped to the sets of users you want to separate.
In the PowerShell example below, I created each component based on the company users belonging to (Contoso or Fabrikam) from their Azure AD account. You can also create additional address lists for things like Distribution Lists based on the code:
##Create two GALs
New-GlobalAddressList -Name "Contoso GAL" -IncludedRecipients AllRecipients -ConditionalCompany Contoso
New-GlobalAddressList -Name "Fabrikam GAL" -IncludedRecipients AllRecipients -ConditionalCompany Fabrikam

##Create two Address Lists
New-AddressList -Name "Contoso" -IncludedRecipients MailboxUsers -ConditionalCompany Contoso
New-AddressList -Name "Fabrikam" -IncludedRecipients MailboxUsers -ConditionalCompany "Fabrikam"

##Create two Room Lists
New-AddressList -Name "Contoso Rooms" -RecipientFilter {(Company -eq "Contoso")-and (RecipientDisplayType -eq 'ConferenceRoomMailbox')}
New-AddressList -Name "Fabrikam Rooms" -RecipientFilter {(Company -eq "Fabrikam")-and (RecipientDisplayType -eq 'ConferenceRoomMailbox')}

##Create two OABs
New-OfflineAddressBook -Name "OAB_Contoso" -AddressLists "\Contoso", "\Contoso Rooms"
New-OfflineAddressBook -Name "OAB_Fabrikam" -AddressLists "\Fabrikam", "\Fabrikam Rooms"
Note: To manage Address Lists your account must be assigned the “Address Lists” role in Exchange Online – this role is not part of the Organization Management role group.
Create Address Book Policies
To create ABPs, enable “Address Book Policy Routing” in your Exchange Online transport configuration. This enables the ABP functionality in the tenant by running the Set-TransportConfig cmdlet to set AddressBookPolicyRouting to True. The effect is to instruct the Exchange transport service to regard users in different GALs to appear as external recipients to each other, which means that functionality like tagging external recipients works:
Set-TransportConfig -AddressBookPolicyRoutingEnabled $trueFinally, use the New-AddressBookPolicy cmdlet to create the ABPs. In the example below, I create two ABPs based on the objects created earlier for Contoso and Fabrikam:
##Create two ABPs
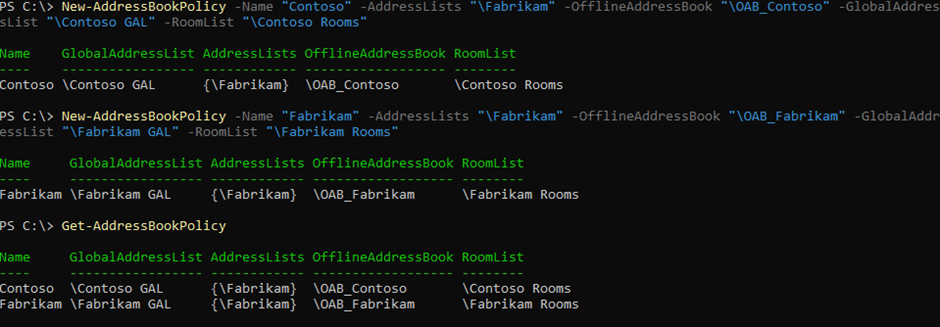
New-AddressBookPolicy -Name "Contoso" -AddressLists "\Contoso" -OfflineAddressBook "\OAB_Contoso" -GlobalAddressList "\Contoso GAL" -RoomList "\Contoso Rooms"
New-AddressBookPolicy -Name "Fabrikam" -AddressLists "\Fabrikam" -OfflineAddressBook "\OAB_Fabrikam" -GlobalAddressList "\Fabrikam GAL" -RoomList "\Fabrikam Rooms"
Once created, the policies can be verified using the Get-AddressBookPolicy cmdletas shown below in Figure 1:

Assign the Policies to Users
ABPs can be assigned to individual mailboxes in the Exchange Admin Center. At scale when assignment is needed for hundreds of mailboxes, that’s not practical. It’s much quicker to set the policy using the Set-Mailbox cmdlet.
For example, below I find all user mailboxes with the correct company attribute and add them to the relevant ABP. The nice thing about this method is that it can be scheduled so that new users are added to the correct ABP as part of a nightly job. How you assign the policy is unimportant. What is important is to assign the right ABP to the right mailboxes.
##Assign ABP to users
Get-Recipient -Filter '(Company -eq "Contoso") -and (recipienttypedetails -eq "usermailbox")' | Set-Mailbox -AddressBookPolicy Contoso
Get-Recipient -Filter '(Company -eq "Fabrikam") -and (recipienttypedetails -eq "usermailbox")' | Set-Mailbox -AddressBookPolicy Fabrikam
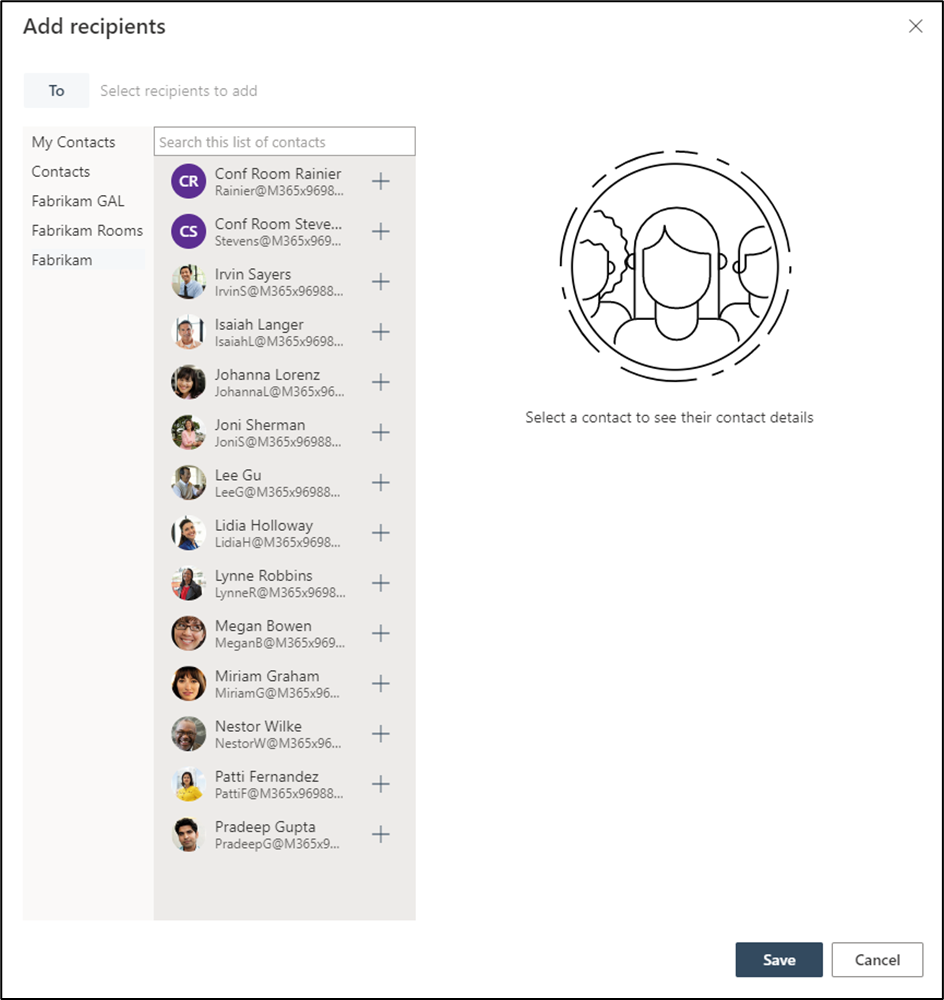
With the policy applied, users now only see the address lists and members defined by the policy assigned to their mailbox, as shown below in Figure 2:
Managing Exceptions
There can be times when a user needs to see the members of multiple address lists from different policies. There is no way to bypass the assigned address book policy for a user, so a new policy is needed. This policy should contain the address lists for everyone that the user needs to contact.
For example, if Contoso and Fabrikam share a CEO, they would need visibility to all staff, regardless of the company. A new policy can be created as shown in the example below to allow the CEO to see all address lists:
##Create “All Staff” ABP
New-AddressBookPolicy -Name "All Staff Visible" -AddressLists "\Fabrikam", "\Contoso" -OfflineAddressBook "\Default OAB” -GlobalAddressList "\All Users GAL" -RoomList "\All Rooms"
In this example, a single additional ABP can be used but catering for every use case and combination of users can become difficult to manage so it’s best to keep things simple.
Using ABPs in Teams
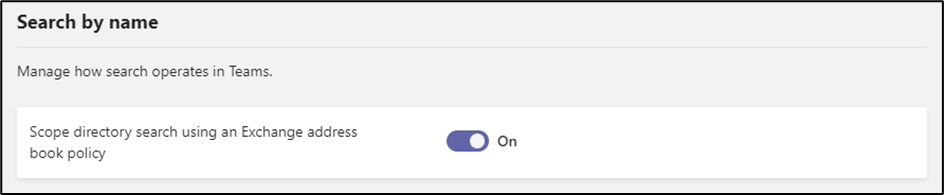
ABPs can be extended to Microsoft Teams by enabling the option to “Scope directory search using an Exchange address book policy” from the Teams Settings section of the Teams Admin Center as shown in Figure 3:
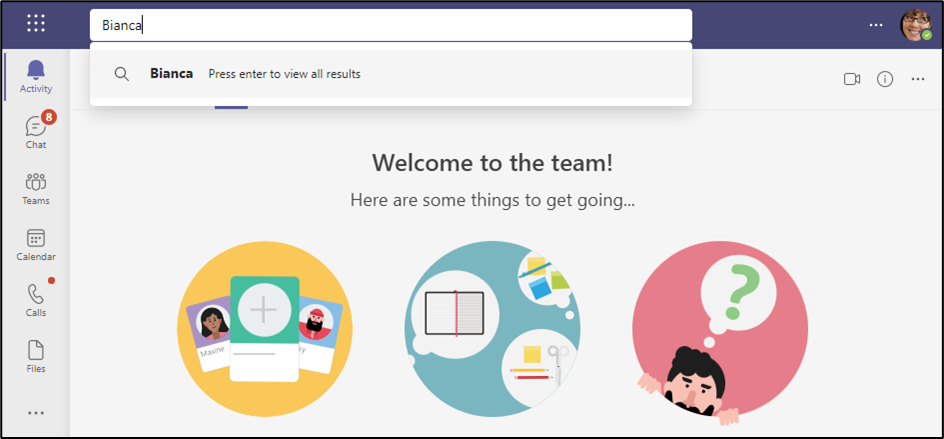
With this setting enabled, users who search in Teams see results limited by their assigned ABP as shown in Figure 4:
There are some side effects to be aware of when enabling scoped directory search in Teams, so it’s important to keep this in consideration before you decide to enable it.
Information Barriers
Information Barriers (IBs) are like APBs because they are also designed to provide internal separation. The difference is that IBs also prevent collaboration entirely for SharePoint, OneDrive, and Teams. IBs replace ABPs in the tenant so they cannot be used while there are any ABPs still in the environment. When IBs are provisioned and segments are assigned, users will be scoped to the segments they are assigned to.
Note: IBs require a minimum of Office 365 E5 licensing or Office 365 A1/A3/A5 licensing
When to use ABPs
Before deciding to deploy ABPs, there are some considerations to be aware of:
- Replication of changes will not be instant; it will take a few hours to update a policy change and even longer if the user is using cached mode in Outlook
- Information Barriers can’t be used if you have ABPs in place. Removal of ABPs in preparation for Information Barriers requires some effort to remove the policies from all users (Including inactive mailboxes)
- ABPs do not prevent emails (neither do IBs) or Teams messages from being sent
- Extending ABPs to Teams impacts Team discovery
- A large amount of ABPs can become complex to manage
- ABPs will not prevent users from viewing others through the other Office 365 apps (except for Teams if scoped directory search is enabled)
In Summary
For most tenants, ABPs are not needed and will only complicate management of the environment. But if you’re in a situation where you need to segregate communication across different groups of users, ABPs can be extremely helpful.


Hi guys,
I’ve setup an ABP called Students_ABL
Result.
Students can’t see the rest of the GAL – that’s what i want!, however they also can’t see each other ..
So all users who aren’t students are part of the default ABL that’s baked in ..Students are part of an ABL i setup called Students_ABL
What i haven’t done though, is enabled “Address Book Policy Routing” in your Exchange Online transport
configuration. Is the enablement of the Address Book Policy Routing a requirement for my ABL to work ?
Thanks ..
Hi Sean,
Thank you for the article. It is the most clear and concise that I have come across. I have followed all the steps but one seems to be failing and I would appreciate some guidance.
This is the error message when running Set-TransportConfig -AddressBookPolicyRoutingEnabled $true
Set-TransportConfig -AddressBookPolicyRoutingEnabled $true
Set-TransportConfig : A parameter cannot be found that matches parameter name ‘AddressBookPolicyRoutingEnabled’.
At line:1 char:21
+ Set-TransportConfig -AddressBookPolicyRoutingEnabled $true
+ ~~~~~~~~~~~~~~~~~~~~~~~~~~~~~~~~
+ CategoryInfo : InvalidArgument: (:) [Set-TransportConfig], ParameterBindingException
+ FullyQualifiedErrorId : NamedParameterNotFound,Set-TransportConfig
I have the same issue where there -AddressBookPolicyRoutingEnabled is not available.
I hope someone can reply to us.
Hi Rasha / Stego,
The parameter works fine for me in the Exchange online management module 3.2.0
Do you have the address lists role assigned as that is required for the steps in this article
How do you add ABP to distribution group?
Hi Sean,
This is very useful, thank you. We’ve just ran through this exact scenario as our organisation has split into two companies but currently still share the same M365 tenant. All is working well, however, users can no longer see ‘Distribution Groups’ or ‘Contacts’. How do we go about creating two additional address lists (ie: New-AddressList) for the groups and contacts and adding them to the relevant Address Book Policy.
Also, how do we filter these new Address Lists so CompanyA only sees their groups and CompanyB just sees theirs? Groups and Contacts don’t appear to have the ‘Company’ attribute so i guess we’d need to use the UPN or something.
I tried this process on on-prem exchange 2019. No problem on OWA side but I am getting”cannot be matched to a name in the address list” error while defining the mail address in outlook
Hi , can someone tell me how to assign addressbookpolicy to recipienttype -eq mailcontact
Thank you for the well documented instructions. I ran into the issue were I could not create a Global Address List. I followed the steps on the microsoft forum. New-GlobalAddressList not a cmd in Connect-ExchangeOnline: https://learn.microsoft.com/en-us/answers/questions/771877/new-globaladdresslist-not-a-cmd-in-connect-exchang.html.
How do you add distribution lists? They don’t seem to have the Company attribute used in your example.
Hi Paul, I am new to OnlineExchange but you might want to look at this line. In theory, you might want to change the -Filter on Get-Recipient to include sharedmailbox.
##Assign ABP to users
Get-Recipient -Filter ‘(Company -eq “Contoso”) -and (recipienttypedetails -eq “usermailbox”)’ | Set-Mailbox -AddressBookPolicy Contoso
And change
(recipienttypedetails -eq “usermailbox”)
TO
( (recipienttypedetails -eq “usermailbox”) -or (recipienttypedetails -eq “sharedmailbox”) )
https://learn.microsoft.com/en-us/exchange/recipients-in-exchange-online/recipients-in-exchange-online
How do you get to the command line for Office 365, I want to separate to GAL. Is they a way to do it from Exchange Admin Center?
I cannot install the cmd line.
Hi Nick,
You must use PowerShell on your PC.
Start it in admin mode.
First, install the Exchange Online Management Module :
PS> Install-Module -Name ExchangeOnlineManagement -RequiredVersion 2.0.5
Import the module:
PS> Set-ExecutionPolicy unrestricted
PS> Import-Module ExchangeOnlineManagement
Connect to Exchange online wit an Office 365 admin account:
PS> Connect-ExchangeOnline -UserPrincipalName admin@yourcompany.onmicrosoft.com
You will be prompted for credentials.
Now, you can enter the Exchange Powershell commands.
I hope this helps.
Hi Sean, thanks for this. Much appreciated. Question: Does when performing a Team search for other Team members, does Teams leverage the GAL (Global Address List) or does it use AzureAD to perform those look ups?
Hi Rok,
This is managed by configuring the Scope directory search using Exchange ABP option