Exchange Hybrid Server
Many organizations have migrated all Exchange mailboxes to Exchange Online but are not ready to get rid of Active Directory. Because recipient management still happens on-premises, you need an Exchange Server to manage Exchange properties and objects in Active Directory.
Running an Exchange Server in Azure isn’t incredibly challenging. Once your resources are deployed, installing, and configuring an Exchange server follows an almost identical path to any virtualization platform. The challenge is that Azure is a consumption-based subscription, and Exchange likes to consume resources, which means that costs ramp up quickly!
PaaS offerings like Automation Accounts, serverless Functions, and Logic Apps make automation easy nowadays. So, can automation solve the cost problem? This article takes you through a few different options, starting with the basics and moving on to something a bit more bespoke. But before we get stuck into the nitty-gritty, let’s consider what we want to achieve.

Cost Savings with Automating Exchange Hybrid Server
Automation can shut down compute resources when they are not needed. Figure 1 shows the difference in costs of running a typical Exchange Hybrid Server VM in Azure with three different scenarios:
- 24/7 – No automation; leave the VM running all the time
- Business Hours – Online 8 hours a day, 5 days a week
- Weekly Maintenance – Online 4 hours a week to allow for maintenance.
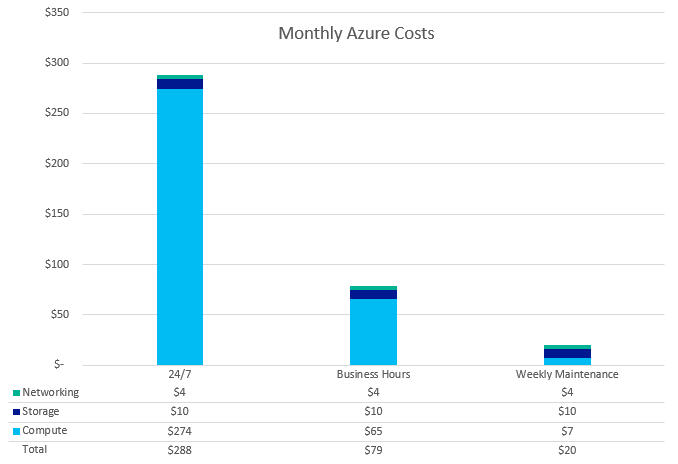
*Note – The estimates shown in Figure 1 are based on the following resources: Virtual Machine – D4s_v3, Standard SSD – E10, Public IP – Standard Static
Option 1 – Start/Stop Automation
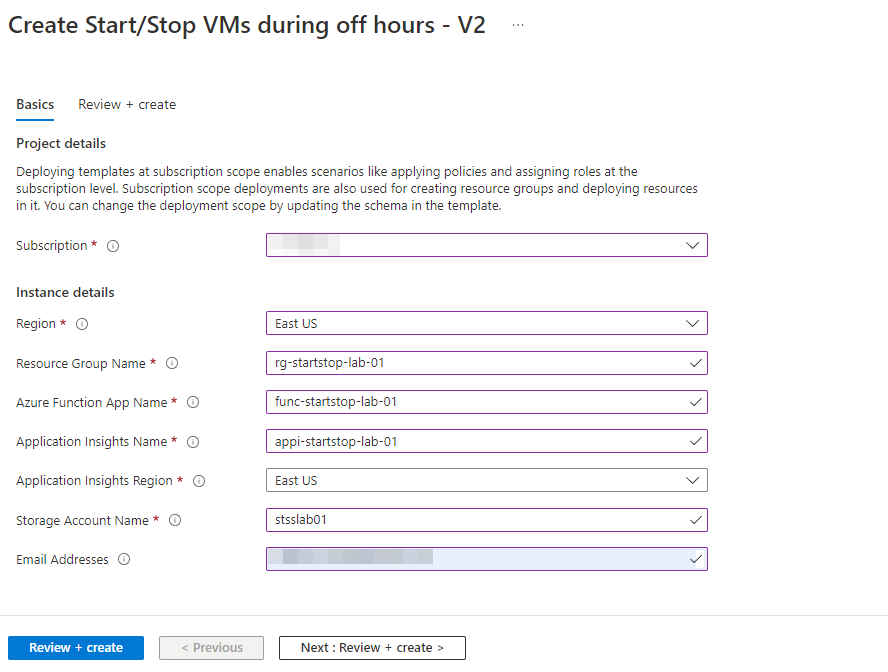
Let’s start with the basic approach. Start by opening the Microsoft pre-packaged solution Start/Stop VMs v2 in the Azure Marketplace. Click Create and complete the fields, then click on Review + create and then Create.
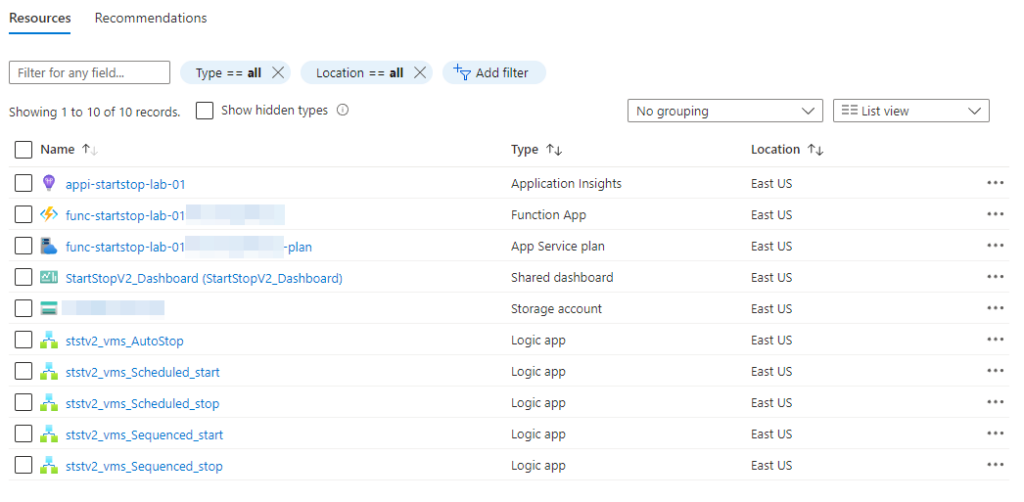
Head over to the specified resource group where the solution created several new resources. Logic Apps act as triggers and are named accordingly to the trigger type and action. We need to configure the relevant Logic Apps with a schedule targeting the Exchange Hybrid Server VM (Figure 3:)
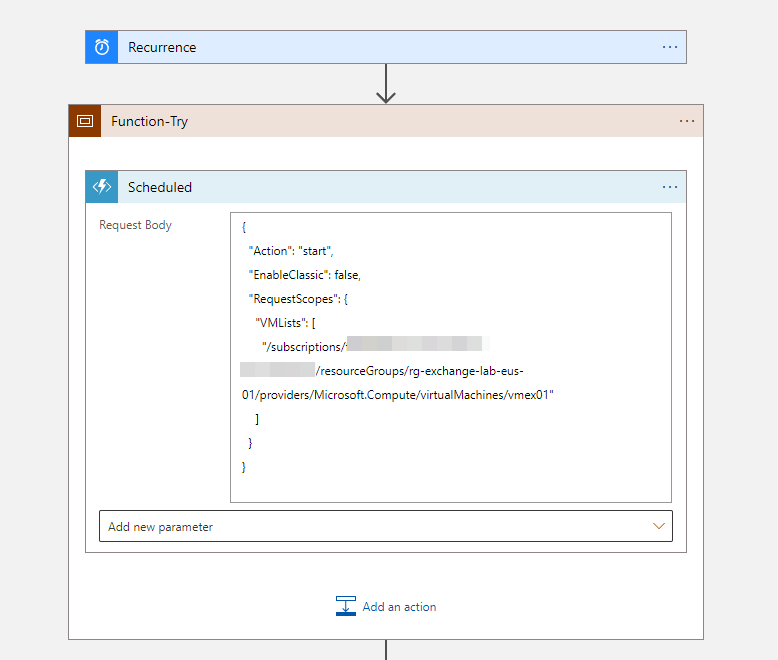
Open the Logic App name ststv2_vms_Scheduled_start andswitch to the Logic app designer. Then, expand the Reoccurance section and configure the desired schedule. Next, expand the Function-Try and Scheduled section. Here we need to update the Request Body to target the VM; we’ll need our VM’s resource ID, available under the Properties page of the VM, then we’ll need to change the RequestScopes so that the Request Body matches the below:
{
  "Action": "start",
  "EnableClassic": false,
  "RequestScopes": {
    "VMLists": [
      "[VM Resource ID]"
    ]
  }
}
Save your changes, switch to the Overview page and click Enable.
Finally, go back to the Resource Group and make the same changes to the ststv2_vms_Scheduled_stop Logic App. This time make sure your Request Body uses the stop Action:
{
  "Action": "stop",
  "EnableClassic": false,
  "RequestScopes": {
    "VMLists": [
      "[VM Resource ID]"
    ]
  }
}
Don’t forget to Save your changes, switch to the Overview page and click Enable.
Your automation is now running, and the Exchange Hybrid Server VM will shut down and startup according to the schedule. Of course, if needed, you can always start the VM manually in the Azure Portal by going to the VM’s Overview page and clicking the Start button.
Option 2 – Exchange Server Automation Runbook
Azure Automation Runbooks allow the creation of automation processes based on PowerShell or Python. There’s enormous potential here, such as using runbooks to process Exchange Online data or create Files in SharePoint Online. In this scenario, we use a PowerShell runbook to start and stop the Exchange VM and to run maintenance scripts on the VM.
We also utilize Azure’s managed identities, specifically a system assigned managed identity; this removes the need to store credentials, and the idenitiy maintains a shared lifecycle with the resource. The result is less effort to secure and maintain access to the resources.
First, let’s create an Automation Account to host the runbook. Go to the Automation Accounts blade and click Create. Complete the fields on the Basics page, click Review + Create, and click Create.
Next, create a storage account. Go to the Storage accounts blade and click Create. Complete the fields on the Basics page, click Review + Create, and click Create.
The next step is to sort out the identity used when resources run. When you create an Automation Account, Azure creates a System Assigned managed identity to represent the account. We need to grant that identity permission to the resources needed to allow automated management of Exchange.
First, go to your VM select Access control (IAM), then Add, Add Role Assignment. Select the Virtual Machine Contributor role and click Next. Select Managed identity, and add your automation account as a member, click Review + assign.
Next, go to your Storage account select Access control (IAM), then Add, Add Role Assignment. Select the Storage Blob Data Reader role and click Next. Select Managed identity, and add your automation account as a member, click Review + assign.
To recap, we’ve assigned the following permissions to our Automation Account:
- Virtual Machine: “Virtual Machine Contributor”
- Storage Account: “Storage Blob Data Reader”
Now let’s get our maintenance script added to our storage. Go to your Storage Account and select Containers, create a new container called “scripts” and set the access level to Private. Open the scripts container and upload your maintenance script. This script returns the computer name is a good test:
$env:computernameNow let’s create our Runbook. Go to your Automation Account and select Runbooks, click Create a runbook. Give it a name like “ExMaintenance”, set the type to “PowerShell” and the version to “5.1”. Click on the Edit button and copy the below code:
Param(
    [Parameter (Mandatory = $true)]
    [String] $VMName,

    [Parameter (Mandatory = $true)]
    [String] $ResourceGroup,

    [Parameter (Mandatory = $true)]
    [String] $StorageAccount,

    [Parameter (Mandatory = $true)]
    [String] $StorageContainer,

    [Parameter (Mandatory = $true)]
    [String] $Script
)

try {
    “Logging in to Azure...”
    Connect-AzAccount -Identity

    “Starting $VMName”
    Start-AzVM -ResourceGroupName $ResourceGroup -Name $VMName

    "Checking VM Agent"
    $VMNameStatus = Get-AzVM -ResourceGroupName $ResourceGroup -Name $VMName

    if ($VMNameStatus.OSProfile.WindowsConfiguration.ProvisionVMAgent -ne $true) {

        "Waiting until VM Agent is Ready"
        while ($VMNameStatus.OSProfile.WindowsConfiguration.ProvisionVMAgent -ne $true) {
            Start-Sleep -Seconds 5
            $VMNameStatus = Get-AzVM -ResourceGroupName $ResourceGroup -Name $VMName
        }
    }
    “VM Agent is Ready”

    "Getting maintenance script from $StorageAccount"
    $StorageContext = New-AzStorageContext -StorageAccountName $StorageAccount
    Get-AzStorageBlobContent -Blob $Script -Container $StorageContainer -Destination ($Env:temp+"/ExMaintenance.ps1") -Context $StorageContext

    "Running maintenance script"
    $MaintenanceScriptOutput = Invoke-AzVMRunCommand -ResourceGroupName $ResourceGroup -VMName $VMName -CommandId 'RunPowerShellScript' -ScriptPath ($Env:temp+"/ExMaintenance.ps1")

    “Maintenance script output:”
    Write-Output $MaintenanceScriptOutput.Value[0].Message

}
catch {
    Write-Error -Message $_.Exception
    throw $_.Exception
}
- Connect to Azure using the managed identity for the Automation account
- Startup the VM
- Download the maintenance script from your Storage Account
- Run the script on the VM
- Return the output of the script
Click Save and Publish. Then hit the Start button, fill in the parameters, and check the output to make sure everything is working (Figure 5):
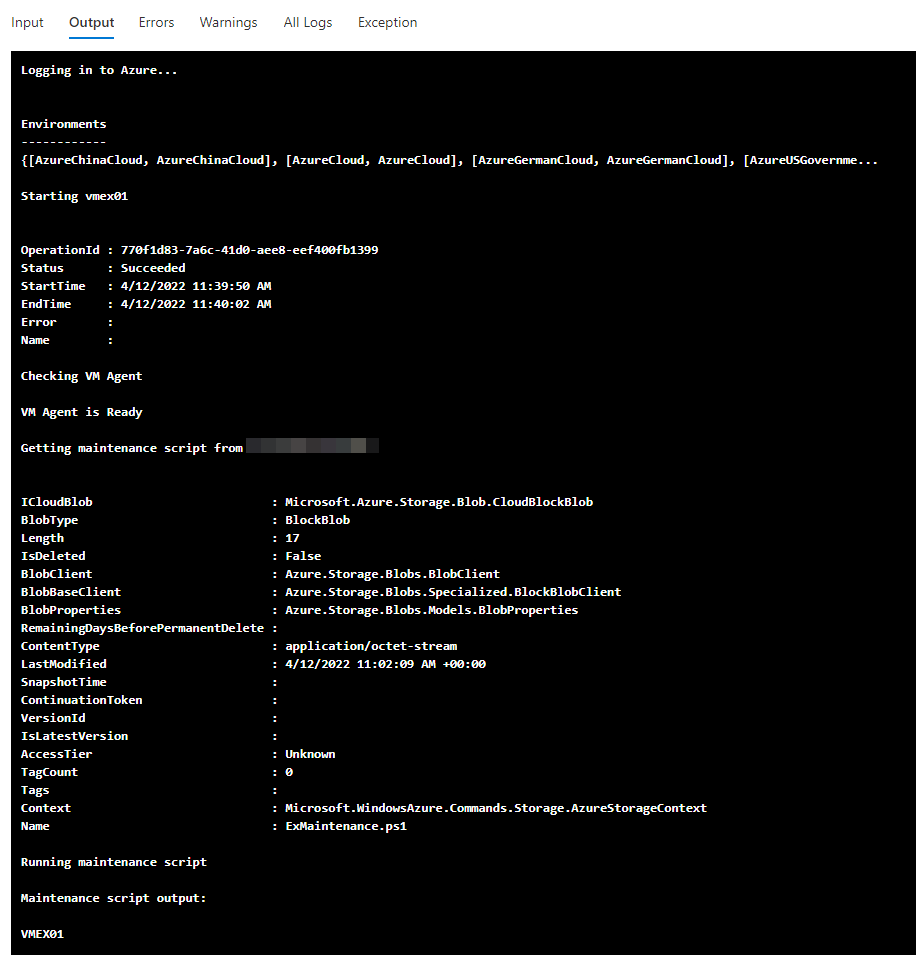
At this point, you can upload a script to your Storage account to do whatever you need. For example, start windows update, generate a report, send an email, etc.
Now to schedule the Runbook. Go to the Schedules page and Add a schedule. Configure the schedule for when you want the VM startup and how often. I.e. Once a day, or once a week at 8:00 AM. Then configure the runbook parameters to tell the runbook which script to send to which VM (Figure 6):
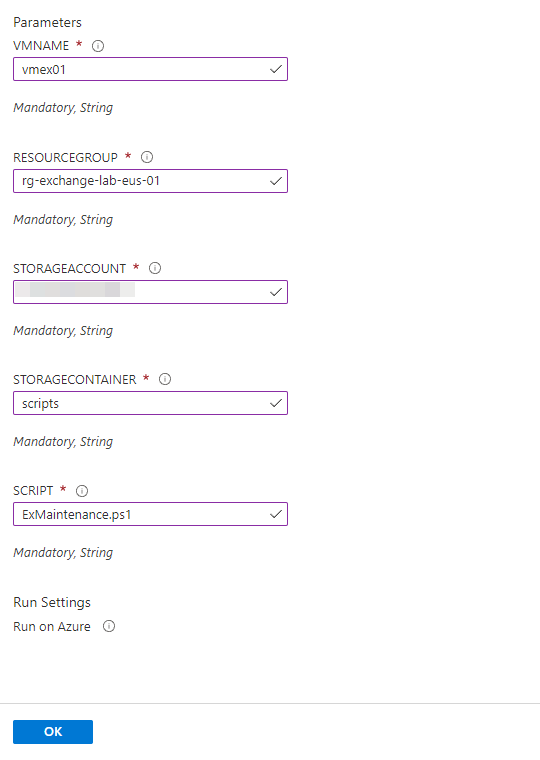
Notice that because the script is specified as a runbook parameter in the schedule, multiple schedules can use the same runbook to run different scripts at different times.
The last thing to do is create another runbook to shut down the VM. Follow the same process as for the first Runbook but instead use the following code:
Param(
    [Parameter (Mandatory = $true)]
    [String] $VMName,

    [Parameter (Mandatory = $true)]
    [String] $ResourceGroup
)

try {
    “Logging in to Azure...”
    Connect-AzAccount -Identity

    “Shutting down $VMName”
    Stop-AzVM -ResourceGroupName $ResourceGroup -Name $VMName

    “Shutdown command sent”

}
catch {
    Write-Error -Message $_.Exception
    throw $_.Exception
}
This time, when configuring your schedule, configure it to shutdown the VM every day. This way, if you need to start up your VM manually and forget to shut it down again afterward, it will shut down automatically at the scheduled daily time.

Automation is the Cloud’s Best Friend
Pre-packaged solutions are a great way to save you time and money quickly and easily. Automation Runbooks utilize familiar PowerShell coding to provide colossal flexibility. Azure’s built-in identity and access controls can provide secure and managed authentication, so you don’t have to. Automating your Cloud has never been easier!


This is an awesome article, thank you
Excellent article Nathan