Creating Plans from Templates Automatically
A recent article about how to use the Graph API to report plans in a Microsoft 365 tenant described how the addition of support for application permissions for the Planner Graph API helps admins to automate interactions with Planner plans. Application permissions are particularly useful when automating processes with the Microsoft Graph API, allowing the task to run without user authentication prompts.
Building upon this idea, it’s also possible to automate the creation of plans, similar to how Team creation can be automated to keep Teams’ environments tidy and secure. There are many examples of how a repeatable process can benefit from using Planner to ensure tasks are tracked across complex processes or projects. One relevant example, which I use in this article, is when planning a Microsoft 365 Tenant-to-Tenant migration. Many of the tasks are the same for each migration, at least in the planning stage.
In this article, I explain how to create Planner plans from templates for repeatable processes and how to automate provisioning to minimize administrative effort.
Note: The code sample and template file used in this article are available on GitHub here.

Building the template
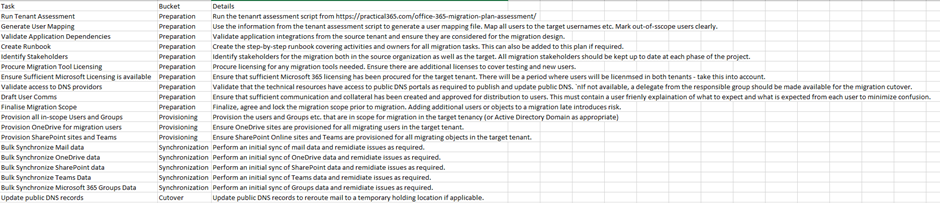
In GitHub, you can find a very basic plan template CSV file containing some common tasks and categories for tenant-to-tenant migrations. The CSV contains columns for tasks, buckets, and task details, which are used when provisioning the plan (Figure 1).
Creating a Registered App and Assigning Permissions
As with any Graph API automation script, an Azure AD registered app with consent granted for the required application permissions is required. Surprisingly, provisioning a Plan with application permissions only requires one permission:
- Tasks.ReadWrite.All
Additionally, if you plan to include the “TeamsChannelName” parameter to add a Planner tab to a Team, the following additional permissions are required:
- TeamsTab.Create
- ChannelSettings.Read.All
After creating the registered app, generate a client secret (for testing), and note the client and tenant IDs that are required to generate an access token. For running scripts in production, I recommend using a certificate to authenticate rather than a client secret, as described in Using Azure Automation to Process Exchange Online Data with PowerShell.
Microsoft Platform Migration Planning and Consolidation
Minimize the risk, time, cost, and complexity associated with your next Exchange Online Domain Transfer
Setting up the Environment
The script uses the Microsoft.Graph.Authentication and Microsoft.Graph.Planner modules from the Microsoft Graph PowerShell SDK. You can install these modules on a local workstation (using the cmdlet Install-Module Microsoft.Graph) or use them with Azure Automation Runbooks. If you use Azure Automation, make sure to keep PowerShell Modules up to date.
If you plan to include the “TeamsChannelName” parameter to add a Planner tab to a Team, the Microsoft.Graph.Teams module is also required.
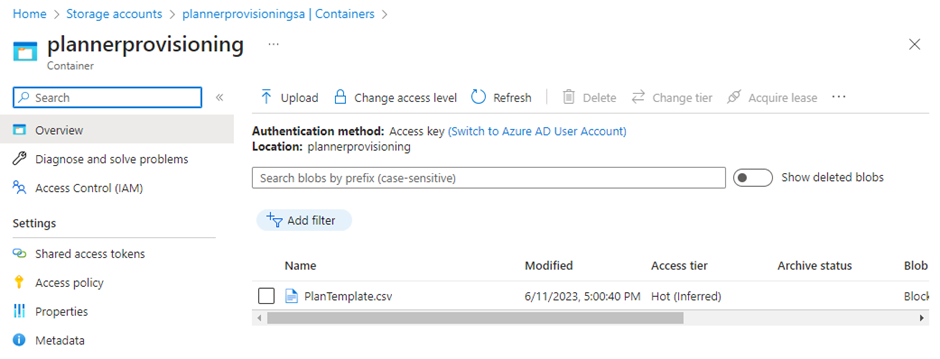
Additionally, if the script runs in Azure Automation, it connects to Azure blob storage to import the plan template file. This requires a storage account with a blob container. In Figure 2, I have created a blob container and uploaded the PlanTemplate.csv.
To connect to Azure blob storage, the script leverages the AZ PowerShell module. Azure Automation installs this module by default, so no action is needed to make the module available to the runbook. You must assign permission to read the blob (Storage Blob Data Reader) to the managed identity of the Automation Account, as shown in Figure 3. A managed identity is the service principal assigned to the Automation Account, as discussed in this article about using Exchange Online PowerShell with Azure Automation managed identities.


Using PowerShell to Create Plans
The script uses the template file and the parameters listed below to add a Plan to an existing Microsoft 365 Group and populates that plan with the defined buckets and tasks. The following parameters are configured:
- ClientID – ClientID is a required parameter and is the Client ID of the Azure AD registered app.
- TenantID – TenantID is a required parameter and is the Tenant ID of the Azure AD registered app.
- ClientSecret – ClientSecret is a required parameter and is the client secret generated in the Azure AD registered app.
- CSVFilePath – CSVFilePath is a required parameter and is the relative path to the CSV template file. If the file is in the current directory, specify just the CSV file name.
- PlanName – PlanName is a required parameter and is the name for the new Planner plan.
- GroupID – GroupID is a required parameter and is the Object ID of the Microsoft 365 Group that the Plan should be added to.
- StorageAccountName – StorageAccountName is an optional parameter and is only required when running the script in Azure Automation. It is the name of the Storage Account the blob container is in.
- StorageContainerName – StorageContainerName is an optional parameter and is only required when running from Azure Automation. It is the name of the blob container the template file is stored in.
- TeamsChannelName – TeamsChannelName is an optional parameter and is the display name of a channel in the Team to add a Planner tab to. This is only valid if the Microsoft 365 Group you choose has an associated Team.
The script has five major sections:
- Import the CSV template and request a Microsoft Graph Access Token.
- Provision the Plan.
- Provision all buckets.
- Provision each task and add task details.
- Optionally, add a tab to a Teams channel for the Plan
If running from Azure Automation, to import the template from blob storage, we connect to Azure using the managed identity of the automation account and use the Get-AzStorageBlobContent to download the CSV for import.
Connect-AZAccount -Identity

$context = New-AzStorageContext -StorageAccountName $storageaccountname

Get-AzStorageBlobContent -Blob $CSVFilePath -Container $StorageContainerName -Context $context

$csv = import-csv plantemplate.csv
To create the Plan, we build the parameters for the Plan with the name and target Group and then run the New-MgPlannerPlan cmdlet.
$params = @{
    container = @{
        url = "https://graph.microsoft.com/v1.0/groups/$groupid"
    }
    title     = $planName
}
try {
    $plan = New-MgPlannerPlan -BodyParameter $params
}
catch {
    write-error "Could not create the plan. Error:`n $_"
    exit
}
Next, the buckets are created by identifying the set of unique bucket names in the CSV and using the New-MgPlannerBucket cmdlet to create each bucket. Buckets are displayed in the order listed in the template using the order hint parameter. As shown in the Planner documentation, the order hint “ !” is specified for the first item in a list. After that, additional items are added to the end of a list by specifying the previous order hint followed by “ !”.
[array]$Buckets = ($csv | Select-Object Bucket -Unique)
$orderhint = " !"
$BucketList = @()
$i = 0
foreach ($bucket in $Buckets) {
    $i++
    Write-Progress -Activity "Creating Buckets" -Status "Creating Bucket $i of $($Buckets.count)" -PercentComplete (($i / $Buckets.count) * 100)
    $params = @{
        name      = "$($bucket.Bucket)"
        planId    = "$($plan.id)"
        orderHint = "$($orderhint)"
    }

$CreatedBucket = New-MgPlannerBucket -BodyParameter $params
    $BucketList += $CreatedBucket
    $orderhint = " $($createdBucket.orderhint)!"
}
Next, the script loops through the set of tasks in the template to create the task objects and add task details using the New-MgPlannerTask and Update-MgPlannerTaskDetail parameters, respectively.
$i = 0
foreach ($Task in $csv) {
    $i++
    Write-Progress -Activity "Creating Tasks" -Status "Creating Task $i of $($csv.count)" -PercentComplete (($i / $csv.count) * 100)
    $CurrentBucket = $BucketList | Where-Object { $_.name -eq $Task.Bucket }
    try {

        $params = @{
            planId   = "$($Plan.id)"
            bucketId = "$($CurrentBucket.id)"
            title    = "$($Task.task)"
        }

        $CreatedTask = New-MgPlannerTask -BodyParameter $params
    }
    catch {
        write-error "Could not create task: $($task.task), Error:`n $_"
        exit
    }

    $params = @{
        description = "$($Task.details)"
        previewType = "description"
    }
    ##Update Plan Details
    try {

        Update-MgPlannerTaskDetail -PlannerTaskId $CreatedTask.Id -BodyParameter $params -IfMatch (Get-MgPlannerTaskDetail -PlannerTaskId $CreatedTask.id).AdditionalProperties["@odata.etag"]
    }
    catch {
        write-error "Could not update task details: $($task.task), Error:`n $_"
        exit
    }
}
Finally, if the TeamsChannelName parameter is specified, the new plan is added as a tab to the Team of the Microsoft 365 Group using the New-MgTeamChannelTab parameter.
if ($TeamsChannelName) {
    Try {
        $ChannelID = (Get-MgTeamChannel -TeamId $groupid | ?{$_.DisplayName -eq $TeamsChannelName}).id
        $params = @{
            name                  = $PlanName
            displayName           = $PlanName
            "teamsapp@odata.bind" = "https://graph.microsoft.com/v1.0/appCatalogs/teamsApps/com.microsoft.teamspace.tab.planner"
            configuration         = @{
                contentUrl = "https://tasks.teams.microsoft.com/teamsui/{tid}/Home/PlannerFrame?page=7&auth_pvr=OrgId&auth_upn={userPrincipalName}&groupId={groupId}&planId=$($plan.id)&channelId={channelId}&entityId={entityId}&tid={tid}&userObjectId={userObjectId}&subEntityId={subEntityId}&sessionId={sessionId}&theme={theme}&mkt={locale}&ringId={ringId}&PlannerRouteHint={tid}"
                removeUrl = "https://tasks.teams.microsoft.com/teamsui/{tid}/Home/PlannerFrame?page=13&auth_pvr=OrgId&auth_upn={userPrincipalName}&groupId={groupId}&planId=$($plan.id)&channelId={channelId}&entityId={entityId}&tid={tid}&userObjectId={userObjectId}&subEntityId={subEntityId}&sessionId={sessionId}&theme={theme}&mkt={locale}&ringId={ringId}&PlannerRouteHint={tid}"
                websiteUrl = "https://tasks.office.com/{tid}/Home/PlanViews/$($Plan.id)?Type=PlanLink&Channel=TeamsTab"
            }
        }
        $CreatedTab = New-MgTeamChannelTab -TeamId $groupid -ChannelId $ChannelID -BodyParameter $params
    }
    catch {
        write-error "Could not create tab for task: $($task.task), Error:`n $_"
        exit
    }
Working with the Plan
After the script has run, the members of the target Microsoft 365 Group will see the new Planner plan from the Planner app, and all tasks will be provisioned in the correct buckets (Figure 4).

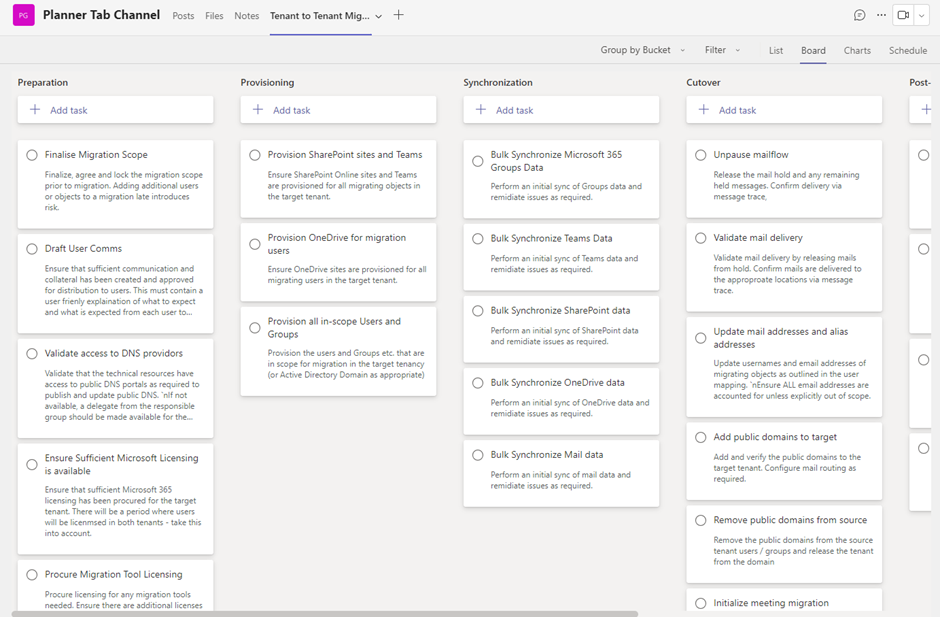
If the TeamsChannelName parameter is used, the tab is also made available in the Team, as shown in Figure 5. The default “Tasks by Planner” Teams app is used by the script, which adds full functionality to the Tab.
Creating a plan from a template allows a team working on a tenant-to-tenant migration to start working with the plan without creating a new plan from scratch for each project. This is particularly useful when the same basic plan is used on multiple occasions. The sample I’ve shown here is relatively basic, but there is much more that could be added to meet your own requirements. For example, I’ve only added standard descriptions to each task, but Planner also supports checklists and attachments which can be used to give more depth to the output. Once the basics are configured, such as the storage account and app registration, any additional tweaks to how the plan is provisioned can be made relatively easily.


How about checklist items? How can you add them?
New-MgTeamChannelTab doenst longer support Configuration Parameters and I cant add the new Created Plans to the Channels. Any Idea for Workarounds?
Sorry, I meant could the script be adjusted to pull from a list of sites and hit all of those sites with the same Planner template? As opposed to running the script over and over and entering a GroupID each time.
Yep, you would just use a single template and deploy to each team you need
Is this something you’d be able to use to deploy a template plan to multiple sites in one go on the script?