Viva Learning was launched to GA (General Availability) at Ignite 2021 Fall Edition and rolled out to commercial Microsoft 365 tenants during the last months of 2021.
Your employees will, by default, be able to begin using Viva Learning right away without any IT administrator action to enable it or configure it. Now is the time to get to grips with what is available to configure, and how you can use the built-in functionality to good effect.
What’s included in Viva Learning without additional licensing?
Some of the most useful features in Viva Learning require additional licensing. However, a large amount of functionality is included within existing paid-for licensing as part of Microsoft 365, including access to a selection of 125 LinkedIn Learning Courses, Microsoft Learn integration and Microsoft 365 training.
The built-in functionality follows a similar model to Viva Insights, where personalization for the user is included but limited personalization, metrics and control is available for the organization; so, a group of users can choose to share courses they find useful, add tabs into their Team to share and organize the content they want to learn, bookmark content and see personalization.
A manager’s view – such as recommending courses to their direct reports, then viewing who has completed the courses, or the HR, knowledge or learning administrative features, plus promoting particular content and learning management system (LMS) and third-party content provider integration all require the add-on license.
However – one aspect that is part of the Microsoft 365 included version is SharePoint integration. This means that you can allow different parts of your organization to manage document libraries with learning content in, set permissions appropriately so only the right users will be able to see that content – and then create a central list of the content and make it available via Viva learning.
In this article, we’ll set up the basics of Viva Learning and bring our own content in via SharePoint.

Configuring Viva Learning
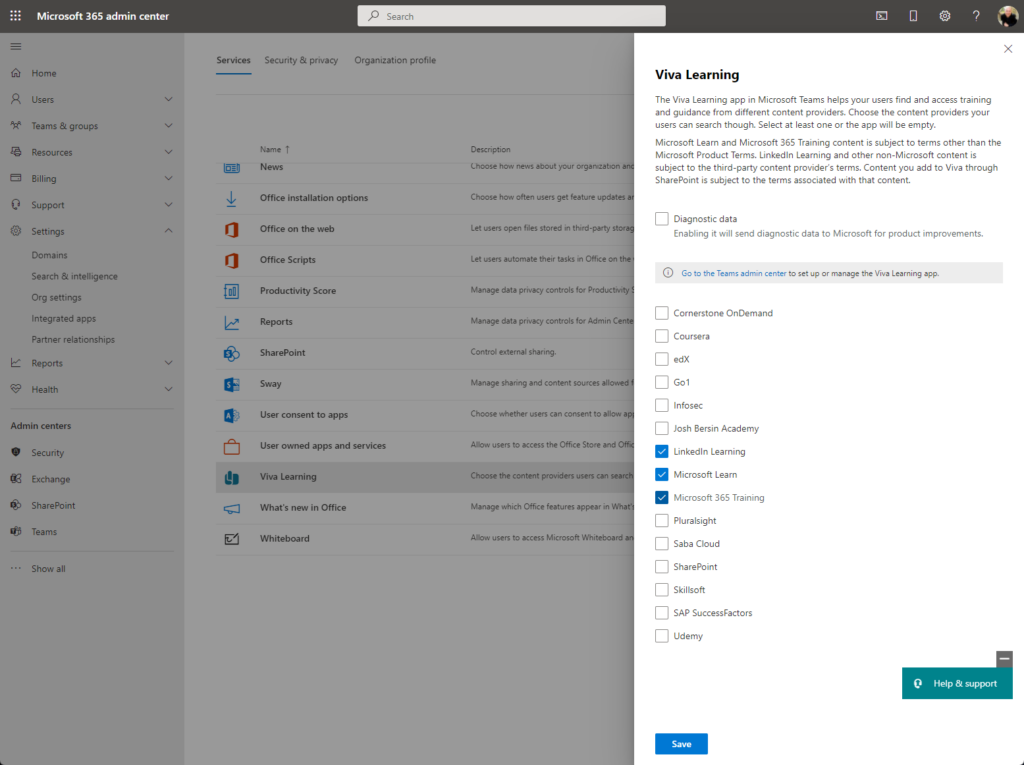
Viva Learning is configured via the Microsoft 365 Admin Center, within Settings > Org Settings, under Services.
We’ll first examine the pre-configured integrations and if required, switch off any functionality not required. For example, if you have already deployed Microsoft 365 Learning Paths, you may prefer to continue using it rather than the standard content provided for users, and use Viva Learning to focus on business-related content.
Deploying Viva Learning as a Teams App
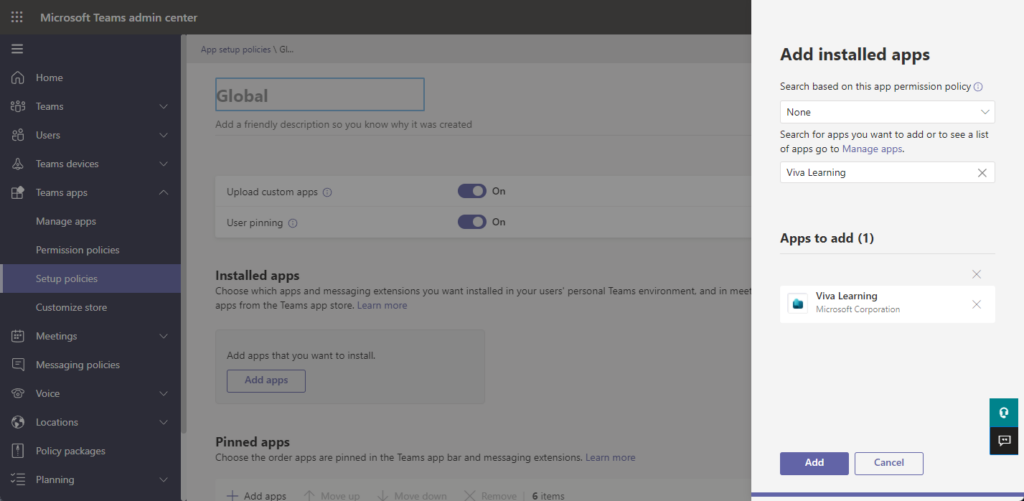
People can by default add Viva Learning themselves to Microsoft Teams as an app. As an admin though, you should consider configuring it to automatically install, and potentially pin the app, by creating or modifying an App Setup Policy in the Teams Admin Center.
When editing or creating a new App Setup Policy, you’ll perform three steps.
First, you’ll add a new Installed app and add Viva Learning:
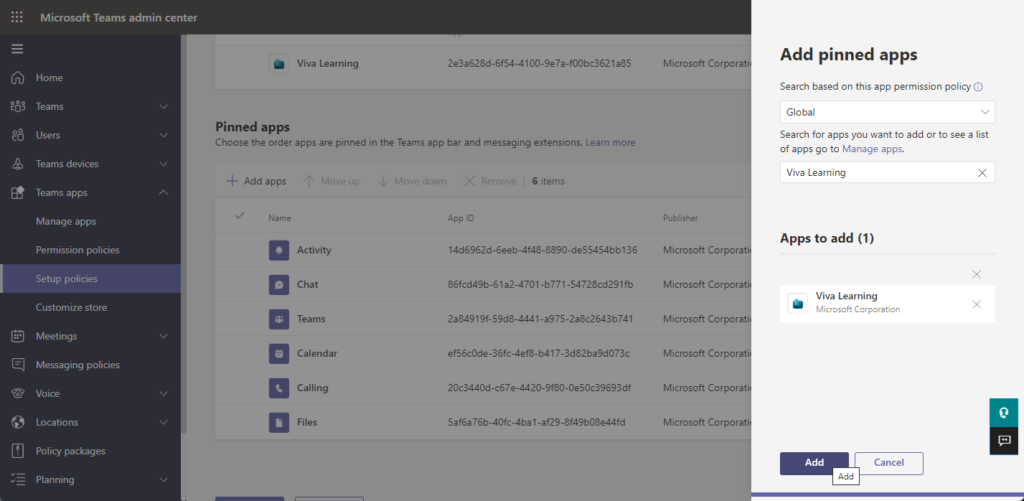
This will then install the app, but it might not be obvious to users. In most circumstances, that is fine – but you may wish, particularly as you launch it, to pin the app in the client.
To do this, scroll down the App Setup Policy page and add it again, but this time as a pinned app:
Finally, adjust the order of the app as required. Remember that to a user this may not be the most important app, even if it is to you – so don’t give it priority over the apps they rely on day to day.
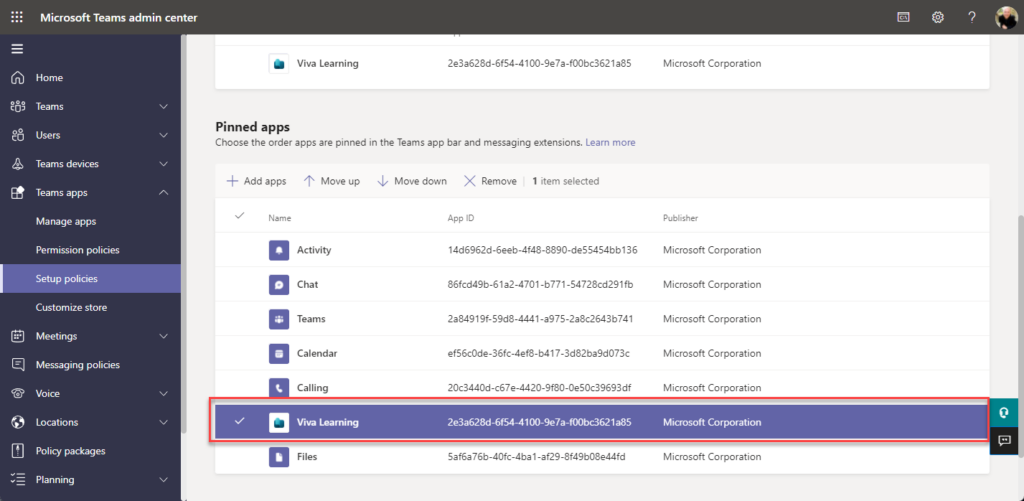
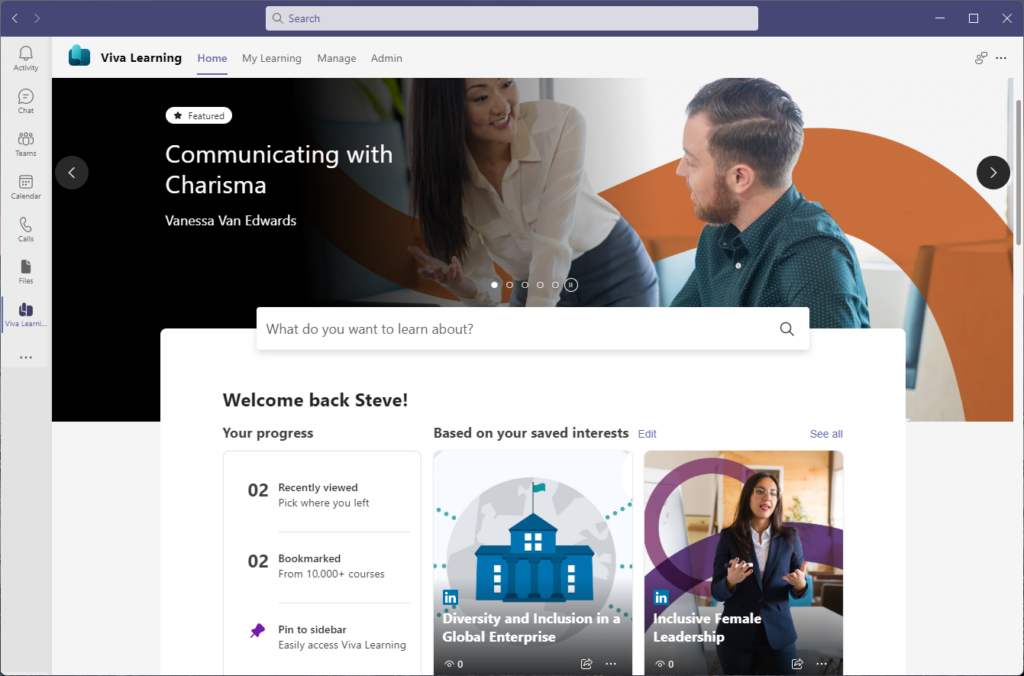
Once configured, the app will be available for use within several hours. In its default form, the user will see the built-in featured courses and be prompted to select their most important topics so that suggestions can be made.
Connecting Viva Learning to learning content in SharePoint Online
One of the most valuable features provided within the existing, paid Microsoft 365 licensing, is the ability to bring your own content to Viva Learning without paying for the Viva Learning uplift.
This allows you to store content inside multiple SharePoint Site Collections with different sets of permissions, allowing distributed curation of content, and allows different groups of users to see only the content they have permissions to see.
Viva Learning connects to SharePoint natively and uses a SharePoint List to determine where to find content.
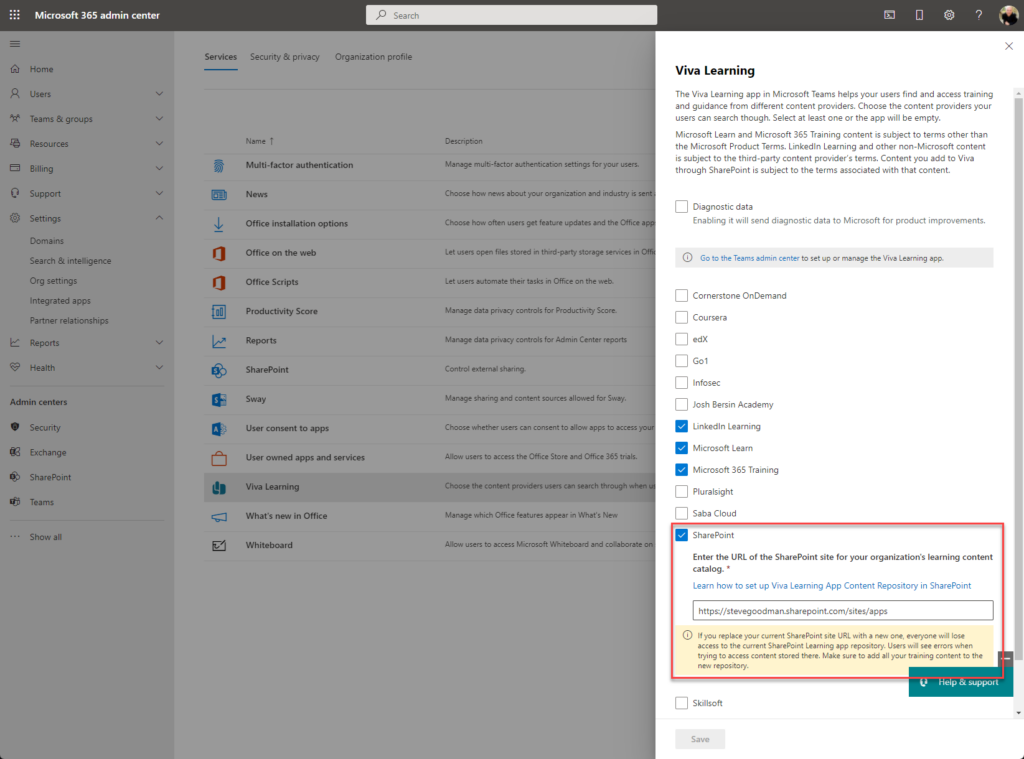
To create the SharePoint list that will hold an appropriate SharePoint Site collection, first set up a new SharePoint Site Collection that will be managed by either yourself, or the team who will manage the core list of locations (rather than the content itself). After waiting 24 hours after creating the site, navigate back to the Microsoft 365 Admin Center and find the Viva Learning setting under Settings > Org Settings, under Services.
From the list of content sources, select SharePoint and then add the URL of the Site Collection, then choose Save:
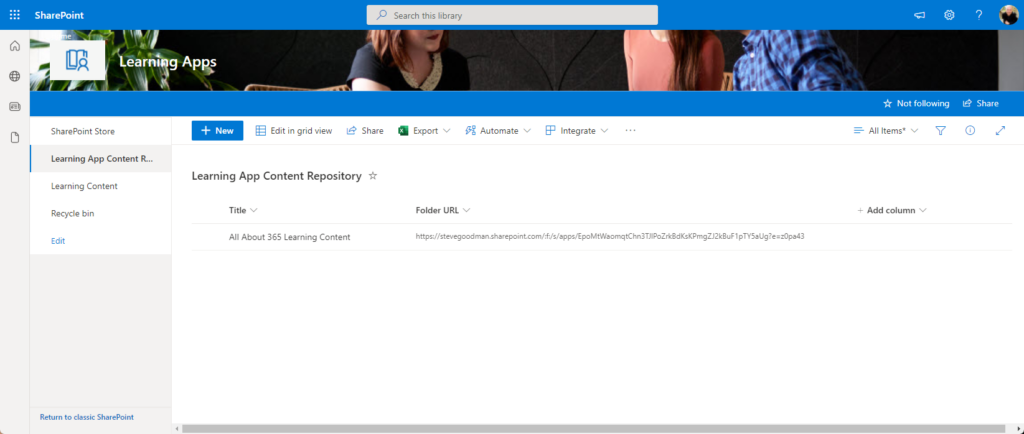
Within approximately an hour, navigate to the Site Collection and you’ll see a new list with the suffix Content Repository.
This list contains names and URLs of SharePoint Online document libraries that Viva Learning will index and make available to users, based on their SharePoint permissions.
In the example below, we’ll add a single document library, by adding an appropriate title and URL link to the document library itself:
Viva Learning will take some time to index the content itself – in testing this appears to be around 24 hours – therefore use this opportunity to make sure the document library is correctly configured.
In the document library, first set appropriate permissions. If, for example, you will only want a particular team or department to see course content, set SharePoint permissions based on their group membership so they can view items.
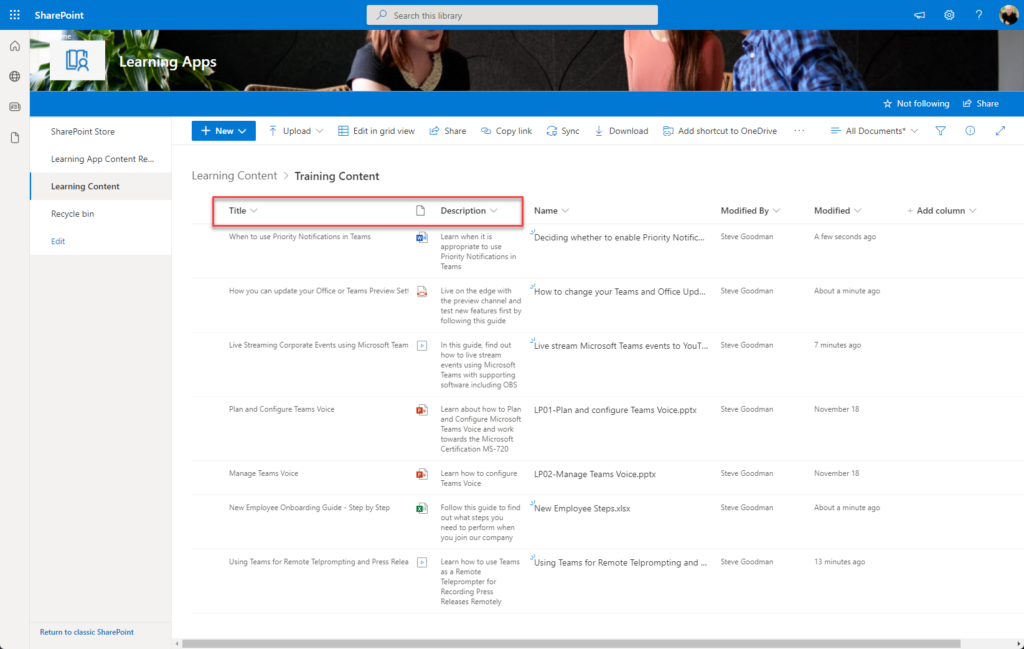
You’ll also need to make sure you have both a Title column (available by default) and a multi-line Description column. You can then upload content including PowerPoint, Word, Excel, and PDF files.
It is important to note that the File name isn’t used for the title, and instead this is populated from the document properties. You can change the Title in SharePoint or the file itself, and this is the primary field that users will see when finding content.
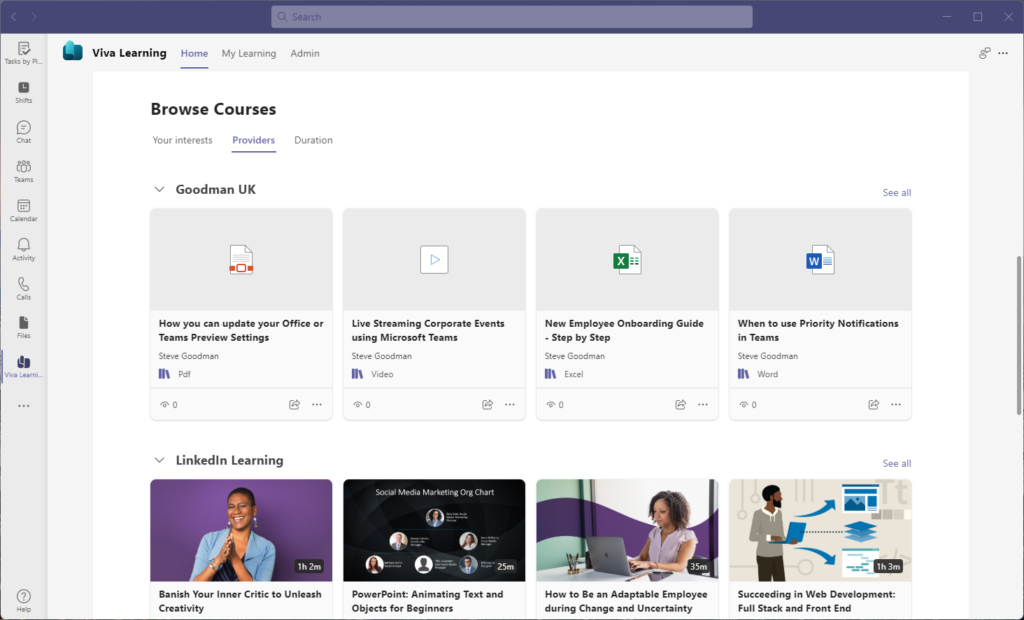
After waiting for Viva Learning to index your content, navigate back to Viva Learning in Teams and on the Home tab, scroll down to Providers and choose your organization name. You should now see indexed content available.
Read More: Building a Knowledge Network with Viva Topics

Organizing and managing SharePoint content for Viva Learning
Naturally, you’ll want to make sure that content is curated and made available in the right way rather than just pointing Viva Learning at a list of document libraries.
Firstly, you’ll need to understand whether you will be buying the add-on Viva Learning licensing or starting with the built-in capabilities.
The built-in capabilities don’t allow managers to recommend courses (the term used in Viva Learning when a manager sets learning tasks for their team) and track their progress. That means formal training people must complete, with evidence of course completion, isn’t a good use case unless you pay for the add-on licensing.
Informal courses, such as on-boarding guidance, tips, application guides or optional courses are best suited to the built-in version.
For example, a guide on using HR benefits, or on how to complete expenses, is an ideal use case as people will often not need to complete the training but will want to be able to bookmark and find the guidance on a semi-regular basis.
Identify these areas of the business that already create guidance like this – often stored with policies and procedures in hard-to-find places on your intranet and help ensure they know the guide rails for the type of content that’s worth uploading.
Then, for each area or the business that will provide content and manage content, create SharePoint document libraries that they can use, with appropriate permissions. If they already have document libraries they use to publish content like policies and procedures, then consider using a specific folder in those document libraries that they can move appropriate content to, rather than creating new SharePoint Site Collections or Document Libraries. Ensure they understand the Title and Description columns must be completed and once they are happy with their content, add the URLs to the Document Library sub-folder to the Content Repository list.
Remember that any changes they make won’t be reflected instantly, so mistakes in document titles or descriptions will persist for approximately 24 hours after they have been fixed. Therefore, in both initial setup – and ongoing management of content, planning and verification is essential.


We could never get this working, and the admin centre how has a testing tool, it said that the site we had target was not a coimmunications site.
Just been into admin centre to change the locatoin to a site based on communications and the options are no longer present. A check with MS Support suggests they want us to get a premium viva licence to view our own content.
I this is the case, its not making the change to premium that easy, if we have to pay to view our own SharePoint content…
Can we as a organization assign the course with task and track the employee training through viva learning? Do they charge for it and if we add our own content do we have pay for it or what kind of licenses would be required for this.
I’ve office 365E3 license. Do I need any other license to use SharePoint as a content repository for Viva Learning.
Or SharePoint as a content repository will work with seed or premium?
Can we publish other SharePoint sites url under viva repository I tried adding url as folder path but it didn’t work
Hello.
Could you help me understand my problem: administrator added Sharepoint as Source of Content.
But in my setting in VivaLearning it is not available. I cant chose Sharepoint because it is not the list of Content sources.
Thank you.
Hello.
Could you help me understand my problem: administrator added Sharepoint as Source of Content.
But in my setting in VivaLearning it is not available. I cant chose Sharepoint because it is not the list of Content sources.
Hello Steve,
Is it possible for organizations create their own training modules and add those modules to its collection under Viva ?
Or can the organization only curate course modules that are available from Microsoft and its partners.
If organizations can create their own training modules, can you please direct me to an online instructions on how this is done.
The purpose of this article is to explain how to do that using SharePoint, although as with the in-build modules, you cannot assign or track course module completion.
If you have a third-party provider that integrates with Viva Learning, and pay for Viva Learning or the Viva add-on SKU, then you can create course modules in that platform then expose them in Viva Learning.
Thank you for the useful instructions.
Is it possible to make images visible on your own organization’s content? Currently, only an icon of word or ppt is displayed, and that is not really inviting.
Is it possible to make own interesting tabs, or as an admin?
Hiya, unfortunately, as I understand it – not at the moment. I’ve seen that others have asked Microsoft about this (on the Microsoft Tech Community) and they are aware that it would be desirable to take a thumbnail photo to use.
You can add a tab as a user to your Team, and share Viva Learning content. As an admin, you can choose featured content in the Viva Learning admin page and schedule / remove / update this, but you cannot add a new tab.
I’ve office 365E3 license. Do I need any other license to use SharePoint as a content repository for Viva Learning.
Or SharePoint as a content repository will work with seed or premium?